📖 Read Time: 15 Minutes
🏋️ Join the tribe of Movement & Calisthenics Athletes
People just like you that are working with their own body weight to get strength, lose fat, build muscle, recover from injuries and live their best lives!
📋 Table of Contents
• How to Achieve a Freestanding Handstand
• What is a Progression?
• When and How to Progress
• Handstand Training Structure
• Handstand Fundamental
• Strength Progression
• Skill Element
• Muscle Element
• Endurance Element
• Freestanding Handstand
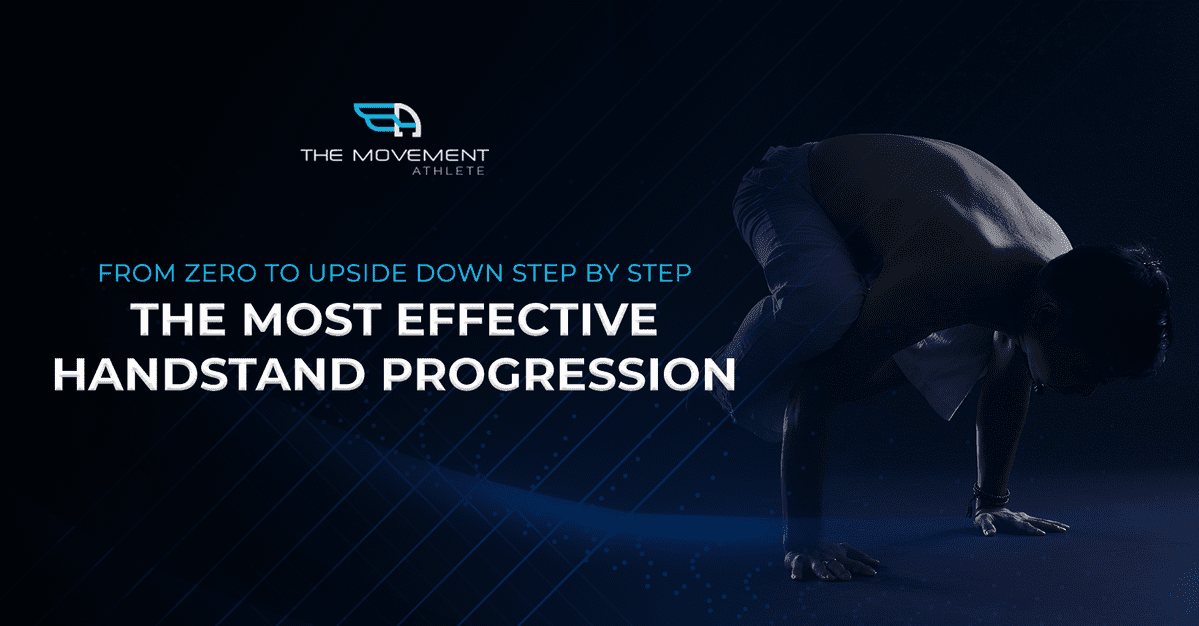
HOW TO ACHIEVE A FREESTANDING HANDSTAND
🤸♀️🤸♀️🤸♀️ Let’s Get on the Journey
Calisthenics relies on progressions in order to get closer to your fitness goals.
When you’re learning a calisthenics skill increasing strength is not enough – you need to think about mobility, flexibility, balance, endurance: all of these follows a progression that will get you there.
Another thing that you need to consider in your training is the learning process for a skill. Like any other proper training program, handstand training should be highly individualized since each person would start at a different level and respond differently to each stimulus. Especially when learning a skill similar to handstand, there are psychological barriers that you need to overcome, not only physical.
Also, your handstand training should also adjust to your current situation since consistently hitting a handstand is quite difficult for the beginning. And when you get your handstand consistently, holding a specific time consistently each day could still be difficult because of numerous factors can affect your skill work.
What matters is you training consistently and follow a proper progression to fully grasp the skill involved in executing the skill.
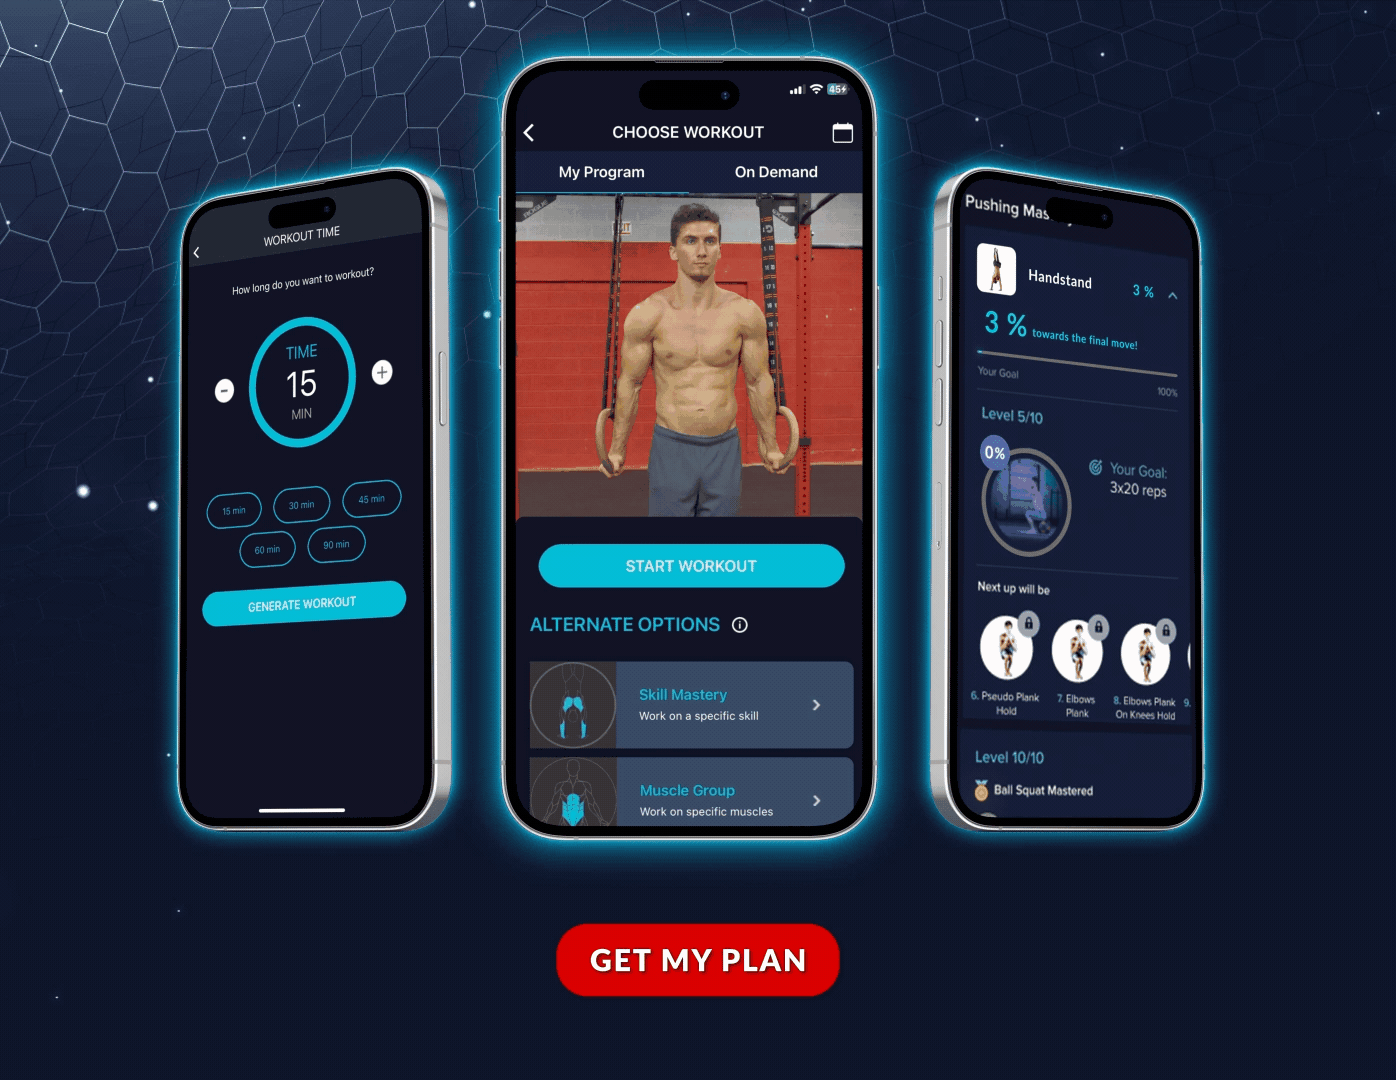
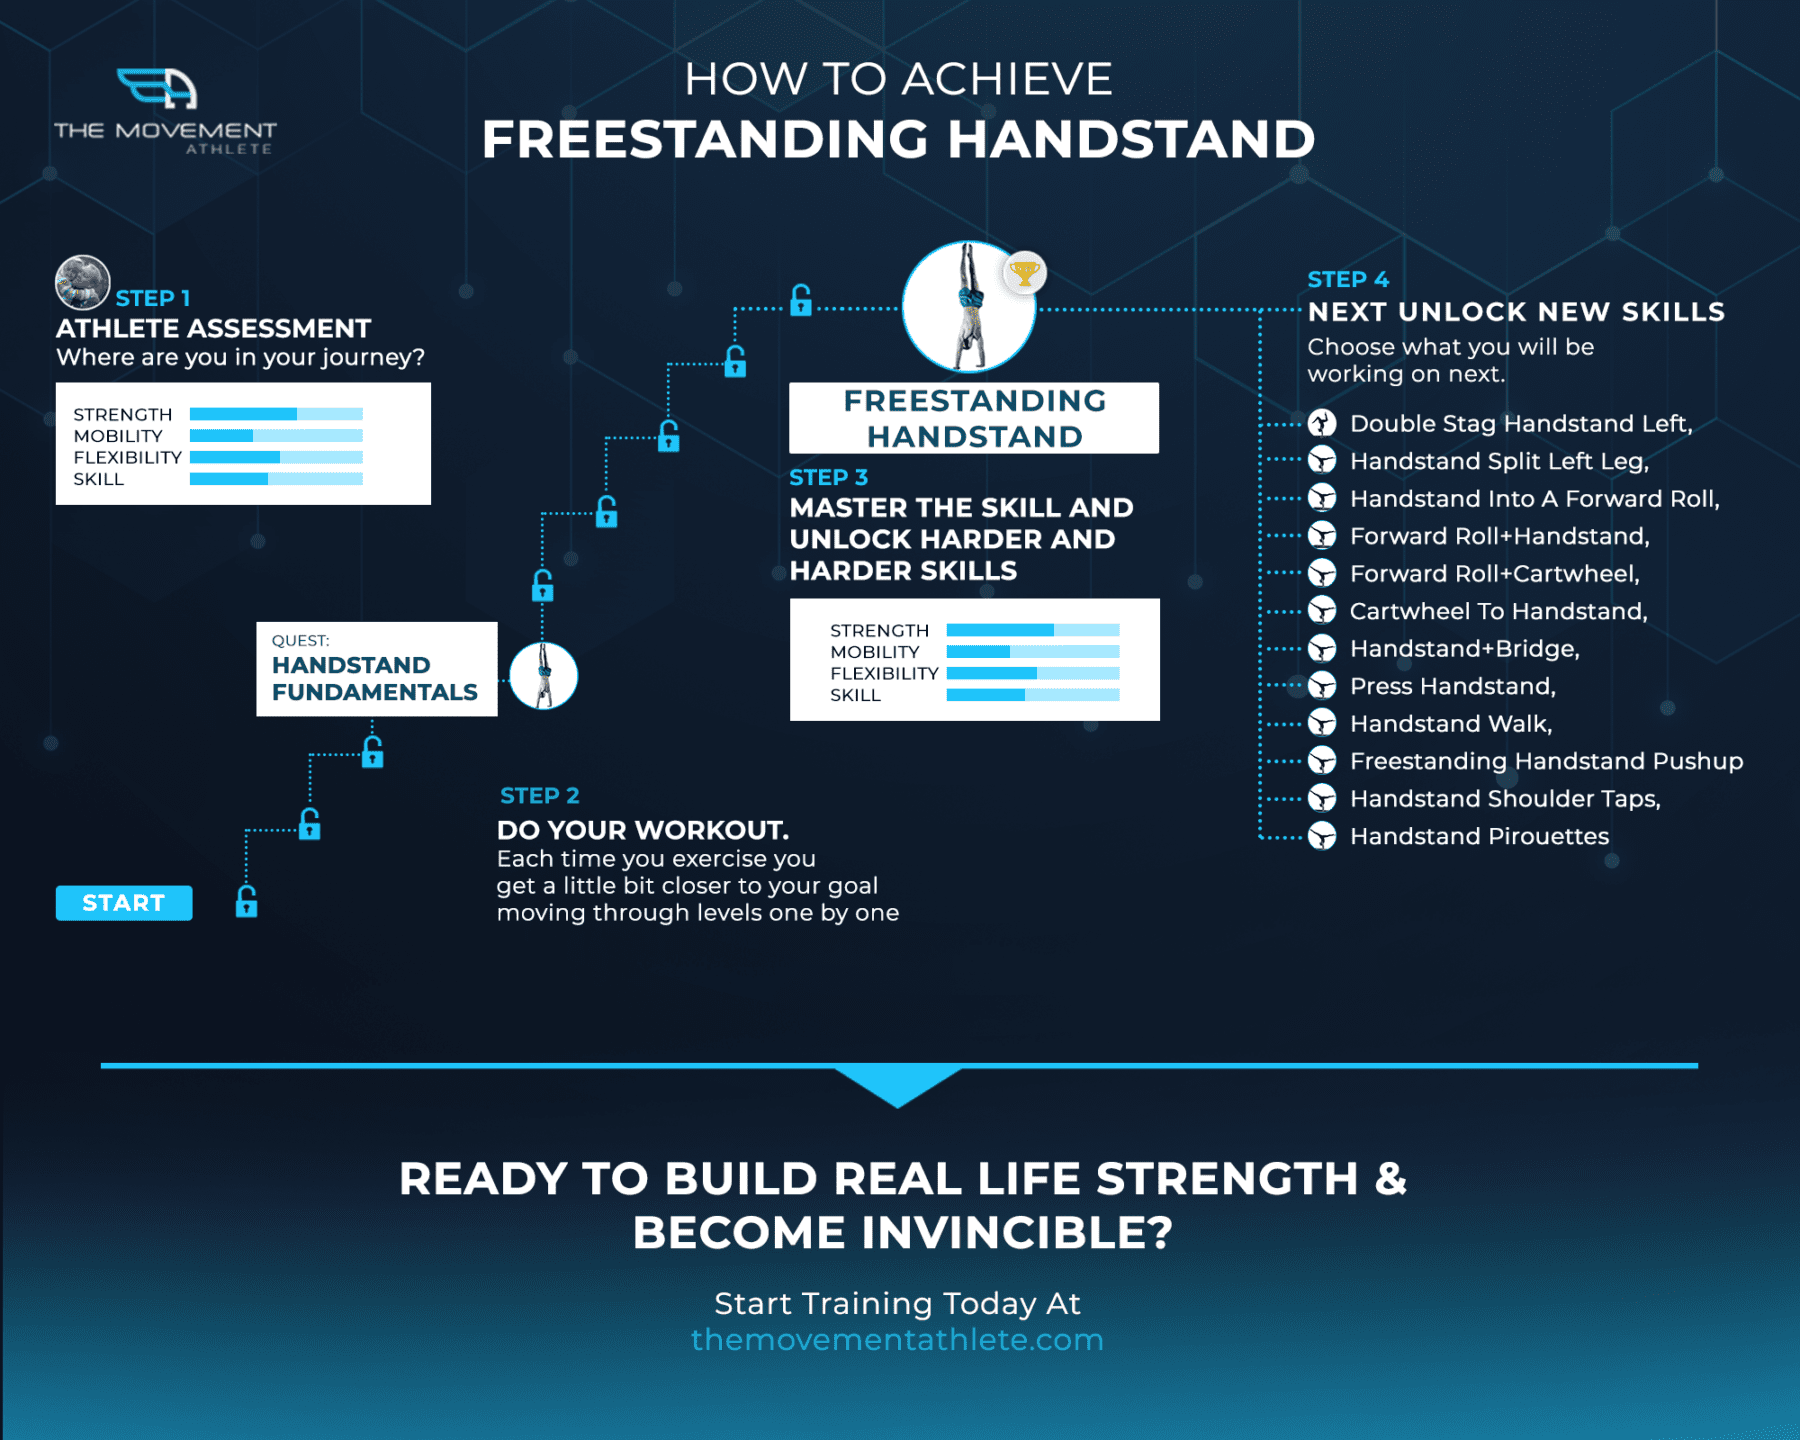
This is exactly what The Movement Athlete can provide you for your handstand goals: progressions. Not sure where you stand? Take our free assessment to get a personalized handstand training plan.
WHAT IS A PROGRESSION? 🙄💡
Progressions are basically step-by-step process for learning a skill or improving your physical fitness attributes mentioned above.
Handstand isn’t an exception. When you start your journey to learning the handstand, you’ll be starting with the most basic progression.
After each progression, the next one will be harder and harder. It will also be more complex with multiple elements integrated into one exercise. You’re basically like playing a video game.
Unlocking each level will get you to a higher and much harder level.
This goes on until you reach your handstand which is a complex motor skill. The progressions will still go on up even when you’re trying to learn the harder handstand progressions.
👉WHEN AND HOW TO PROGRESS
To achieve a freestanding handstand we want to first make sure that you master a handstand fundamental. Note that where you start on this journey really depends on where are you at regards your current mobility and strength.
So if you have been lifting or training for a while you might start at step 15 or maybe you already can perform a mastery for a handstand fundamental.
If you are creating your own program you will want to see at which level you can perform a mastery reps and sets.
See at which level you can easily do 3 sets of 8 reps, then back up one step to a previous level. This is where you should start. For example, if you can do 3 sets of 8 reps of full push-ups, go back one step in the push-up progression and start there. Start with 3 sets of 3 half push-ups, then next session do 3 sets of 4, then 3 sets of 5. Once you build to 3 sets of 8 you can move on to the next step.
Our Movement Athlete Assessment is there to help you with just that and will walk you through a number of questions that will help determine your exact level.
Now you never want progress quicker than adding one repetition per workout. It is crucial you do not attempt to progress faster than this, but rather, stick to micro-increments of one extra repetition with each session. This not only allows for a smooth, constant progression, but it also gives the connective tissue in your joints time to adapt to the stresses placed on it, and reduces the risk of injury.
When Should I Progress? ⏳⏳⏳
One simple rule: you should move ahead when you’ve mastered the current skills and feel you can perform it completely. In our Movement Athlete Academy App – we guide you automatically so you don’t need to think about it.
You will hear a lot of calisthenics experts argue that it is very arbitrary to have a number of reps to progress, but after training thousands of athletes these are the optimal numbers that we feel will help everyone progress without getting injured. The micro incremental progressions that we develop will also make sure that there are no big gaps between the levels and steps so you will always feel like you are moving forward.
The one thing you should always remember is that you must not rush a progression. The most important thing is that you feel comfortable with the current step.
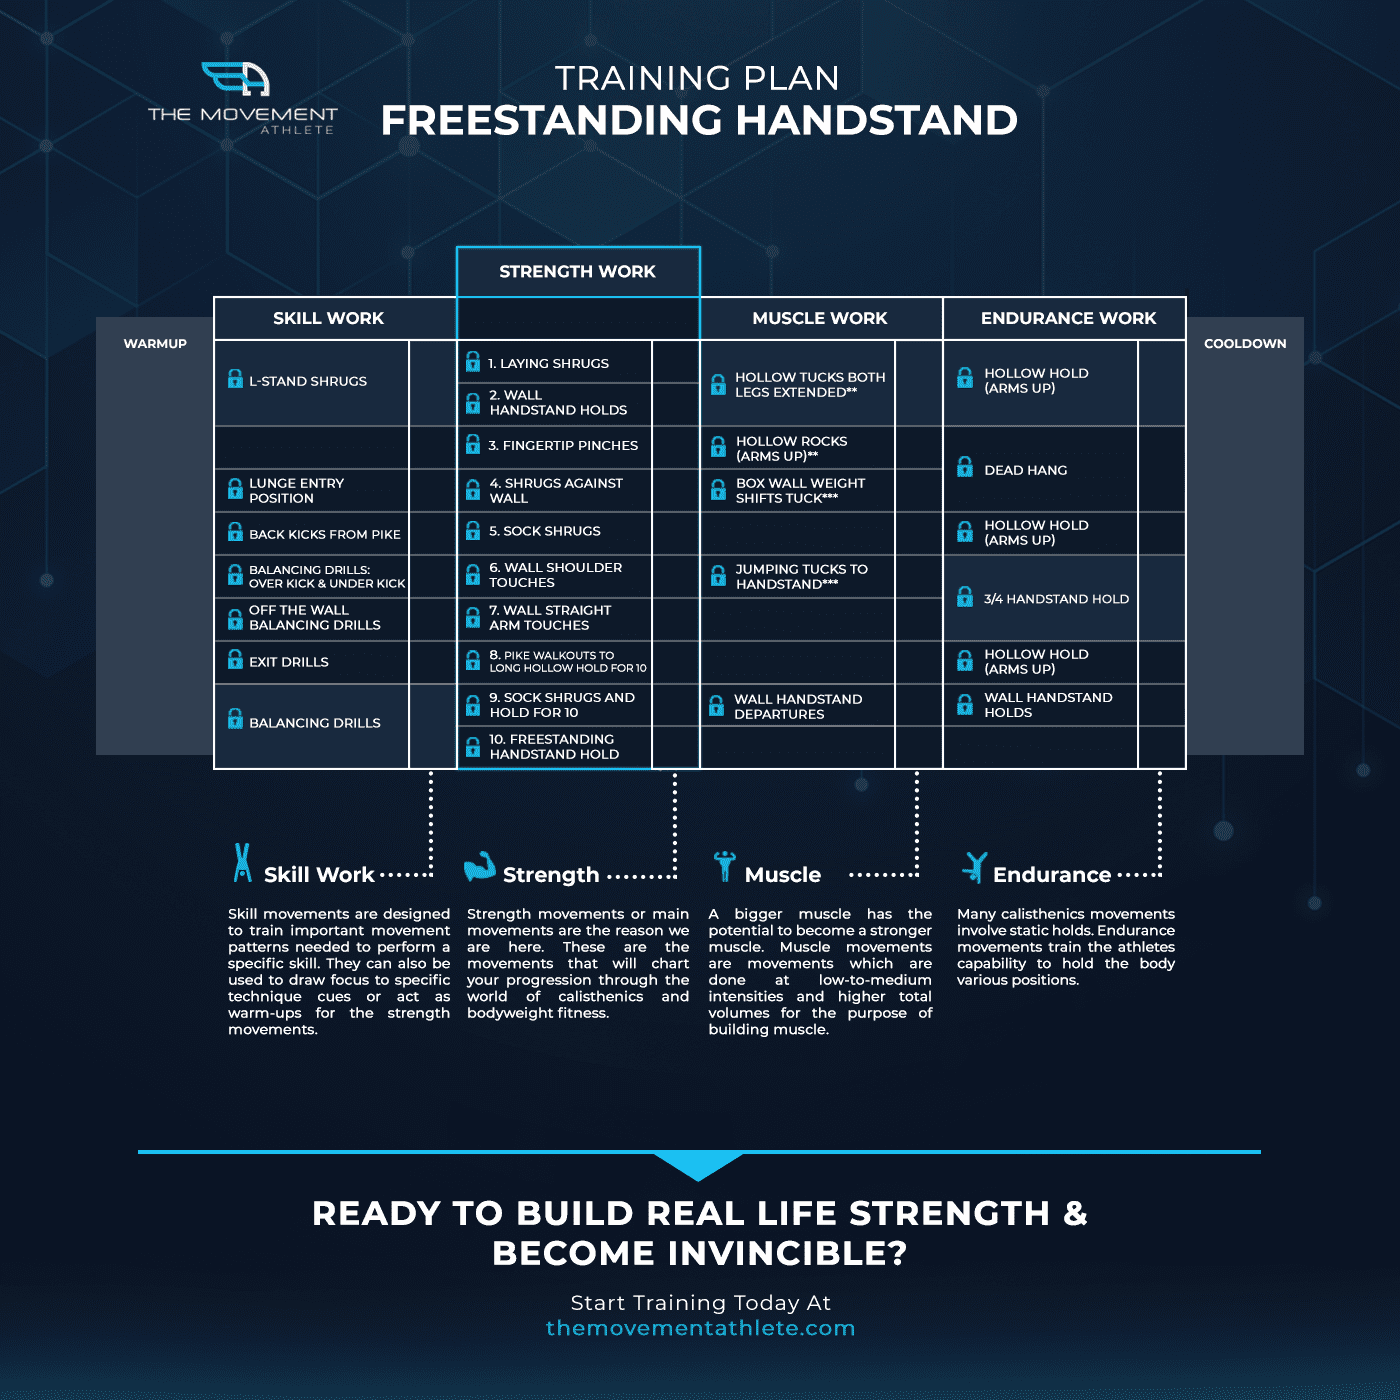
🔓🤸♀️HANDSTAND TRAINING STRUCTURE
In calisthenics, progressions are the way to… well, you’ve guessed it, to progress. Progressions are a series of exercises from the easiest to the most difficult leading ultimately to a straight freestanding handstand.
When building a training program for any calisthenics skills we always use 4 categories:
• ✅ Strength
• ✅ Skill
• ✅ Muscle
• ✅ Endurance
Let’s look at each one of those separately.
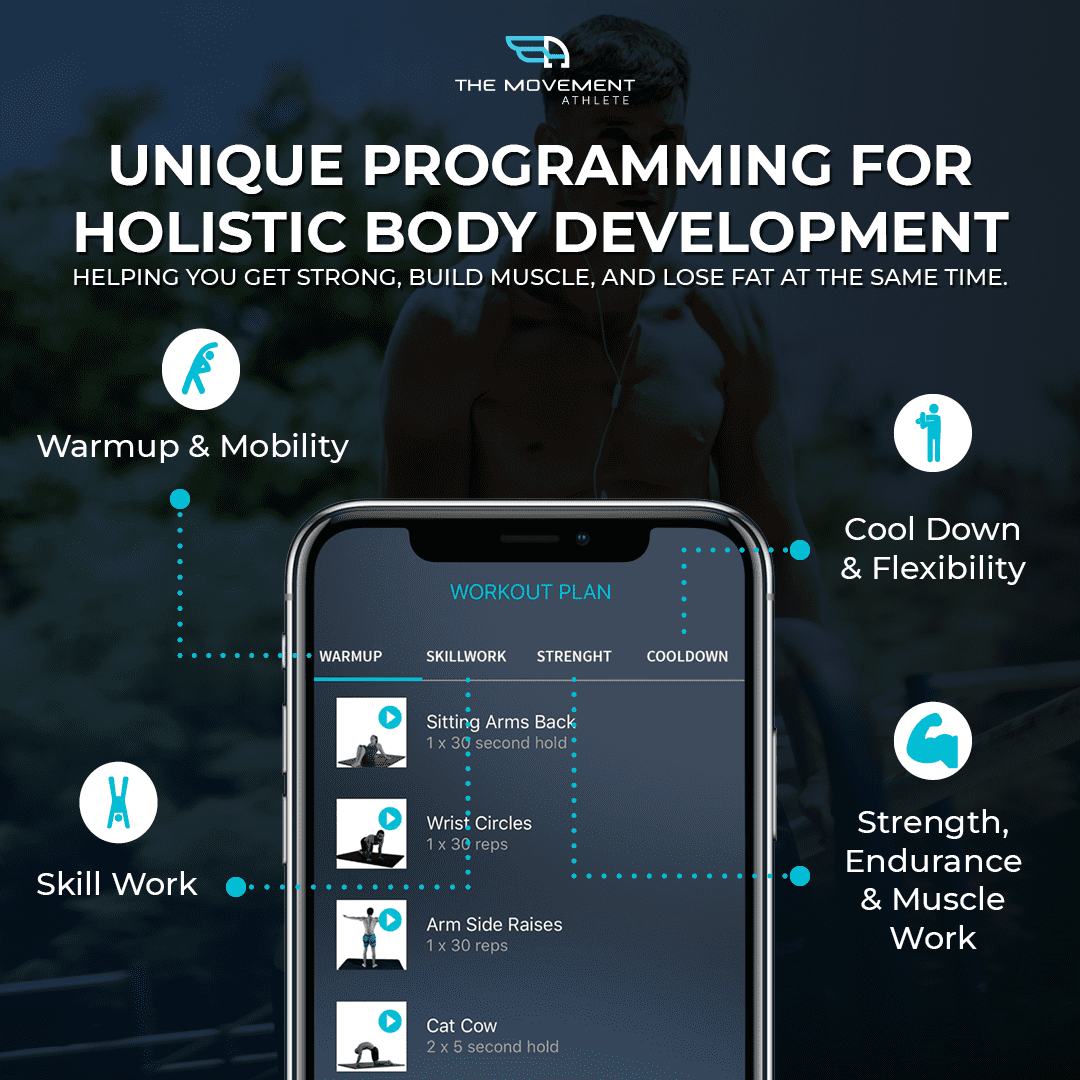
👉SKILL WORK
Technique is key in calisthenics. Skill movements are movements which are designed to either draw focus to specific technique cues, train important movement patterns for the subsequent strength movements or act as warm-ups for the strength movements. Skill movements are done at a low intensity and low total volume.
👉STRENGTH WORK
Strength movements or main movements are the reason we are here. These are the movements that will chart your progression through the world of calisthenics and bodyweight fitness. There is a large variation in strength movements, from easy to hard, low volume to medium/high volume, dynamic to static.
👉MUSCLE WORK
A bigger muscle has the potential to become a stronger muscle. Muscle movements are movements which are done at low-to-medium intensities and higher total volumes for the purpose of building muscle. The lower intensities also allow athletes to focus on the muscles involved and to get a good squeeze and pump. Many muscle movements are pulled from appropriate strength movements.
👉ENDURANCE WORK
Many calisthenics movements involve static holds. Endurance movements train the athletes capability to hold the body various positions. These are typically programmed to be easier than the equivalent strength movement holds. Instead, more work volume is added for more practice time.
Taken together, these different movement types are designed to produce skilled, strong and complete bodyweight athletes.
Note that very often calisthenic trainers would divided them into separate days, so 1 day you would be working on skill another day on muscle building another day on endurance.
In The Movement Athlete program we bring them all together in the most efficient way.
📍Why do we do it this way?
In an ideal situation (abundant time, energy, equipment), it can be beneficial to separate training goals or the systems being trained. For example, you would have a heavy strength workout on one day or at one time of day, then have a speed and agility workout on another day or at another time of day. Professional athletes often train like this, often with multiple sessions a day, six days a week. This allows the athlete and the athlete’s body to focus on the type of training of that session and to reduce interference from training several aspects of fitness concurrently.
The Movement Athlete does include workouts that focus on different aspects. However, due to various reasons, many of the typical workouts will train skill, strength, muscle development, endurance and flexibility in the same workout.
Ok, Lets get to it already. Below we go into details on what it takes to accomplish Freestanding Handstand from zero.
First we will walk you through Handstand Fundamental progression which is a prerequisite to unlock (start working on) Freestanding handstand.
We will go into details about what are the exact exercises included and why.
Note that inside The Movement Athlete program we create your own training program based on your assessment and give you daily workouts – so you don’t need to think about any of these. You can try TMA for free here.
🎯MILESTONE 1. HANDSTAND FUNDAMENTAL
FREESTANDING HANDSTAND PREREQUISITE:
If you would be starting your handstand journey from absolute zero – you would start at step 1 of Handstand Fundamental.
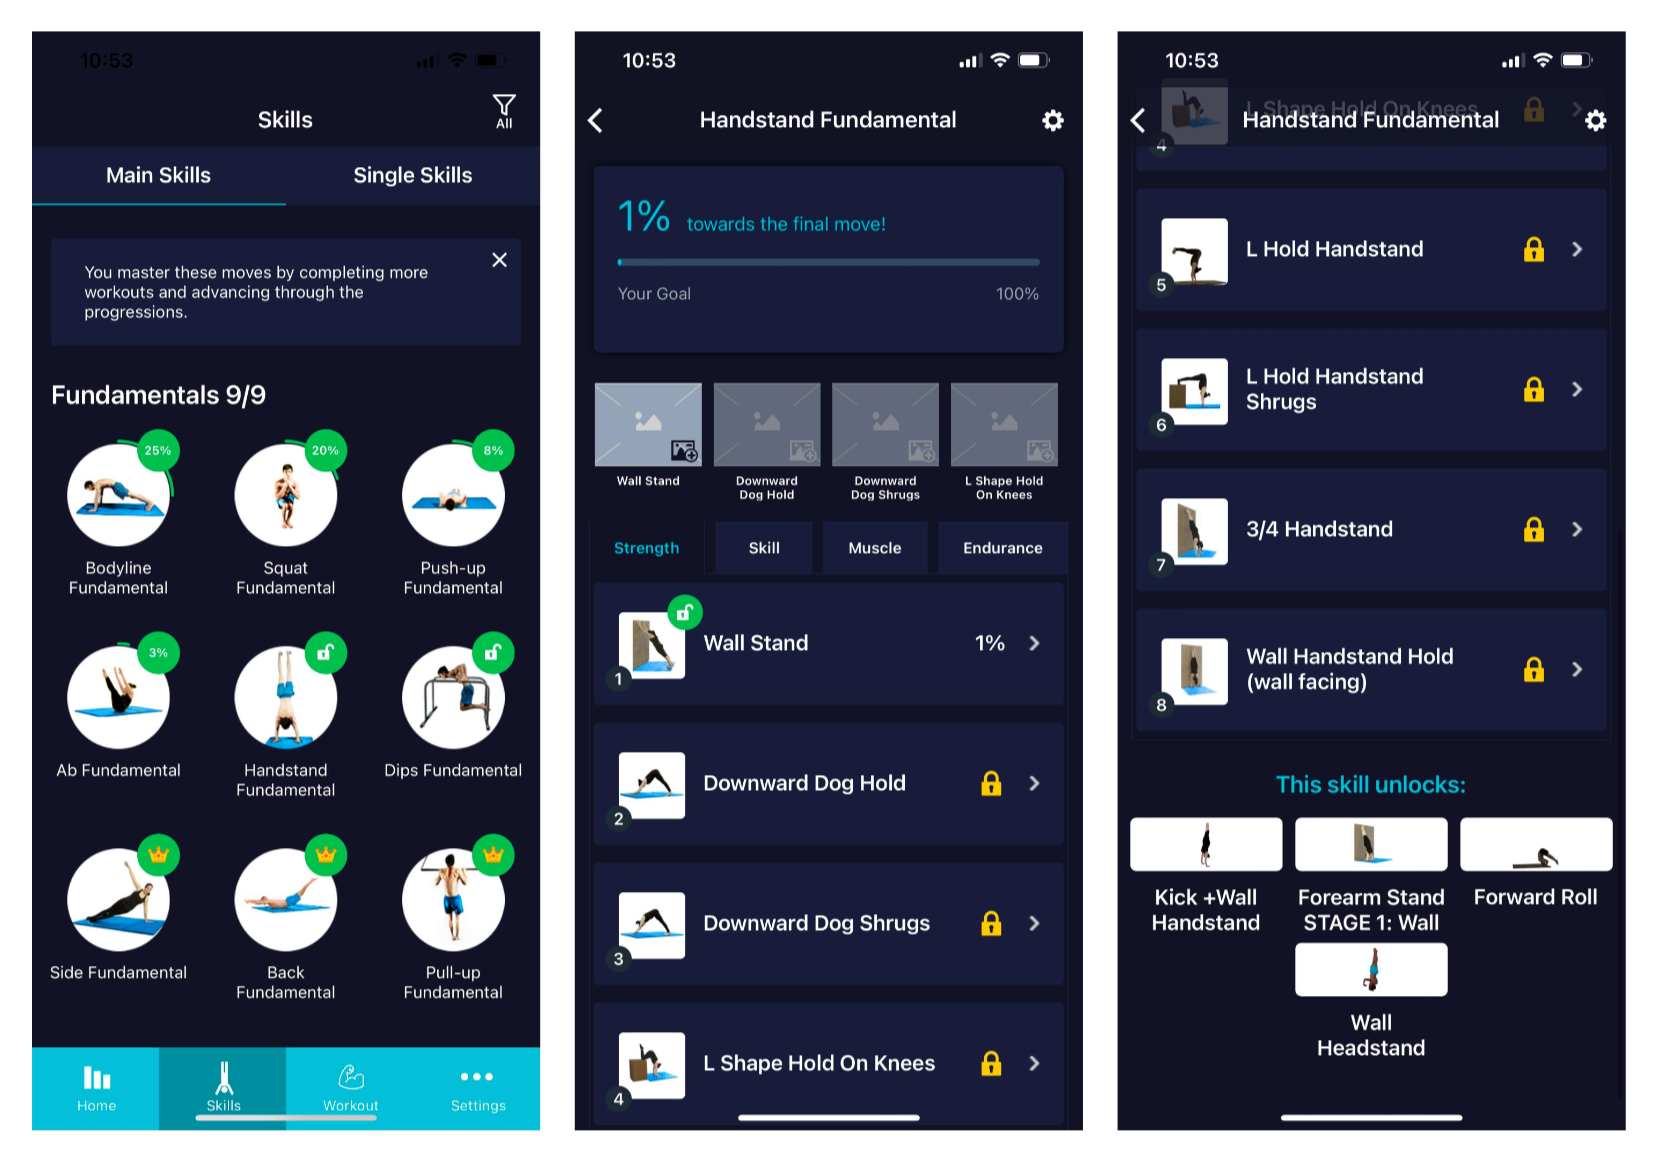
🔎HANDSTAND FUNDAMENTAL – WHY
This is the level of absolute beginner; someone who has zero experience with hand balancing. They have basically never been upside down before.
Prerequisites: None
Goals: Working up to handstand against the wall
Priorities:
Our goal for this phase is for you to learn:
• ✅ Learn body alignment
• ✅ Find a resting position in arm support
• ✅ Get comfortable upside down
• ✅ Improve work capacity of being on the hands
Notice how mastering this skill unlocks a variety of other skills.
In today’s guide we will focus on Freestanding Handstand, but noticed that once you have your wall handstand you can easily progress to a walll handstand push-up.
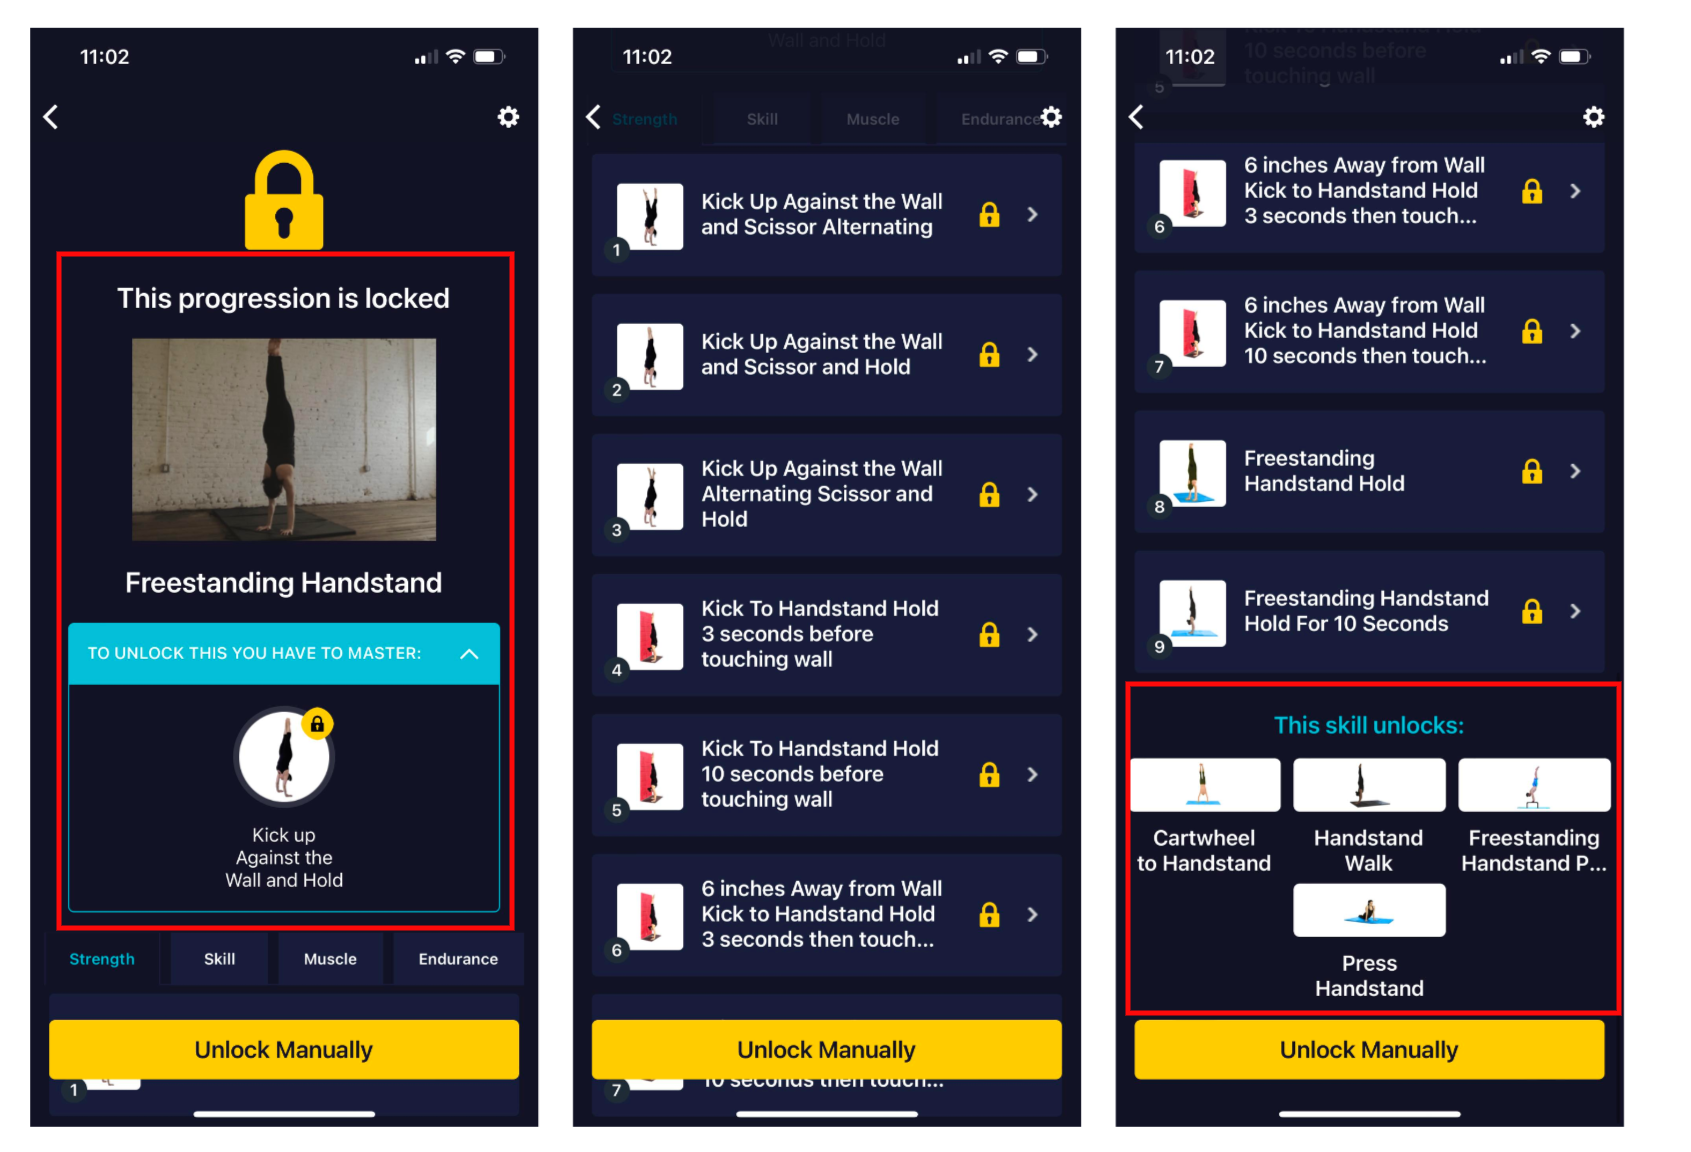
As you can see, freestanding handstand will be locked until you master this skill.
In this way, like we mentioned earlier, you’ll ensure that you have shoulder and hip mobility, upper body and lower body (for entering a handstand) strength, strong core, and adequate body awareness to progress further in to a free-standing handstand.
In doing so, you’ll progress much faster and safer. Trying to do a free-standing handstand without the necessary foundations will only get you frustrated because you’ll learn slower. You might not learn at all! Also, the last thing you’d want is to fall face-straight-first into the ground.
Do it step by step slowly.
🔐 HANDSTAND FUNDAMENTAL PROGRESSION
AND TRAINING STRUCTURE
Skill training, especially handstands, not only involves physical demands, but also it requires you to overcome psychological barriers.
These physiological barriers are:
Fear of inversion – We’re used to being upright most of our lives so being inverted could be pretty scary at first.
Fear of falling over – You’re scared because you haven’t learned the right technique yet to hold yourself in the position. Once you’ve got it, it’ll be easy.
These barriers prevents you from pushing through your comfort zone. As beginners in handstand, you must first get the basic strength of the push-up position and get comfortable at least with headstands or the feeling of inversion in hanging position.
From there, you may proceed slowly with your chest-to-wall handstand and make your way upwards while solidifying your body alignment.
With chest-to-wall handstands, start in a push-up position with your feet against the wall. Slowly walk walk your feet upwards and slowly move your hands closer to the wall. Hold a position which gives you enough challenge to hold around 30 seconds. As you get more comfortable, you can walk more into a more vertical position until you get your chest touching the wall and you’re fully in a handstand position.
Key reminders you should be aware when you’re practicing your static handstand progressions:
• ✅Consistent hold time – keep your handstand progression hold in the 30 to 60 seconds range. Increase your hold time according to your skill level and try to keep it consistent.
• ✅Body Alignment – Straight line, straight arms, pelvic tilt
• ✅Body Awareness – You should be able to be aware of your mistakes and correct it while in holding the position
• ✅Body Control – Control your entrance and exit. Don’t just kick up and drop with dead weight after holding. Keep everything tight.
• ✅Breathing – How can you keep your handstand for forever if you’re not breathing? Breathing also helps with your body control if you’re doing it correctly.
With The Movement Athlete app, your handstand program will be already structured depending on your skill level. It will also address your weak points in your handstand and help you get over your fears slowly and safely.
You don’t have to worry about your program because the app got it covered for you. As you progress and unlock new skills, your program progresses with you!
Let’s talk about each of those elements:
💪Strength Element
Handstand is obviously an upper body dominant skill. You will have to work on strengthening the right muscles that will be used for handstands.
In a research conducted on gymnasts regarding influence of strength on quality of handstands, it was observed that the stronger the participants, the better the quality of their handstands are and can hold them longer.
Don’t worry about it being too difficult for you. There’s a progression that will start from the easiest exercise.
💪Strength Progression
Here are the list of exercises for developing strength:
1. Wall Stand
How to Perform:
1. To begin, stand in front of the wall a little further than arms length away. Legs straight, feet together, arms at your side.
2. Place your palms up on the wall, arms next to your ears, simultaneously step your feet back and straighten legs.
3. Your body should be in a straight line from your wrists to your ankles.
4. Hold position for specified time.
5. Step feet forward, bring arms down.
2. Downward Dog Hold
How to Perform:
1. Begin in a kneeling position.
2. Coming forward, place your hands out in front of you.
3. Rise up off knees, straighten legs.
4. Walk feet in as close to arms as possible, while keeping legs straight.
5. Push through arms, head looking back towards legs.
6. Feel a deep stretch in hamstrings. Hold for a specified time.
7. Return to kneeling position.
3. Downward Dog Shrugs
How to Perform:
1. Begin in a kneeling position.
2. Coming forward, place your hands out in front of you.
3. Rise up off knees, straighten legs.
4. Walk feet in as close to arms as possible, while keeping legs straight.
5. Push through arms, head looking back towards legs.
6. Push through your shoulders, scapular elevation, let your chin meet your chest.
7. Then relax traps as the heads lowers toward your elbows. All while keeping your arms straight.
8. Repeat per specified repetitions.
Note: This article has been condensed to show the complete structure and key elements. The full handstand progression includes 11 strength exercises, 6 skill exercises, muscle and endurance elements, plus the complete freestanding handstand progression with all detailed instructions and video demonstrations.
With The Movement Athlete app, your handstand program will be already structured depending on your skill level. It will also address your weak points in your handstand and help you get over your fears slowly and safely.
You don’t have to worry about your program because the app got it covered for you. As you progress and unlock new skills, your program progresses with you!
Begin your personalized journey through this short assessment below.
TAKE THE ASSESSMENT NOW!
📌Takeaway
Breaking down the elements of the handstand into easier, more digestible exercise helps us understand the movement easier so we can progress faster.
This actually hold true for all calisthenics exercises, even the simplest ones, because calisthenics movements engages the full body and challenges your mind as well.
For a more complex move like the wall and freestanding handstand, we need to cover all elements to get you inverted as safely as possible in the most efficient manner.
To learn more about the general common mistakes you need to avoid plus the tips you need to learn the handstand faster, head over to this article:
Ready to get started?
Get your free personalized training plan now