Handstand Straddle Hold on Parallettes: Complete Training Guide
📖 Read Time: 8 Minutes | 🎯 Difficulty: Intermediate | 💪 Prerequisites: Floor Handstand
🏆 Join 100,000+ Movement Athletes!
Ordinary people achieving extraordinary results with progressive calisthenics—no gym required!
✅ Build strength
✅ Improve balance
✅ Master skills
Takes 5 minutes • Personalized to your level • No credit card required
📋 What You’ll Learn
- Why Parallettes: Benefits over floor handstands
- Prerequisites: When you’re ready to attempt
- 8 Key Benefits: From wrist health to confidence
- Step-by-Step Guide: Proper execution technique
- Coaching Points: Position breakdown with visuals
- Pro Tips: Starting low and pressing techniques
Increase your handstand control by learning handstand straddle on parallettes!
A flat solid floor is an ideal surface to first learn your handstand. It provides good feedback to learn how to control the inverted position. The next step to get more control is by moving to a different surface so you can do handstand virtually anywhere you want to.
🎯 Why Parallettes Are Game-Changing
- Wrist Relief: Different angle reduces pressure and pain
- New Stimulus: Fresh challenge for arms and wrists
- Better Balance: Straddle position lowers center of gravity
- Confidence Building: Overcome fear of elevation gradually
💡 Pro Tip: Start with low parallettes to build confidence while still being able to jump into position safely.
🔒 How to Know When It’s Safe to Attempt
You must have a solid base handstand before attempting this skill. The basic floor handstand lets you focus on the fundamental elements such as alignment and control before moving to a more difficult surface.
Once you have a good grasp of the floor handstand, you can move on to the parallettes.
✅ Prerequisite Checklist
Before attempting parallette handstands, ensure you can:
- Hold a floor handstand for at least 30 seconds
- Have consistent handstand alignment
- Understand basic handstand mechanics
- Control your entry and exit safely
💪 8 Key Benefits of Parallette Handstand Training
- 1. Strengthens shoulders
- 2. Strengthens core muscles
- 3. Improves straight-arm strength
- 4. Develops body awareness
- 5. Boosts handstand confidence
- 6. Prepares for advanced moves
- 7. Strengthens wrist deviation
- 8. Transfers to other surfaces
📹 How to Perform: Step-by-Step Guide
- Setup: Bend over and place hands onto the bars
- Entry: Lean forward placing weight in hands, and jump feet up into a handstand with legs straddled
- Hold: Maintain handstand position for specified time
🎯 Key Training Tips
🚨 Start Low
Starting at a high set of parallettes will just give you a headache. It’s scary to get into your handstand and bailing out would still be terrifying. Choose a low elevation of parallettes and slowly move upward.
✅ If You Can Press, Even Better
It’s not mandatory to have a standing press-to-handstand before learning on parallettes, but it’s better to have control getting into position. Pressing minimizes the risk of falling forward which would be scary at elevation. Pressing with control gives you confidence even with the new wrist angle.
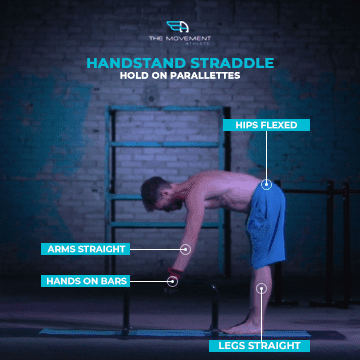
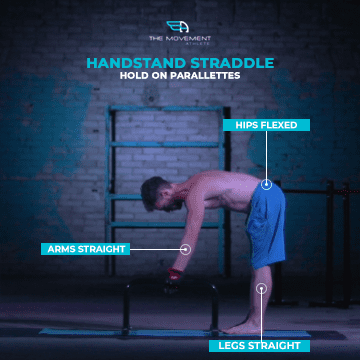
Coaching Points
Starting Position:
- Arms straight
- Hips flexed
- Legs straight
- Hands on bars
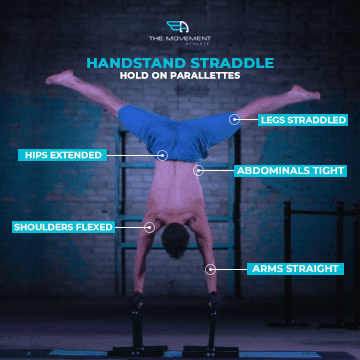
Movement Position:
- Legs straddle
- Abdominals tight
- Hips extended
- Arms straight
- Shoulders flexed and depressed
Finish Position:
- Arms straight
- Hips flexed
- Legs straight
📊 Programming & Progression
Sample Weekly Progression
Week 1-2: 3 sets x 10-15 seconds
Week 3-4: 3 sets x 20-30 seconds
Week 5-6: 4 sets x 30-45 seconds
Week 7+: Progress to legs together
Remember: Quality over quantity. Perfect form for 10 seconds beats sloppy form for 30 seconds!
⚠️ Common Mistakes to Avoid
- Rushing progression: Master low parallettes before moving higher
- Poor shoulder position: Keep shoulders depressed and protracted
- Banana back: Maintain hollow body position throughout
- Gripping too hard: Relax grip to improve endurance
- Holding breath: Breathe naturally throughout the hold
📌 Key Takeaways
- Master floor handstand first – Essential prerequisite
- Start with low parallettes – Build confidence gradually
- Use straddle position – Lower center of gravity for better control
- Focus on form – Quality beats quantity every time
- Consider learning to press – Safer entry and exit
- Be patient – This skill takes time to develop

🔥 Limited Time: Free Personalized Assessment ($197 Value)
Master Every Handstand Variation
Get Your Custom Handstand Training Plan in 5 Minutes
⭐⭐⭐⭐⭐ Join 100,000+ athletes mastering advanced skills
✅ Complete handstand assessment ($197 value)
✅ Personalized progression roadmap ($297 value)
✅ Daily adaptive workouts ($47/month value)
✅ Expert form video library ($297 value)
✅ Progress tracking & analytics ($97 value)
🎆 Total Value: $935 – Yours FREE Today
🔒 100% Privacy Guaranteed • No Credit Card Required • Unsubscribe Anytime

“The progressive approach helped me go from shaky floor handstands to rock-solid parallette holds in just 3 months. The personalized plan made all the difference – no more guessing!”
— Alex, 31, Physical Therapist