📖 Read Time: 12 Minutes
🏋️ Join the tribe of Movement & Calisthenics Athletes
People just like you that are working with their own body weight to get strength, lose fat, build muscle, recover from injuries and live their best lives!
🤯Flexibility vs Mobility
Before we talk more about the requirements in mobility and flexibility, let’s first cover the difference between the flexibility and mobility.
Take note that while they are usually used interchangeably, there are still differences between the two.
👉Flexibility

Flexibility refers to lengthening your muscles at end range with assistance from gravity, weights, a friend, bands, or from even your other limbs (think of pulling your leg with your arms to get a deeper stretch).
You can improve your flexibility by static stretching. This means holding the end range for extended periods of time. While there is no set standard, research shows that at least 30 seconds of stretch can already be enough to increase your range of motion.
It’s a popular belief that improving your flexibility can decrease the risk of injury, reduce delayed soreness from training, and improve your general movement performance. However, these have been debunked by numerous studies already.
In our case, flexibility is crucial for activating our muscles to a wide range of motion while under tension. Flexibility improves the active range of motion our muscles, joints, and other passive structures can perform.
Flexibility are usually done as cool down at the end of your workout.
We’ll discuss what type of flexibility is important for press to handstand.
👉Mobility
Mobility is your body’s ability to move through a range of motion with control without the assistance of external forces or yourself.
In other words, mobility is the manifestation of your strength in a given range. Improving your mobility not only helps you progress into a better press to handstand, but also translates to better movement function and health.
Read more here: 📍What Does It Mean to Be Strong in the Real World
Mobility are similar to strengthening exercises but with a wider range of motion to specifically achieve this purpose. In a 2021 research, specialists found that strength training can contribute to improved range of motion similar to stretching. We can extrapolate this data and consider mobility as strength training.
🏆Mobility training can be incorporated in your warm-ups, main workout, or on separate days.
⭐️Combination of both
Study shows that flexibility isn’t always crucial for daily function and it’s better to put more significance in improving your range of motion that you can control.
However, in the context of learning press to handstands, mobility and flexibility are both crucial to improve both aesthetic and efficiency of your press to handstand.
🧐Why flexibility and mobility crucial for pressing?
To put it short, both flexibility and mobility will make your pressing efficient.
Lacking in flexibility and mobility department can be made up by having enough strength. However, having the necessary range of motion will allow you to get into a more mechanically advantageous position for pressing.
In addition, having the necessary requirement will help you maintain a high level of safety in your training to avoid injuries.
🤔What do you need to work on for press to handstand?
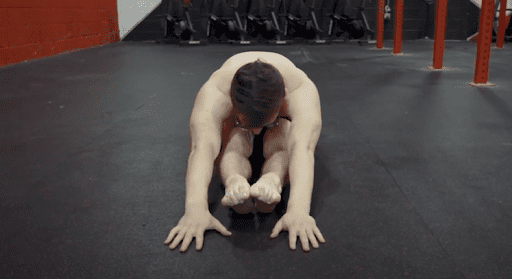
🔥Pancake
The main stretch we need to achieve for a good press to handstand is the pancake. In this position, hip mobility and flexibility is required to achieve the proper hip compression to easily raise your hips.
As mentioned in the 📍 introduction article on press to handstand, we need to position our hips on top of our hands for counterbalance so we can lift your feet off the floor.
With proper hip flexibility and mobility, we’ll be able to easily position our hips high to easily achieve the initial phase of pressing.
There are two leg positions we can work on during pancakes.
🔥Straddle
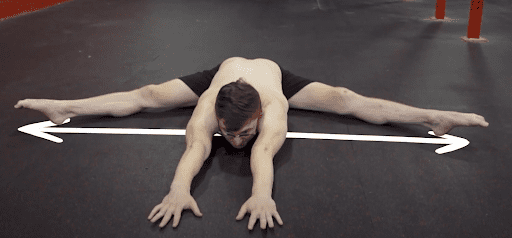
The first one is the straddle pancake. With the straddle, legs are apart so a good amount of hip adduction or the leg’s ability to move far from the midline. It’s basically a split.
During the straddle, our glutes and leg abductors activate to facilitate the movement.
The straddle position decreases the length of the body lever compared to the pike variation. This means it will feel a lot lighter compared to the pike.
Pike
The second leg position is the pike. Here, legs are together in the midline and straight. The stretch also targets the hamstrings and hip flexors similar to the straddle but does not stretch the adductors as much.
The pike is crucial for pike press to handstand. This is a much more difficult variation of pressing since the feet move further away from the body making it heavier to hold.
🔥Shoulder mobility
Specifically overhead shoulder flexion, shoulder mobility is crucial for any handstand variation and movement.
In the press to handstand, shoulder flexion strength and mobility improves the efficiency of the press. If your shoulders are too tight, you’ll end up with less shoulder flexion which looks like a pike handstand.
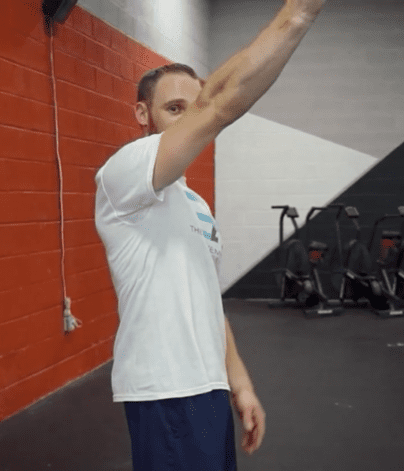
In the photo above, coach Jesse shows a tight angle position if ever you can no longer pull your arms overhead.
You can get away with slightly limited shoulder flexion, but it will take a lot more strength to execute the press and the straight handstand. Consequently, you will become tired much faster and will be unable to maintain it for long periods of time.
A good overhead shoulder flexion not only makes the pressing movement efficient, but also makes the skill look a lot cleaner, and cooler.
🔥Hip mobility

For the compression and especially the straddle press variation, hip mobility is a must. This is similar to the overhead shoulder requirement. It helps with efficiency and aesthetic of the press.
Your hips must be mobile enough to open up into a straddle and compress forward close to your upper torso to facilitate the efficient handstand press.
🔥Hamstring flexibility
To better achieve the compression, flexible hamstrings is a must. In the pancake position, your hamstrings get elongated as you move your lower body closer to the upper body.
🔥Quad mobility
During the compression, quads shorten and contract. Especially in straddle sits, many people get their progress bottlenecked in this aspect due to heavy cramping.
Cramping in quads during compression is due to weakness and tightness in the position. The quad muscles get confused and cramp as a response.
Improving quad mobility will resolve this cramping and will make leg compression a lot better.
🔥Glute mobility
While seeming negligible, glute activation also plays an important role in pancake compression and straddle position. Tight glutes can hinder you from achieving the pancake position and even the straight legged handstand at the top.
Strong and mobile glutes stabilize the hips during compression. In addition, research shows that weakness in the glutes can lead to lower back pain and we don’t want that!
🔥Lat mobility
One function of the latissimus dorsi or lats is to assist your shoulders in creating the overhead shoulder flexion.
Tight lats can impede your ability to move your arms overhead. So improving your lats can massively increase your shoulder flexion.
Add that you will feel much better with loose and supple lats!
🔥Wrist flexibility
The regular handstand loads the wrists at a 90-degree angle. However, for presses, you might need more than that to achieve the forward lean for pressing.
Wrist flexibility in both extended and flexed position is crucial for safety and execution of the exercise. You will be spending a lot of time loading the wrists which is why we need to prepare it through flexibility and mobility work.
✨Best Mobility Exercises for Press to Handstand
The press to handstand is not only all about strength, but also demands a good level of mobility and technique.
If you want to improve your progress fast in the exercise, then addressing the mobility and flexibility demands is the way to go. Training only for strength will take a longer time because breaking through the higher strength demands is more challenging.
✊ SO WORK ON YOUR MOBILITY AND FLEXIBILITY!
Not all of these exercises are crucial. You can play around with combinations as well as variations as long as you get to improve the elements required mentioned above.
If you want to start your press to handstand journey today, take our free assessment to get a personalized training plan based on your current abilities.
✨Lower Body Mobility for Press to Handstand
The main goal of these lower body exercises is to help you improve your pancake and/or pike compression for a press to handstand that doesn’t rely too much on strength. Each exercise targets specific muscle groups with the main pancake stretch simulating the lower body position for press to handstand.
👊Hip openers
The most basic, but not necessarily easy, exercise among the list is the hip openers. The name does exactly what it does. It helps you open up the hips more for press to handstand. Plus, with other leg variations and holds, you can further increase the intensity for the exercise that supplements our target goal of wide straddle and deeper compression.
👍How to perform:
- Begin in a standing position.
- Lift one knee up as high as you can with bent leg.
- Move to the outside.
- Continue the movement to the back and down.
- Reset and repeat for reps.
- Repeat with the other leg.
🎯Coaching Pointers:
• Engaged core
• Don’t move your upper body torso
• Move with control
• Do not swing and use momentum
💥Variations:
Variation 1 – While lifting your knee upward, push your knee down with your arm as additional resistance. Work against your arm by driving your knee upward. Hold for 10 to 20 seconds per set.
Variation 2 – Instead of following the motion with bent legs, perform the same movement pattern with straight legs. This will further work your glutes, quads, hips, and hamstrings.
Variation 3 – Add hold time and pauses when the leg is at the peak of height.
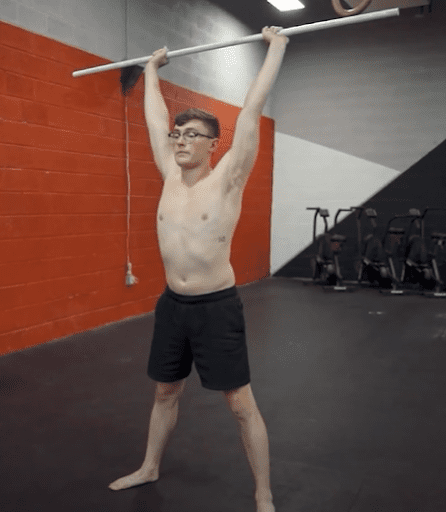
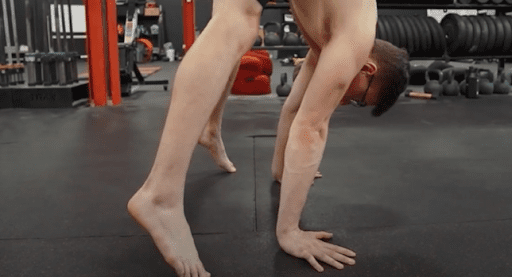
👊Standing Straddle flat back
Our first exercise focuses on improving your hamstring mobility while maintaining overhead shoulder flexion. It’s simple to perform and easily scalable based on your skill level.
In the reference above, you might notice our Movement Athlete coach using a stick, but you can use anything light like a band or a rope. The goal is to maintain tension and shoulder flexion.
👍How to perform:
- Stand with feet slightly wider than the hips.
- Raise your arms overhead while holding a stick.
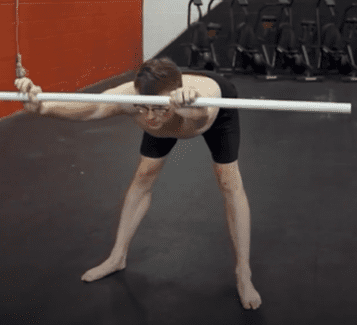
- Hinge at the hips to lower your upper torso until parallel to the floor.
- Slight pause at the bottom position to feel the stretch.
- Pull back up to the starting position.
- Repeat for reps.
🎯Coaching Pointers:
• At the standing position, imagine holding a handstand with arms locked out, aligned to the whole body and shoulder elevated
• Full body tension
• Hinge at the hips
• Flat back
• Controlled movement
• Hips naturally move backward
• Legs straight
• Avoid arching the lower back
• Avoid moving the shoulder angle
💥Variations:
Variation 1 – You can perform the same motion in a seated position. As a result, you can assume a pancake position, placing more demands on your lower body. Pancake good morning is another name for this variation.
Take notice of how wide your straddle is. The wider straddle isn’t always the better as a 180-degree split isn’t necessary for a straddle press. In fact, wider straddles will place your hips lower making it much more difficult to press into a handstand.

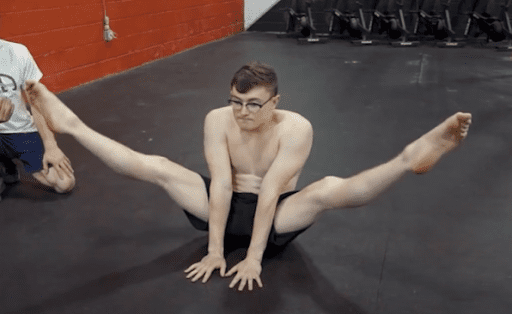
👊Sitting leg lifts
At first glance, you might think that this exercise is easy, but when you do that first rep, your quad cramps so hard making you want to quit!
Sitting leg lifts are one of the best exercises for core compression strength, your quads, and hamstring flexibility. This exercise isolates these targeted areas which is uncommon in regular movement patterns. As a result, your body gets confused by the new loading and you get cramps in your abs or quads.
To minimize the early stages of cramping, just keep your progress gradual. There’s no need to push through harder variations and range of motion if you’re just starting out.
You can also adjust the difficulty of the exercise by starting with a more vertical torso. You can move your hands forward to make the exercise much more challenging.
Don’t worry. Those cramps will eventually go away, especially as you get used to the movement.
👍How to perform:
- Begin in a sitting position with legs straddled.
- Place your hands in front of you.
- Pull your legs upward.
- Brief pause at the top position.
- Lower down with control.
- Repeat for reps.
🎯Coaching Pointers:
• Keep your back straight
• Legs straight
• Engage your core
• Gradually lift your legs higher over time
• Hands further away from your body to increase intensity
• Upper body stationary
• 180-degree straddle is not necessary
💥Variations:
Variation 1 – You can focus on one leg at a time to address or prevent imbalances
Variation 2 – Adding pauses at the top position
Variation 3 – Moving your torso backward to make the exercise easier.
Variation 4 – Piked legs instead of straddle.
👊Half kneel position
If you want to relieve some of the cramping you get from leg lifts and also improve quad and hip flexibility, then you can throw in the half kneel position after each set. Alternatively, you can also add this exercise as a part of your cooldown.
👍How to perform:
- Begin in a high kneeling position.
- Place your two arms on the forward knee.
- Push down the knee.
- Lean forward while pushing down.
- Hold for a time and feel the stretch.
🎯Coaching Pointers:
• Posterior pelvic tilt
• Engage your core
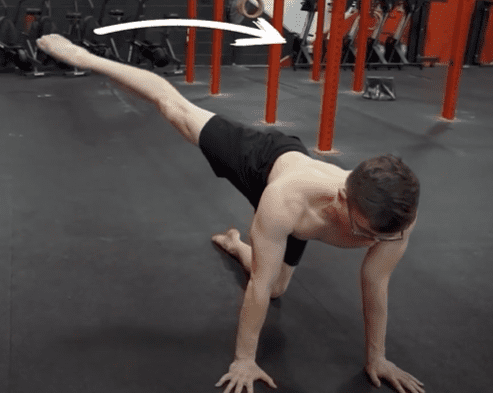
👊Fire Hydrant
Let’s give some attention to our glutes with the fire hydrant. The glutes are responsible for leg abduction or when we move our legs away from the body like performing a straddle position. In addition, we also get to strengthen our hips in the top range of the fire hydrant.
There are also many movement pathways to choose from to increase difficulty and target specific weaknesses in our movement.
👍How to perform:
- Begin in a quadruped position.
- Lift your knee sideward as high as you can with control.
- Lower it back to the starting position.
- Repeat for reps.
- Repeat for the other leg as well.
🎯Coaching Pointers:
• Core engaged
• Straight arms
• Hips parallel to the floor
• Engage your glutes
💥Variations:
Variation 1 – After the abduction, you can continue moving your knee to the back to form a circle. You can also reverse the motion
Variation 2 – Straighten your leg to extend the lever and make the exercise much more difficult
Variation 3 – Add holds and pauses
👊Straddle split at wall
This is a popular flexibility move in the world of gymnastics and ballet to improve the straddle flexibility. You just literally have to go in front of a wall and do the straddle. Since this exercise is very low impact, you can add it at the end of your training session.
👍How to perform:
- Position close to a wall.
- Lie on your back and place your glutes to the wall so that your legs are also against it.
- Open up into your wide straddle.
- Hold for a specified time.
🎯Coaching Pointers:
• Actively engage your legs as you hold the stretch
• Don’t forget to breathe
💥Variations:
Variation 1 – You can also perform the exercise off the wall so you’re working against gravity and don’t have the assistance of the wall to increase your straddle.
Variation 2 – In addition to the active position of variation 1, you can add pulses or mini pulses to the exercise.
👊Romanian deadlift
You might be surprised with a weighted exercise in the list, but the Romanian deadlift can provide benefits that are too good to neglect.
In this exercise, we’re giving the hamstrings a nice stretch for additional active flexibility. Weights are added to increase the intensity of the exercise since the bodyweight variation can be too light and the one-legged variation is limited because of balance.
👍How to perform:
- Hold light weights in front of you with straight arms.
- Hinge at the hips to lower your upper torso until near parallel to the floor.
- Rise back up to starting position.
- Repeat for reps.
🎯Coaching Pointers:
• Use light weights then gradually progress
• Keep your lower back straight
• Proud chest position
• Leave a slight bend in your knees
• Full body tension
• Squeeze your glutes and hamstrings
✨Upper Body Mobility for Press to Handstand
Now, let’s move to the upper body mobility requirement for the skill. This usually focuses on muscle groups and joints that will improve our ability to increase our shoulder flexion.
☑️I’s
The I’s is a popular exercise in physiotherapy and recovery/rehabilitation field to regain a good range of motion in your shoulders.
But aside from recovery, this exercise is also excellent for general shoulder health and (for our current purpose) improving our press to handstand.
👍How to perform:
- Begin by lying on the floor in a prone position.
- Raise your arms overhead.
- Tilt your hips backward so that you create space between your stomach and floor.
- Raise your arms up to your maximum range.
- Lower down with control.
- Repeat the arm movement for reps.
🎯Coaching Pointers:
• Isolate your shoulders by keeping the rest of the body rigid
• Avoid arching your lower back to increase range of motion
• Straight arms
• Thumbs facing upward
• Controlled movements
• Retract your shoulders by pulling the scapula together
• Elevated shoulders to simulate a handstand
• Straight legs and together
💥Variations:
Variation 1 – Add hold time at the end range in your last rep.
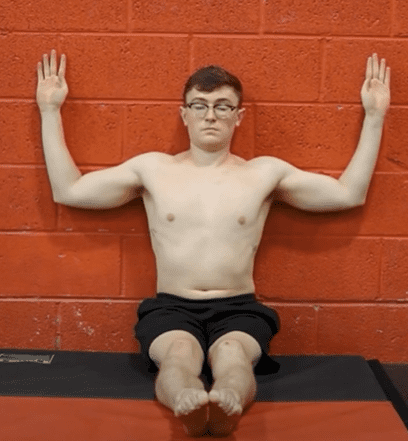
☑️Angel’s
Angels work similar to the I’s but they also have the benefit of improving your scapula stabilization and your rotator cuff strength. Healthier and stronger shoulders mean better progress for press to handstand.
Furthermore, angels strengthen the upper back muscles which also act as stabilizers in a handstand and press to handstand.
Take note that this exercise is quite difficult to perform with perfect technique so adjust the exercise according to your current mobility.
👍How to perform:
- Begin in a supine position.
- Raise your arms overhead.
- Slide your arms downward until your elbows are aligned to your shoulders.
- Brief pause in the position.
- Rise back up to the starting position.
- Repeat for reps.
🎯Coaching Pointers:
• Posterior pelvic tilt
• Similar to the I’s, keep your lower back flat against the floor
• Keep your wrists, back of the hand, and the rest of the arm in contact with the ground at all times
• If full contact feels impossible, aim to achieve the most contact you can perform
• Stop lowering down if you break contact
💥Variations:
Variation 1 – For added challenge, you can sit on the floor and place your back against the wall to fight against gravity. This is more challenging, but opens up the opportunity for more growth. You can make this exercise easier by standing up and placing your feet further from the wall.
💡 Key Takeaway: The best way to progress in press to handstands is to combine training strength, technique, and mobility and flexibility. Having strong and supple lower body specifically for press to handstand is crucial to achieve spending minimal strength while looking badass in your press to handstand.
Check out our comprehensive workout guide to learn how to incorporate these movements into your training routine: 📍Press to Handstand Workout Guide
Ready to master your press to handstand? Start with a personalized training plan by taking our free assessment today.
Related Articles You’ll Love:
Ready to get started?
Get your free personalized training plan now