Join the tribe of Movement & Calisthenics Athletes – people just like you that are working with their own body weight to get strength, lose fat build muscle, recover from injuries and live their best lives!
😱What are progressions?
Calisthenics isn’t as straightforward as weightlifting in terms of progressing.
In weight lifting, after getting stronger and reaching the higher limit of the rep range, you just simply have to add more weights to the same exercise. You’ll use the same movement and the same tempo, the same technique.
In calisthenics, you’re working only with your body weight (let’s not include weight calisthenics for now). This means you’re going to work with the same amount of weight. So in order to progress, we have to use progressions.
Progression are set of exercises designed to help you reach a specific exercise you want to learn. For each calisthenics fundamental and more advanced movements, there are specific progressions to help you reach each goal.
In a progressions, exercises intensity and exercise goals are adjusted thanks to manipulating the body. We treat our body as a lever and by changing body angles and positions, we get to increase or decrease the difficulty of an exercise.
Read more here: 📍Progressive Calisthenics
✊Why are they divided into four sections?
In The Movement Athlete app, we categorized the progressions into four main elements.
-
- 👊Strength – This focus on building general or specific strength through exercises that require high effort. Low volume is needed to maximize recovery.
- 🤸Skill – All exercises require proper technique and form. This element focuses on improving your technique for the main movement.
- 💪Muscle – Bigger muscles increase the potential of strength.
- 🏃Endurance – Especially for advanced exercises, we need a higher working capacity to sustain our level of training safely while maximizing gains.
🧐Why are there many progressions?
Don’t worry. The number of exercises looks a lot but you will probably breeze through it over time.
In addition, we each exercise progression is crucial for progress and safety. Progressions break up the skill into simpler elements so you can work on each element separately before combing them all together. This way, we make better use of our time and we don’t get frustrated getting nowhere with our training.
🤯Where is the Mobility and Flexibility?
A proper press to handstand seem like an amazing display of strength. However, it’s not only about getting strong enough.
Press to handstands, if you want to perform them efficiently as possible and look cool, also demand mobility and flexibility primarily from your shoulders and lower body.
If you’re looking for the mobility and flexibility component, we’ve separated most of them from the main progressions.
In the THE Movement Athlete app, we’ve integrated most of the mobility and flexibility work in the warm-up and cooldown sections. However, there are also certain exercises tha are included in the main progression as well.
You can read more on mobility for this skill here: The Best Mobility Exercises for Press to Handstand.
STRENGTH👊
The strength element generally covers the specific shoulder strength requirement. Our shoulders cannot produce much force at such angles when arms raised required for a press to handstand. For this reason, we need to strengthen our shoulders specifically for this position.
These progressions below gradually build up the strength required for the full press to handstand. In addition, the exercises below will improve your core strength to make press to handstand a lot easier.
Keep in mind that a base level of strength is crucial. While you can get away with less mobility and use strength to perform press to handstands, you cannot compensate with mobility for your lack of baseline strength.
So this element should always be included if you want to reach press to handstands.
👊Push-up on tuck slides
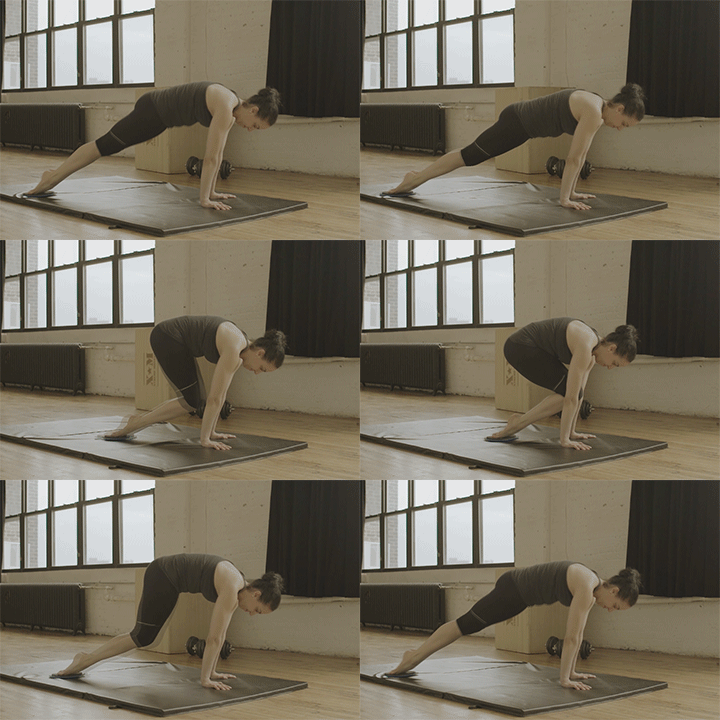
Tuck slides are actually part of the tuck planche progression. With this exercise, you get to gradually load your anterior shoulders and wrist as your slide your legs towards your chest. While sliding, you need to simultaneously lean forward to maintain balance and add the loading properly.
Take note that you should have a slipper surface or at least having something underneath your feet such as sliders or a piece of cloth to help you glide a lot smoother.
How to perform☝️
- Begin in a regular push-up position.
- Point your toes to lessen the point of contact on the floor with your lower body.
- Slide your feet towards your mid section and drive your knees towards your chest. At the same time, lean forward with your upper body to increase the loading unto your arms.
- Reverse the motion to get back into the push-up position.
- Repeat for reps.
Coaching Pointers🎯
- Remove most weight from your legs to easily slide and better hit the targeted muscles
- Shoulders depressed and scapula protracted
- Hollow body form
- Full body tension
👊Push-up to pike slides
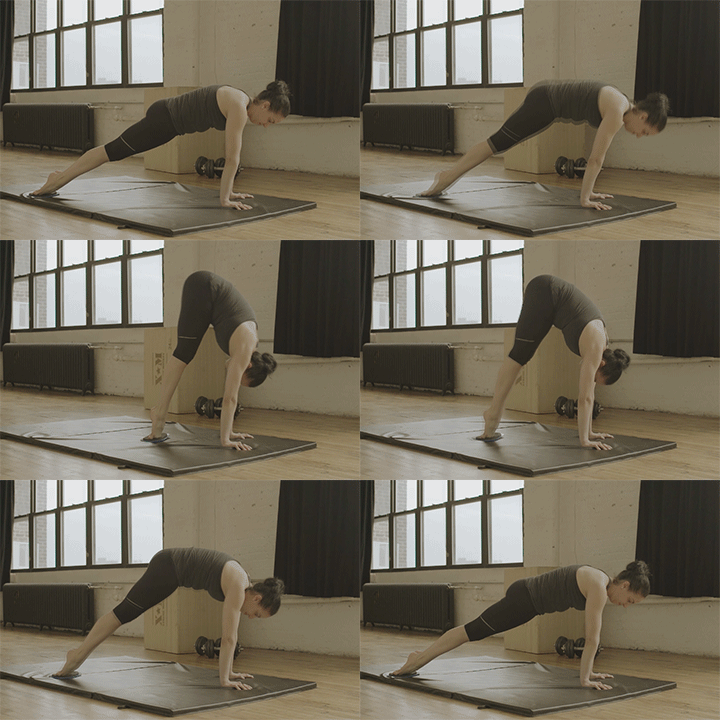
This exercise has a general motion with the prior progression but with a two distinct differences. Firstly, the legs are maintained straight similar to a press to handstand. Secondly, hips are compressed and raised towards above your wrists. This will prepare you for the initial stage of pressing.
How to perform☝️
- Begin in a regular push-up position.
- Point your toes to lessen the point of contact on the floor with your lower body.
- Pull your feet closer to your hands as you simultaneously raise your hips and push your arms overhead.
- Brief pause at the top position.
- Slowly reverse the motion.
- Repeat for reps.
Coaching Pointers🎯
- Remove most weight from your legs to easily slide and better hit the targeted muscles
- Shoulders depressed and scapula protracted
- Hollow body form
- Full body tension
- Don’t get discourage if you are unable to stack your hips on top of your wrists. Build the range of motion over tim
- Straight lock out arms
- Hinge at the hips
- Straight legs as much as possible but you can slightly bend if your mobility is limiting you
👊Straddle stand walks
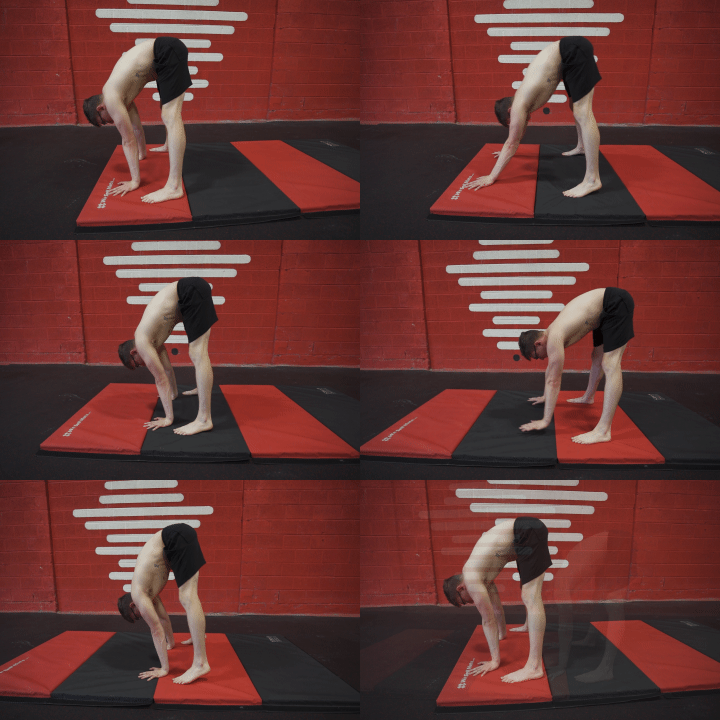
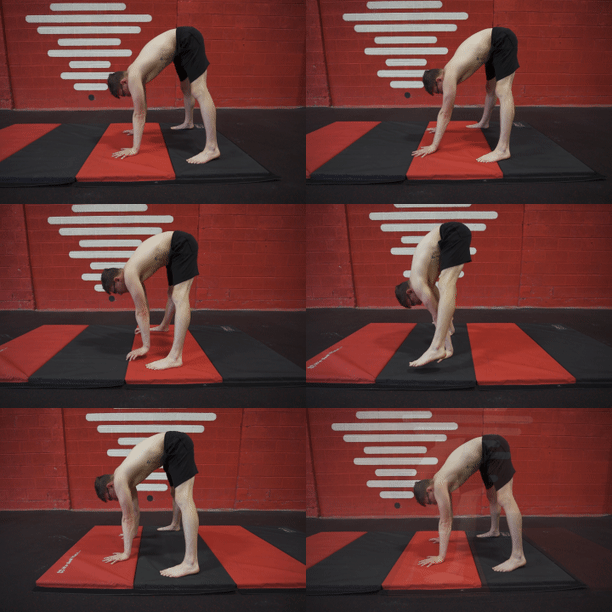
You can get massive benefits from straddle stand walks as a beginner even to an advanced state. In his exercise, you will mimic the starting position of the standing straddle press by leaning forward from a straddle until you can lift your feet off the ground briefly and placing them closer towards the hands. You can also reverse the motion for more challenge.
How to perform☝️
- From a standing position, slightly straddle your legs apart.
- Bend over forward while maintaining straight legs until your arms planted firmly on the ground.
- Shift your weight forward until your feet feels weightless.
- Move both feet closer once you feel weightlessness to make 1 step.
- Plant your feet on the ground to reset.
- Move your hands forward.
- Repeat the motion to starting “walking”.
- After some reps, reverse the motion by first moving the hands first closer to your feet.
- Lean forward to feel weightlessness with your legs.
- Move your feet backward.
- Repeat the motion.
Coaching Pointers🎯
- Maintain straight lock out arms
- You can add a small hops to initiate the walks when first learning the motion. As you grow stronger, rely on the forward lean to move your feet
- Push through your shoulders and hands
- Shoulder fully elevated
- The wider the straddle, the lighter the load, but the further away your hips need to travel to find the balancing “sweet spot”
- Aim to move as slow as possible
👊Box wall weight shift tuck
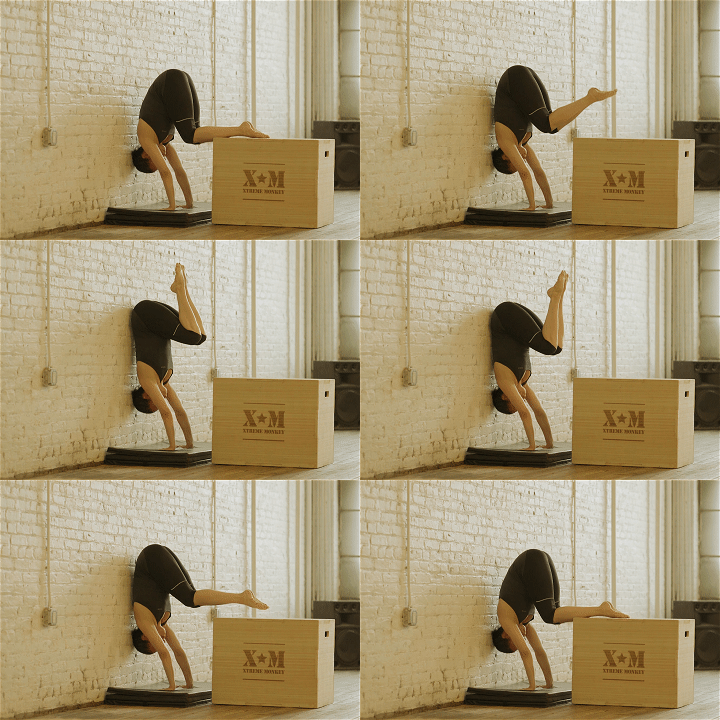
This exercise will help you strengthen the upper range of motion of press to handstand while improving your upper body endurance. It primarily targets the core for controlling the upper range but still works your shoulders and wrists.
How to perform☝️
- Set up an elevated surface near the wall.
- Go into a pike handstand with your feet supported by the elevated surface.
- Once you find balance, pull your lower back against the wall while maintaining the tuck position.
- Hold for a brief moment.
- Move your legs back unto the elevated surface.
- Repeat the motion for reps.
Coaching Pointers🎯
- Lockout arms
- Your quads/hamstrings should be around parallel to the floor at the top position
- Move your hands further away from the wall to make the exercise a bit easier
- Move your hands closer to the wall to make the exercise harder (More shoulder flexion)
- Full body tension
👊Box wall weight shift straddle
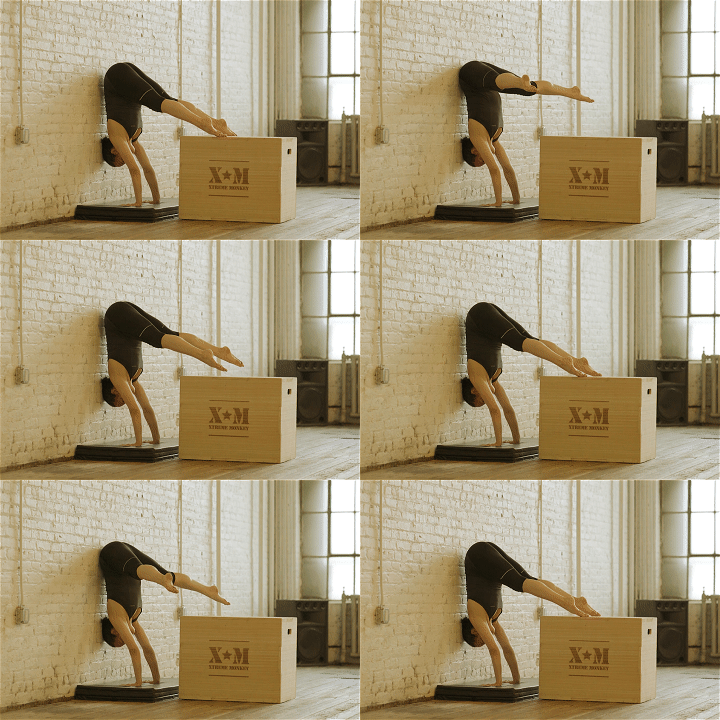
Similar to the exercise above, this progression is done with legs in a straddle position for added lever; meaning, added challenge. The same concept applies. The idea is to control your legs by properly engaging your core and hips.
How to perform☝️
- Set up an elevated surface near the wall.
- Go into a pike handstand with your feet supported by the elevated surface.
- Once you find balance, pull your lower back against the wall while maintaining a straddle position.
- Hold for a brief moment.
- Move your legs back unto the elevated surface.
- Repeat the motion for reps.
Coaching Pointers🎯
- Lockout arms
- Your quads/hamstrings should be around parallel to the floor at the top position
- Move your hands further away from the wall to make the exercise a bit easier
- Move your hands closer to the wall to make the exercise harder (More shoulder flexion)
- Full body tension
- Expect quad cramping if you have limited mobility
👊Handstand straddle down wall
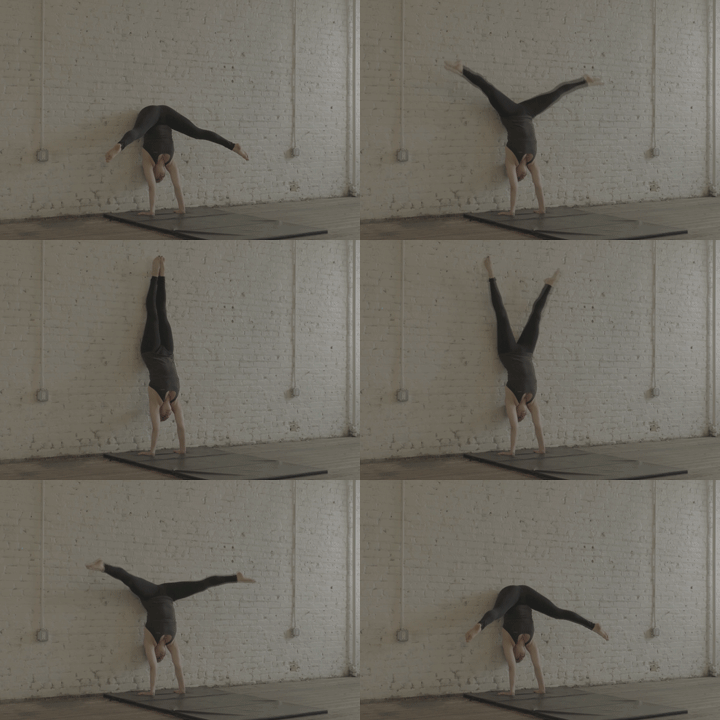
Eccentric work is a powerful tool to develop strength and muscle. The same format can be used for press to handstands. With wall assistance, we can remove the balance component so we can focus on the negatives. This means we can also adjust the hand placement to make the exercise easier or more challenging.
You can adjust the level of descent suitable for your skill level. If you can go all the way down to the bottom, the better.
How to perform☝️
- Jump into a handstand with your back against the wall.
- Straddle your legs.
- Lower down your legs while maintaining straddle slowly until you reach your legs just below 90 degrees.
- Complete lowering down.
- Repeat for reps.
Coaching Pointers🎯
- Follow regular handstand technique
- Aim to slow down the reps as much as possible
- Focus on the upper half of the lowering phase. This means using your hips to facilitate the movement
- Maintain straight arms
👊Handstand straddle up and down wall
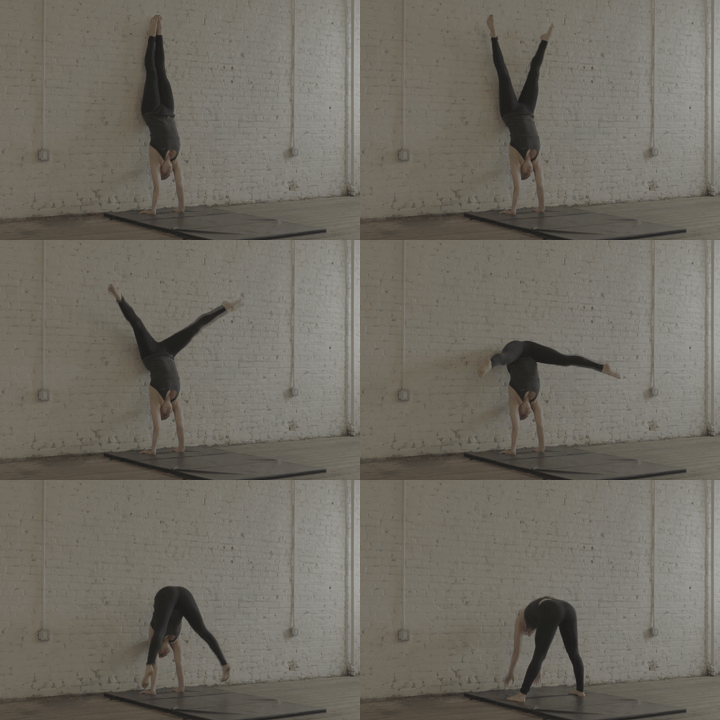
After mastering the eccentric motion, the next step is to combine the eccentric with the concentric or going up. You can alo play around with the hand placement or range of motion to adjust the intensity of the exercise.
How to perform☝️
- Jump into a handstand with your back against the wall.
- Straddle your legs.
- Lower down your legs while maintaining straddle slowly until you reach your legs just below 90 degrees.
- Pull your hips and legs back up to the full handstand.
- Repeat for reps.
Coaching Pointers🎯
- Follow regular handstand technique
- Aim to slow down the reps as much as possible
- Focus on the upper half of the lowering phase. This means using your hips to facilitate the movement
- Maintain straight arms
👊Jumping tuck to handstand
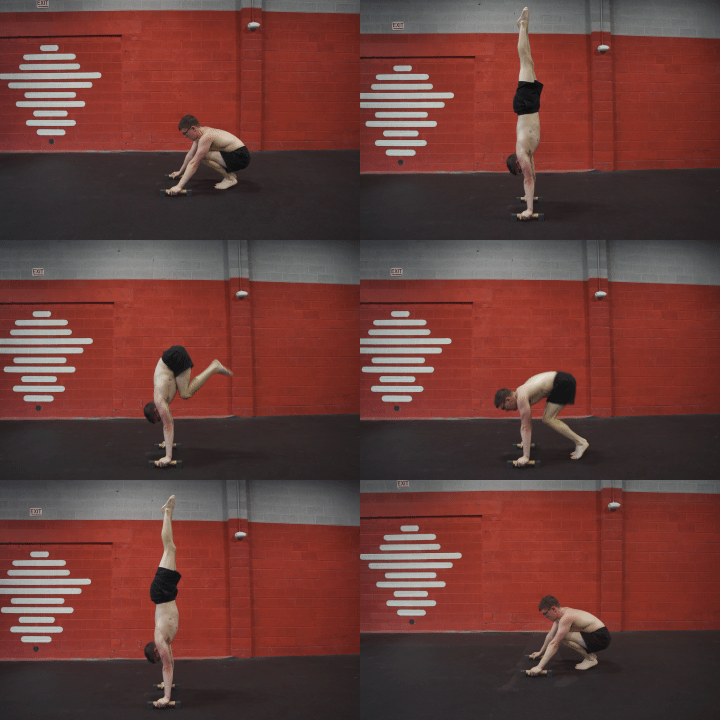
In this exercise, we get assistance from the momentum generated by the jump. You still need to press up using your strength to complete the handstand, but the initial phase (which is generally the most challenging) is slightly made easier. The less momentum you can use to complete the press, the more challenging the exercise becomes.
The tuck position also lessens the lever to make the exercise a tad easier.
How to perform☝️
- Set up for your handstand entrance with pike position and legs together.
- Enter the handstand by jumping with both legs simultaneously.
- After the jump tuck in your legs.
- Pull your hips to align over your shoulders.
- Complete the handstand by extending your legs into the straight position.
- Repeat for reps.
Coaching Pointers🎯
- Use small jumps first to find the right amount of momentum to get into the 90-degree position with your legs
- Use both legs equally for jumping
- Push tall with your shoulders
- Before extending your legs, make sure you already have the balance with the tuck position
👊Jumping straddle to handstand
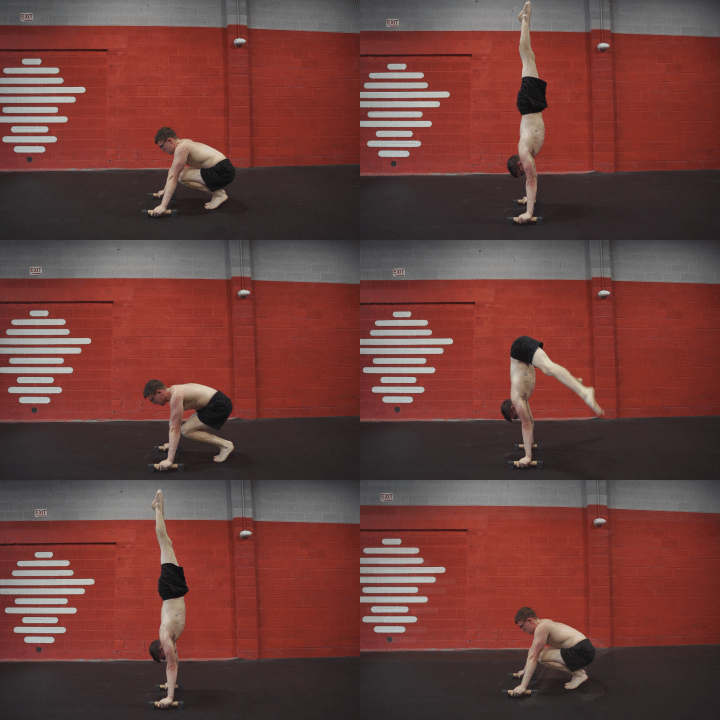
Level up from tuck to a complete straddle. The same principle follows. Jump to make the initial phase more manageable then complete the press but with a straddle.
How to perform☝️
- Set up for your handstand entrance with pike position and legs together.
- Enter the handstand by jumping with both legs simultaneously.
- Pull your hips to stack over your shoulders.
- Then quickly straddle outward your legs.
- Complete the handstand by pulling them together into the straight handstand.
- Lower back to the starting position.
- Repeat for reps.
Coaching Pointers🎯
- Use small jumps to find the right momentum for you to initiate the press up
- Use both legs equally for jumping
- Scapula fully elevated
- From legs together, straddle your legs outwards as you get your hips in the right position
- Lock out arms
👊Jumping pikes to handstand
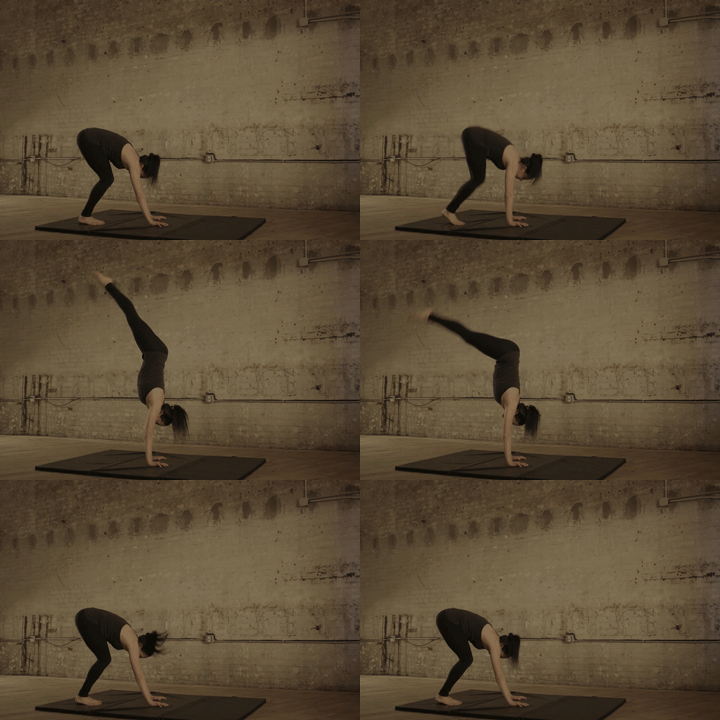
We make the exercise more challenging by keeping the legs together. This pike position extends the body lever consequently making the press heavier.
How to perform☝️
- Set up for your handstand entrance with pike position and legs together.
- Enter the handstand by jumping with both legs simultaneously.
- Pull your hips to stack over your shoulders.
- Continue the press into the handstand while keeping your legs straight and together.
- Lower back to the starting position.
- Repeat for reps.
Coaching Pointers🎯
- Use small jumps to find the right momentum for you to initiate the press up
- Use both legs equally for jumping
- Scapula fully elevated
- Lockout arms
👊Jumping wall facing press
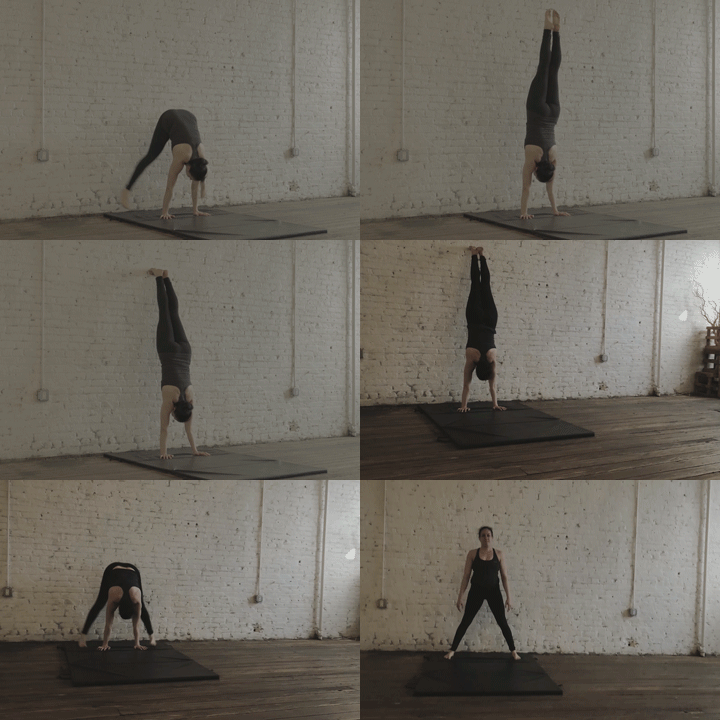
The purpose of this exercise is to develop strength with the hand and shoulder positions closer to the real freestanding press to handstand. However, assistance is still provided by the jump. The wall will guide your press to have a more controlled manner and using less momentum.
How to perform☝️
- Stand a few feet away from the wall with your back facing it.
- Position your legs into a straddle.
- Bend over into a position comfortable for to jump into a handstand.
- Jump with both legs then complete the straddle outwards.
- Finish the press into a full handstand.
- Reset and repeat for reps.
Coaching Pointers🎯
- Use small jumps to find the right momentum for you to initiate the press up
- Use both legs equally for jumping
- Scapula fully elevated
- Lockout arms
- Use the wall to guide your press with the least possible momentum
👊Standing wall press (straddle)
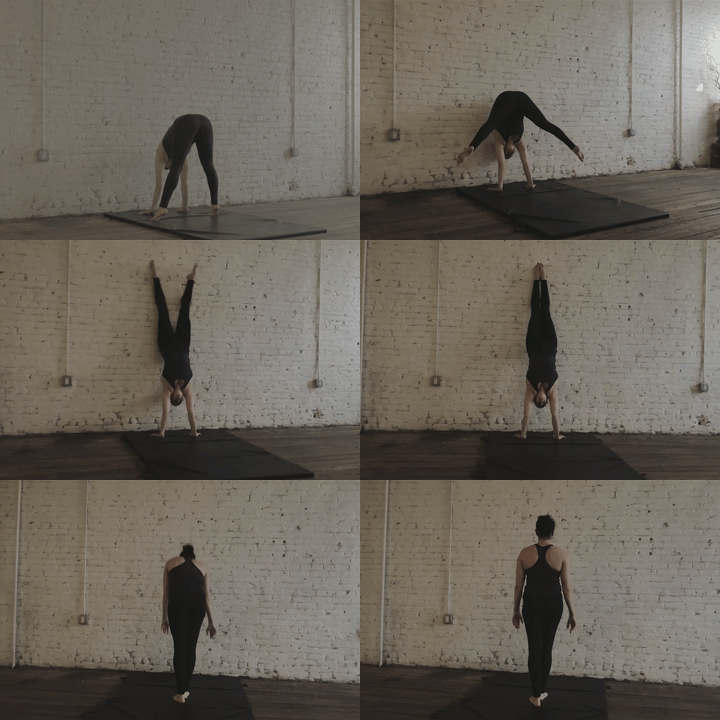
This is the full range of motion of the standing press to wall handstand but with wall assistance. Compared to the other wall-assisted variations, this follows the complete range from lift off to complete handstand, and back to the starting position.
The aim for this exercise is to go as slow as possible when going through the movement.
How to perform☝️
- Stand in front a wall enough so you have ample support for a handstand.
- Place your hands in front of the wall while pike at the hips.
- Press the floor and pull your hips into the wall.
- Follow up by straddling your legs outwards and pressing up into a complete handstand.
- Lower back down and reset.
- Repeat for reps.
Coaching Pointers🎯
- Straight lockout arms
- Press your body against the wall
- Follow through your straddle only after feeling weightlessness with your legs
- Hands further away from the wall, the easier
- Hands closer to the wall, the harder
👊Eccentric press to handstand
We come back to the eccentrics but with no more wall assistance. Before using this progression, you should make sure you already have mastered the previous progressions because this exercise is demanding while requiring you to balance yourself on your two arms.
How to perform☝️
- Jump into your freestanding handstand with proper straight technique.
- First move your legs outwards into a straddle.
- Begin the eccentric by slowly compressing your hips then follow through with your legs.
- Lower down until feet is on the ground.
- Repeat for reps.
Coaching Pointers🎯
- Make necessary balance corrections as you lower down
- If you have good mobility, you want to maintain a closer to 90-degree shoulder flexion even as you lower legs down
- Lower as slow as possible
👊Elevated press to handstand
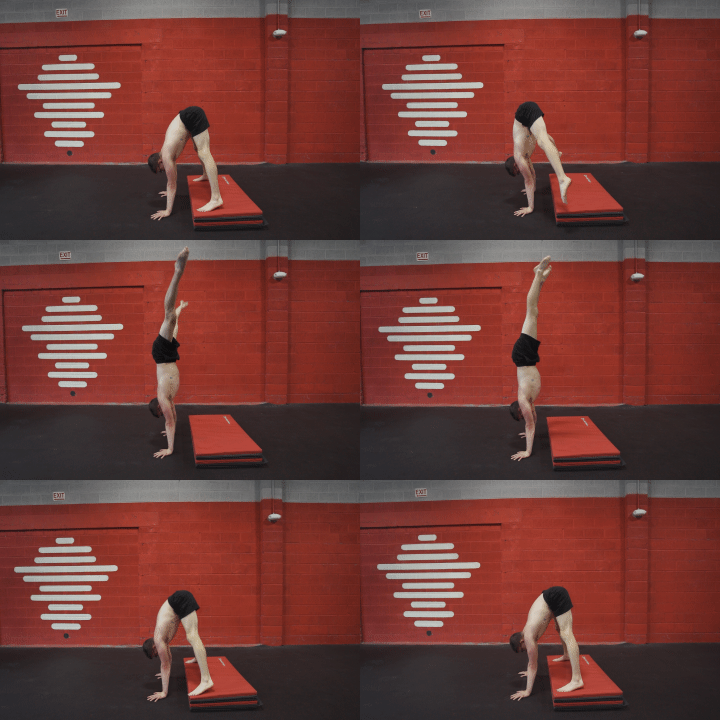
After mastering the eccentric with no assistance, the next step is to work on the concentric phase. Limiting the range of motion by placing your feet on an elevated surface is a great way to stay progressive with the upward movement.
The elevated press to handstand can easily be scaled. You can start off by placing your feet on a higher elevation. Gradually decrease the height until you can do the full range of motion with feet starting from the floor.
How to perform☝️
- Prepare an elevated surface where you can place your feet.
- Place your hands on the floor to go into a supported handstand position where your feet are planted on the elevated surface.
- Begin to place weight unto you arms.
- Shift your weight forward until you can feel weightlessness with your legs.
- Complete the press to handstand motion.
- Repeat for reps.
Coaching Pointers🎯
- You can easily scale the difficulty of the exercise. The higher your feet is, the easier to start the press. Conversely, the lower your starting point, the harder.
- Gradually decrease the height of the starting point until you can press from the ground.
- Lock out arms
- Full body tension
- Even an inch of height will feel a difference so progress gradually to avoid injuries and frustrations
SKILL🤸
This entrance to handstand doesn’t rely on pure strength alone. You need proper timing, coordination, and technique to fully execute the skill correctly.
In the skill element, we’re going to breakdown the movement pattern so you can efficiently learn the skill.
There are four specific learning points for this skill:
- 🌟The hip positioning to create balance for lift off
- 🌟Shoulder placement for better both balance and control
- 🌟Leg movement to get a feel of the pathway
- 🌟& combining all these elements together
🤸Supine pike
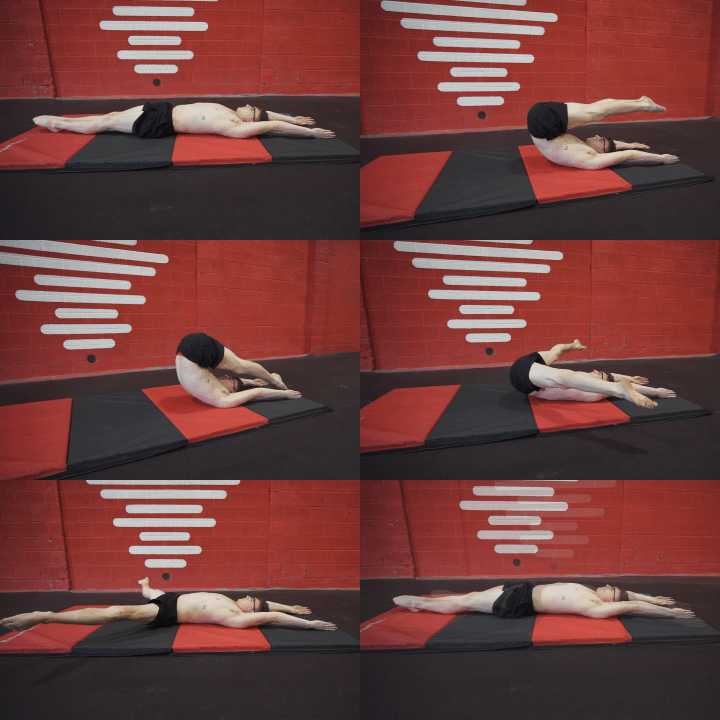
A commonly neglected skill aspect on press to handstand is the lower body movement. The supine pike will help you understand the movement pathway for the press to handstand.
You don’t just lift your legs off of the floor when pressing. It’s actually a combination of hip compression and proper leg timing. Alongside with the lowerbody movement is the upper body forward lean which we will train on separately for easier understanding.
How to perform☝️
- Begin by lying on the floor in a supine position so facing up and legs together.
- Raise your arms overhead simulating a handstand.
- Tilt your hips backward to flatten your lower back against the floor.
- Pike your legs overhead by rolling your spine. Aim to touch the floor with your feet.
- Gradually lower your hips but while still maintaining compression and simultaneously straddle your legs apart.
- As your lower back touches the floor, your legs should be in a straddle split.
- Complete closing your legs to go back into the simulated handstand position.
- Repeat the motion for reps.
Coaching Pointers🎯
- Simultaneously close the legs and open up the hips once your lower back touches the floor
- Engage your core and lower body when performing the movement
- Use one controlled tempo as if performing the press to handstand
- Particularly engage your legs as you straddle with control
🤸Press to headstand
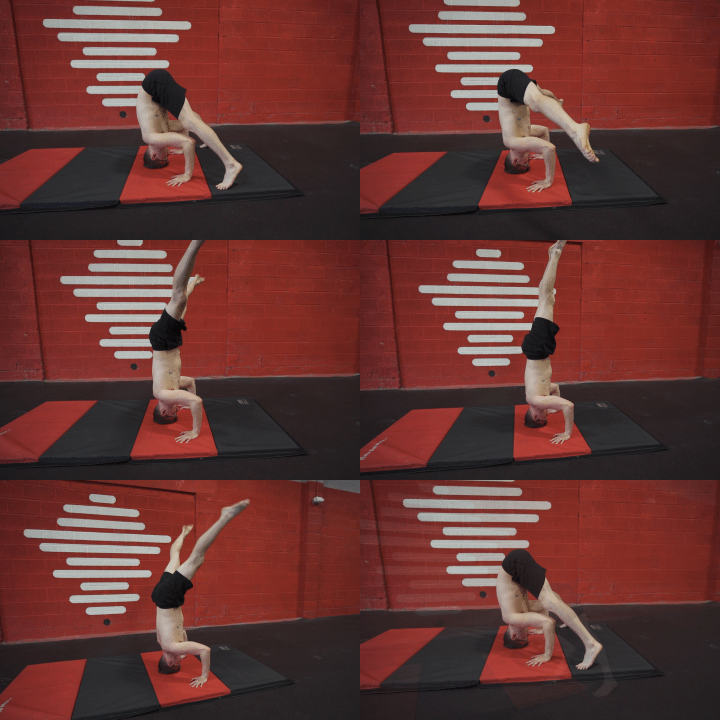
You can also train the lower body movement from a headstand position. Performing the motion is much more manageable in a headstand since it’s more stable and requires a lot less balance. Take note that this exercise trains your lower back as well.
How to perform☝️
- Begin in a headstand position with your two arms in front of you and straddle your legs.
- Align your hips to stack over your shoulders.
- Follow through with your legs upward to complete the press into a straight headstand position.
- Reverse the motion with control.
- Repeat for reps.
Coaching Pointers🎯
- Engage your core and take special attention in your lower back engagement
- Activate your whole legs when pressing. Pointing your toes helps in activation
- Be sure to have a stable headstand before attempting this exercise
- Pressure should be equally distributed unto your head and hands. However, expect more weight on your hands during the start of the press
- Loading should be in the top center of your head
- Stack your hips over your hands before pressing upward with your legs
🤸Press position hip raises
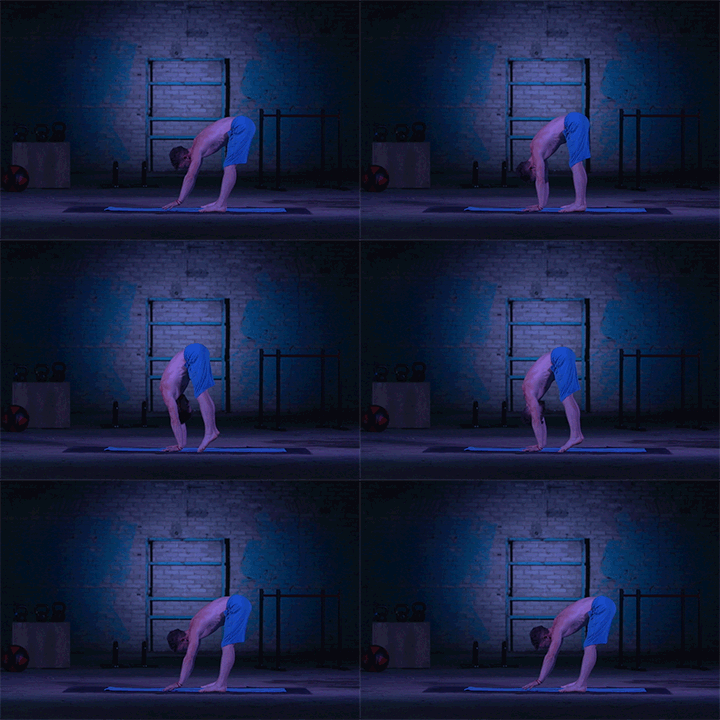
As mentioned in our introduction article to press to handstand, you need to raise your hips until it’s stacked over your wrists. This is crucial for be able to lift your legs off the floor. This exercise mainly focuses on proper hip position before lift off and also trains forward lean requirement for press to handstand. You can’t raise your hips if you’re not leaning forward.
How to perform☝️
- Begin in a standing position then bend over and place your hands in front of you as if starting a press to handstand.
- Shift your weight forward while simultaneously raising your hips and going into your toes.
Coaching Pointers🎯
- Better mobility will make the exercise easier since you can place your hands closer to your feet. This means your hips will be higher and will be easier to raise
- Better lower body mobility can help you stay in a more open shoulder position
- There should be less weight on your toes as you raise your hips and lean forward
- Maintain lockout arms and elevated shoulders
🤸Freestanding handstand to straddle negative
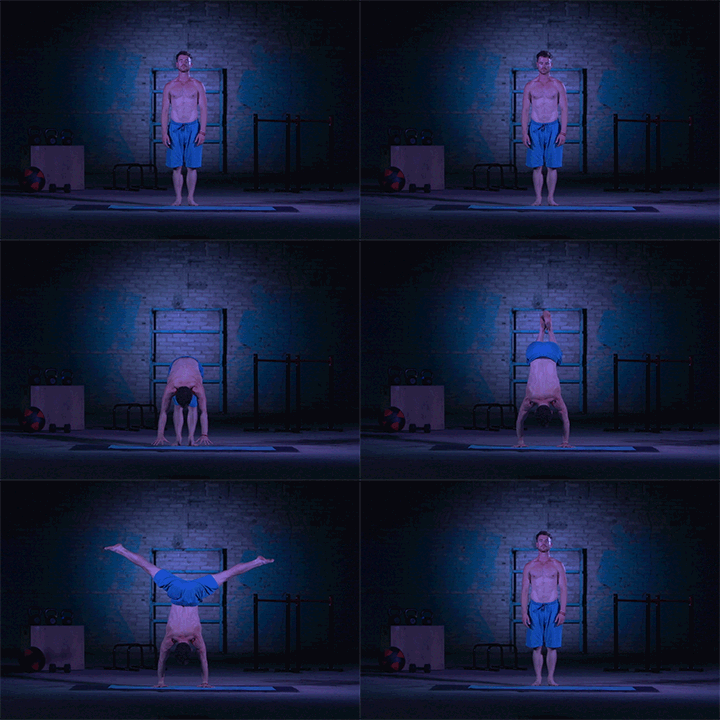
Although closely similar to the eccentric press to handstand, this exercise focuses on teaching you going into a straddle position when going down from a handstand.
The movement helps you get a feel for the straddle handstand which isn’t trained much when during the fundamental work.
In the The Movement Athlete app, we focus primarily on the straight handstand to build a strong foundation. It’s much more difficult to balance compared to a straddle so expect this exercise to be a lot easier in terms of loading. However, you need the proper coordination to lower down your legs at an equal rate which is crucial for our goal.
How to perform☝️
- Enter the straight handstand position.
- Brief pause to catch the position.
- Gradually straddle your legs outwards.
- Compress your hips towards your chest while maintaining your straddle.
- Safely land back to starting position.
- Reset and repeat for reps.
Coaching Pointers🎯
- Pay attention to the feeling of the straddle position during the handstand. It will feel lighter but the leg position might be unequal at first.
- Aim to lower down equally your legs
- Staddle first before moving your hips
- Shoulders fully elevated
🤸Freestanding handstand hold
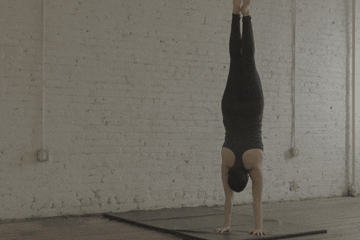
If you want to master the press to handstand, then you should be able to hold your freestanding handstand comfortable for at least 10 seconds.
While longer hold time isn’t necessary, it’s better to have it to ensure you have better control with your handstand. Continually training your freestanding handstand can act as a warm-up for your presses and helps you further improve your handstand balance and control.
For more help on freestanding handstands, read here: 📍The Ultimate Guide to Freestanding Handstand
How to perform☝️
- Begin in a standing position with arms raised overhead.
- Step one leg forward.
- Jump with the leading leg and swing your back leg upward into a handstand.
- Complete the straight handstand position.
- Hold the position for a specified time.
Coaching Pointers🎯
- Hips, shoulders, and wrists stacked over each other for maximum balance
- Aim to balance most of the weight unto the middle of your palm
- Hollow body hold
- Full body tension
- Open shoulders as much as possible
- Maintain balance through corrections through your wrist only. However, you can also balance with your shoulders and hips but avoid changing your leg position
🤸Freestanding handstand tuck
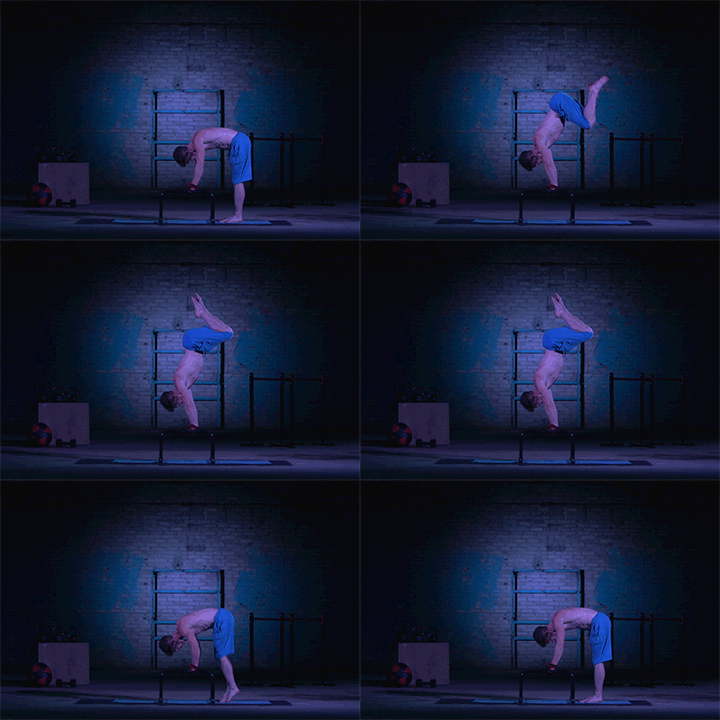
Have you ever heard of the saying, “tuck so you don’t suck”?
The freestanding tuck handstand is a handstand variation that will force you to improve your overhead shoulder mobility and other back muscle stabilizers. This will transfer to other handstand developments such as press to handstand.
The lower center of gravity of the exercise makes the position easier to balance, but much heavier to hold because of the required end range of shoulder flexion.
How to perform☝️
- Enter your straight handstand.
- Slowly tuck your feet towards your knee and compress your hips.
- Hold the position for a specific amount of time.
Coaching Pointers🎯
- You need to open up your shoulders to get the most from this exercise
- Compress your hips to that your legs are infront of you instead of your feet at the back
- Adjust gradual range of motion if needed
- You can use a wall at the beginning to get a feel for the movement
🤸Freestanding handstand Frog tuck
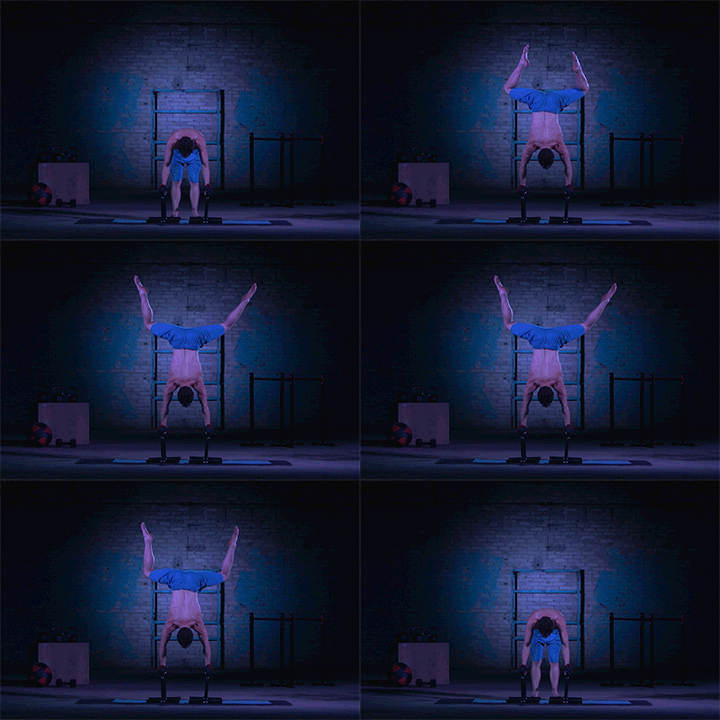
This is a variation of the exercise above but with an open hip position making it feel a bit closer to a straddle. It works similarly to a tuck handstand so it also improves your overhead flexibility and back muscles for better handstand control.
How to perform☝️
- Enter your straight handstand.
- Slowly tuck your feet towards your knee and compress your hips.
- Open up your hips while maintaining the tuck.
- Hold the position for a specified time.
Coaching Pointers🎯
- You need to open up your shoulders to get the most from this exercise
- Compress your hips to that your legs are infront of you instead of your feet at the back
- Adjust gradual range of motion if needed
- You can use a wall at the beginning to get a feel for the movement
MUSCLE💪
In a study, the size of muscles can affect it’s total power output. And since press to handstand has specific strength demands, we’re going to build up our muscles to further improve our strength.
In the muscle element, we’re going to primarily work on the front of the shoulders or anterior deltoids. This muscle bears the most weight during the press to handstand. It will also prepare your wrists which also acts as stabilizers to maintain the handstand position.
A 2013 study shows that having more strength can translate to better handstand balance and quality. We can extrapolate from this data that gaining more strength can also provide better handstand presses which is why we’re also improving our muscle size for strength.
Muscle-size and force production isn’t as straightforward to explain. However, current research suggests that bigger mussels can lead to better strength potential.
💪Decline push-ups
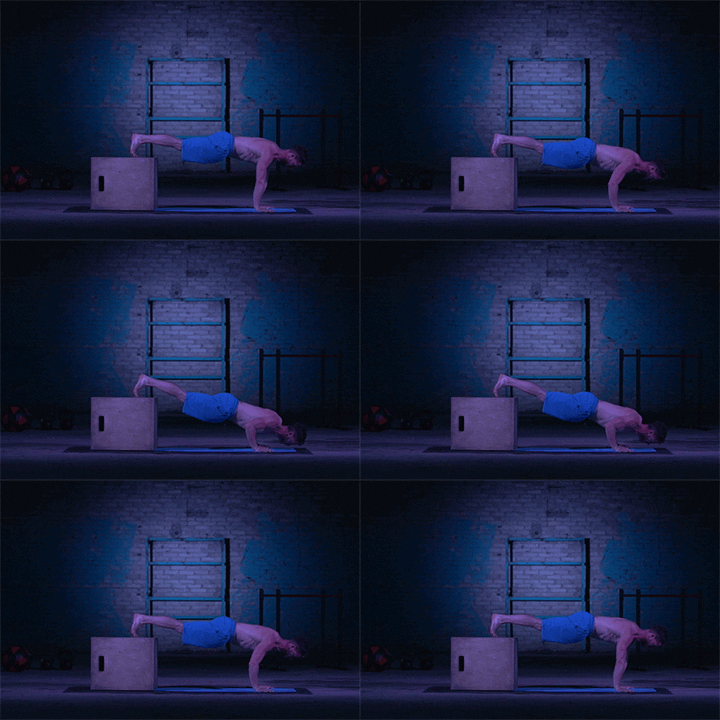
Decline push-ups is your starting point for muscle-building and strength development potential. This is basically follows a regular push-up motion but with feet elevation to shift the loading more onto your shoulders.
The decline push-up works your deltoids. But since your body is still in a more relatively horizontal position, you’re still primarily working your chest muscles. Still, this exercise is an excellent gateway towards the pike push-up.
How to perform☝️
- Prepare an elevated surface suitable for your skill level.
- Set up in a push-up position with your feet placed on the elevated surface.
- Adjust your body for a proper push-up starting position.
- Lower your body down until your chest lightly grazes the floor.
- Push back up to the starting position.
- Repeat the motion for reps.
Coaching Pointers🎯
- Shoulders depressed and scapula protracted
- Let scapula retract as your lower down
- Full range of motion
- Slight forward lean as you go down
- Maintain rigid torso
- Elbows tuck close to your body
- Hands positioned comfortably based on your body anthropometry
💪Pike push-ups
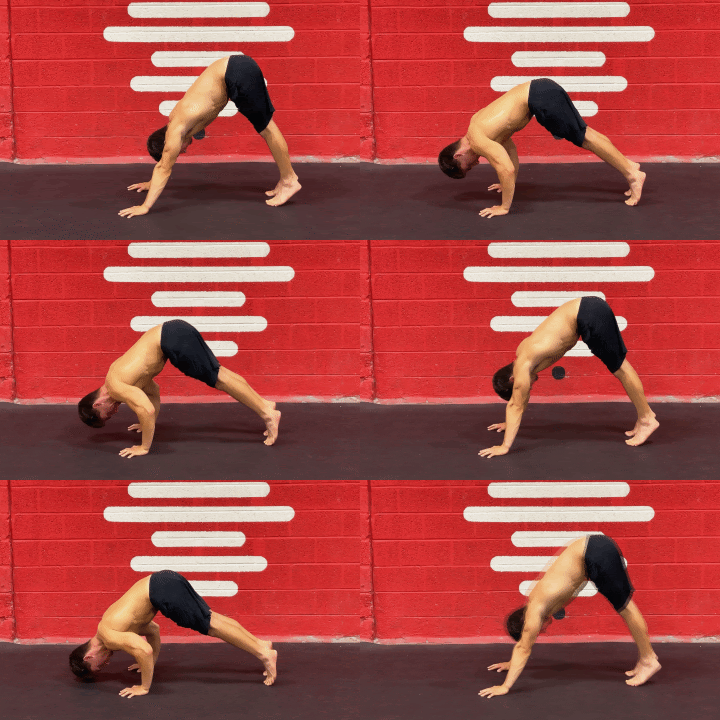
Pike push-ups are the best strength foundation for your shoulders. It builds general strength and specific overhead pressing strength for skills like handstand, press to handstand, and planche.
How to perform☝️
- Begin in a push-up position.
- Walk your hands closer to your feet so that you enter a piked position or a downward dog.
- Shift most of your weight unto your hands.
- Lower your body until your head lightly grazes the floor.
- Push back up to the starting position.
- Repeat for repetitions.
Coaching Pointers🎯
- Maintain forward lean so that the weight is always on your upper body. Legs only for assistance
- Full range of motion until arms straight at the top
- Elbows tucked
- Shoulders elevated at all times
- Stay on your toes
- Upper torso follow a diagonal descent
- Avoid moving your torso to a more horizontal position when going down. This is usually a compensation for weak shoulders that uses more of the chest muscles
💪Elevated pike push-ups
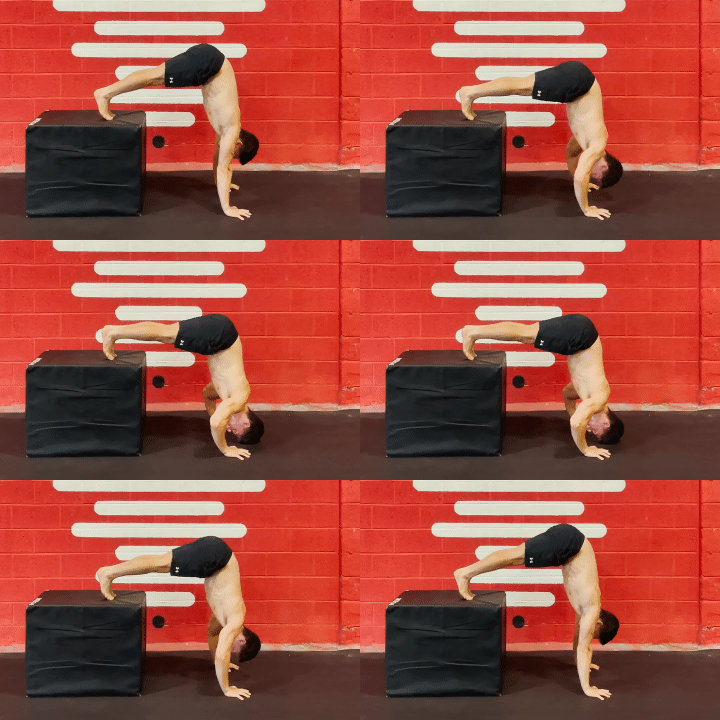
To increase the intensity of the pike-push up, we simply need to elevate the feet to lessen the assistance from your legs.
How to perform☝️
- Prepare an elevated surface suitable for your skill level.
- Set up in a push-up position with your feet placed on the elevated surface.
- Walk your hands closer to your feet so that you enter a piked handstand or an L-shaped handstand.
- Shift most of your weight unto your hands.
- Lower your body until your head lightly grazes the floor.
- Push back up to the starting position.
- Repeat for repetitions.
Coaching Pointers🎯
- Maintain forward lean so that the weight is always on your upper body. Legs only for assistance
- Full range of motion until arms straight at the top
- Elbows tucked
- Shoulders elevated at all times
- Stay on your toes
- Upper torso follow a diagonal descent
- Avoid moving your torso to a more horizontal position when going down. This is usually a compensation for weak shoulders that uses more of the chest muscles
- Gradually increase the height of elevation as you grow stronger
💪Wall handstand push-ups
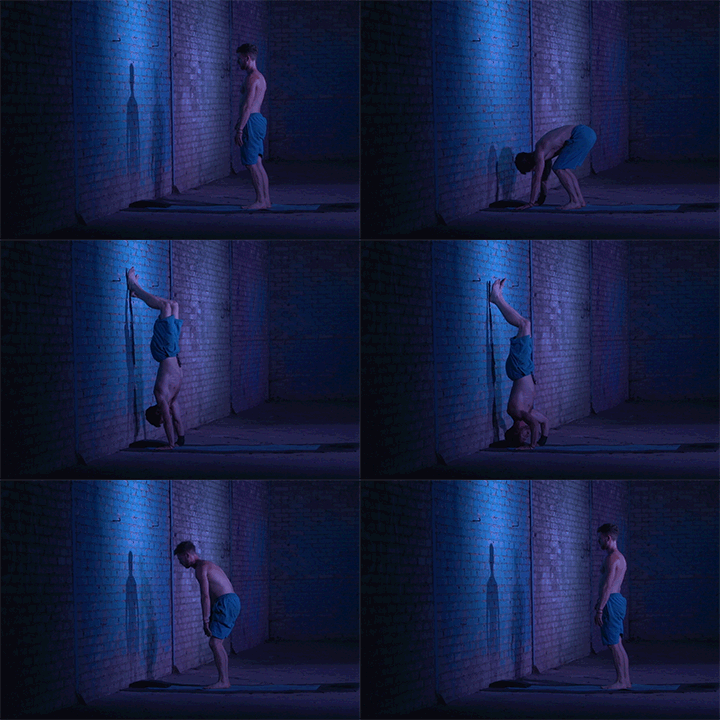
Wall handstand push-ups are basically pike push-ups with higher intensity. This removes the assistance from your lower body so that you’re pushing your full bodyweight with your upper body. The wall serves balance so we can focus on developing strength and muscle.
There are two options for this exercise: back against the wall, or chest facing the wall. The former is excellent for building the basic strength while the latter is better transferable strength for press to handstand because of the shoulder positioning.
Learn more about this exercise here: 📍9 Reasons Why You Should Start Learning Handstand Push-ups
How to perform☝️
- Get into a handstand position with your chest facing the wall.
- Lower down your body until your head light grazes the floor.
- Push back up to the starting handstand position.
- Repeat for repetitions.
Coaching Pointers🎯
- Elbows relatively close to the body
- Add forward lean when going down
- Full body tension
- Maintain hollow body and strong body posture
- Aim for full range of motion, but you can decrease the range when still learning. Minimal range might mean you’re doing this progression too early
- You can alternate back to wall with chest to wall.
ENDURANCE🏃
When working with press to handstands, we’re going to be training a lot of your core and shoulders. In the endurance element, we will be addressing these areas to maintain a high level of training capacity enough for developing strength, muscle, and technique.
🏃Wall handstand hold
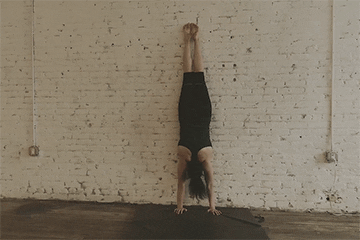
Our bread and butter exercise is the wall handstand hold. The handstand covers most of the essential components for press to handstand.
You can play around the variation you want to opt for. You can face the wall or have your back against the wall. However, freestanding handstand is not recommended since you can lose balance way before you exhaust your muscles enough.
How to perform☝️
- Stand in front of a wall with around 1 to 2 feet away from the wall.
- Place your handstand on the floor.
- Enter the handstand with your body relying on the wall for balance.
- Hold the position for a specified amount of time.
Coaching Pointers🎯
- Follow proper handstand protocols
- Fully elevated shoulders
- The wall will allow you to go longer without getting limited by balance
📌Takeaway
The press to handstand progression is quite extensive because of the elements you need to breakdown for more efficient and safer learning progress.
The journey to mastering this skill can take some time, especially if you haven’t mastered your foundations yet. However, following this progression will provide you a solid path towards press to handstand.
For even faster progress, you can work on mobility and flexibility as well. This make pressing more efficient to require less energy for the movement.
As mentioned earlier, these are developed from the exercises above as well as specialized work in the warm-up and cooldown section.
Know the best exercises for improving your range of motion for the press in this article: 📍Best Mobility Exercises for Press to Handstand.