
Do you ever wonder how some people can perform calisthenics with such ease and power while others struggle to establish themselves?
The secret often lies in the strength of an unsung hero: the lower back.💯
Embarking on your calisthenics journey without giving this key area the attention it deserves is like trying to build a house without laying a solid foundation.
👊This guide is your blueprint for fortifying your lower back. By integrating targeted exercises into your routine alongside comprehensive core strengthening, you will enhance your ability to perform challenging calisthenics movements and set the stage for a balanced, injury-free fitness journey.
Let’s start!
🤔Can You Train Lower Back with Calisthenics?
Can You Train Lower Back with Calisthenics?
Before we jump into our main topic, let’s address a crucial question: Can you actually train your lower back with calisthenics?
Absolutely, you can. Calisthenics isn’t just about flashy moves and high jumps; it’s a seriously effective way to strengthen various muscle groups, including that all-important lower back.
Now, why bother with your lower back? Well, it’s the backbone of your body’s strength. It supports your upper body and comes into play in most movements. Keeping it strong is key to good posture, reducing injury risk, and boosting your overall physical performance.
Read more about the 📍benefits of calisthenics to reducing your lower back pain here.
With calisthenics, you don’t need fancy gym equipment to target your lower back. Simple, effective exercises like bridges, supermans, arch holds, and reverse hyperextensions get the job done. These moves are great for working the erector spinae muscles along your spine, helping with everything from bending over to perfecting your posture.
And the best part? You can do these exercises pretty much anywhere—at home, in the park, you name it. Just remember to keep an eye on your form and take things one step at a time to avoid any mishaps.
🔥Lower Back Calisthenics Fundamental Progression
Knowing the roadmap through the basics is your golden ticket when starting with lower back calisthenics. I know jumping right into the tough stuff sounds way more exciting, but hear me out: getting cozy with the fundamentals is your secret sauce to nailing long-term gains and dodging injuries.
Think of this as your quest to build a powerful, stable, and flexible core tailor-made for those fresh to the scene, especially if you’ve little experience with lower back calisthenics. Perfect for calisthenics newbies or anyone who’s not yet a lower back wizard. We’re here to stack up that essential strength and flexibility, setting the stage for all the cool, advanced moves you’re eyeing.
Alright, let’s break it down:
What Exactly is a Progression?🎯
Visualize progression as the stages in a gaming scenario; each phase is a climb towards mastering an ability or enhancing your physical prowess.
For instance, you start with the simplest progression to conquer the squat. As you advance, each progression escalates in complexity and difficulty, similar to scaling up the levels in a game.
You’re introduced to exercises that fuse multiple facets, pushing your boundaries with every try. The aim is to unveil new challenges and grow stronger with each stride.
And here’s the fascinating part: the quest for progression doesn’t end once you’ve mastered the skill. It’s an ongoing pursuit of improvement, always keeping you engaged and aiming for loftier targets.
💥The Basis of Lower Back Training
Consider progressions as a journey map, directing you from the simplicity of basic moves to the sophistication of advanced maneuvers, eventually leading to a robust lower back.
When we tailor a training regimen for lower back fundamentals, we primarily focus on four critical areas:
- Strength
- Skill
- Muscle
- Endurance
Here’s a deeper dive into each area:
🤸SKILL WORK
Calisthenics is all about nailing technique. Think of skill exercises as your toolbox for polishing up your form, mastering essential movement patterns, and preparing your body for strength workouts. These exercises are chill—low intensity, not too many reps—and perfect for warming up or honing your technique. So, before diving into the tough stuff, let’s get those basics sharp!
👊 STRENGTH WORK
Strength acts as the backbone of our training journey. These exercises pave the way for you, transitioning from simpler variations to challenging demonstrations of strength. By integrating dynamic and static movements, you’ll perform various exercises to build a sturdy lower back.
💪 MUSCLE WORK
Here’s the deal: When your muscles get stronger, they also tend to get bigger. Muscle exercises focus on specific muscle groups with moderate intensity and higher volume to stimulate muscle growth and development. You learn how to really understand and control those muscles, squeezing out every last drop of goodness from each rep.
🏃 ENDURANCE WORK
Calisthenics often involves sustaining positions for longer durations. That’s where endurance exercises come into play. They’re all about building that grit to hold positions longer, pushing your hold times, and stretching your practice sessions.
Sure, it’s not as hardcore as lifting heavy, but endurance work is your secret weapon for lasting longer and getting tougher.
Mixing these four types of exercises – skill work, strength, muscle work, and endurance – is like the ultimate recipe for becoming a calisthenics ninja: skilled, strong, and super adaptable.
And hey, while many coaches like to split these workouts across different days—you know, focusing on one type each day—the Movement Athlete program has it all dialed in to make you efficient. We are all about getting you fit and fabulous, completely streamlined and seamless; no more days of juggling.
Our Reasoning?
In an ideal world, athletes have unlimited time and resources to individually concentrate on specific training goals. But it’s often more practical to merge various training aspects into a single session. While professional athletes may follow a split routine,
The Movement Athlete program optimizes time and effort by combining skill, strength, muscle development, endurance, and flexibility in each workout.
Lower Back Fundamental-Why
This stage is designed for absolute beginners, targeting individuals who are just embarking on their journey to strengthen and enhance the flexibility of their lower back.
- 👊 Prerequisites
None: This level requires no previous knowledge or skill in lower back conditioning.
- 🎯 Goals
Mastery of Elevated Bridge (Bridge Prep): Focus on developing the flexibility and strength necessary to perform an elevated bridge, which enhances spinal mobility and strengthens the back muscles.
Mastery Back Plank: Aim to perform a back plank, targeting the lower back, glutes, and hamstrings, thereby promoting core stability and endurance.
- ⚡️ Priorities
The primary focus at this stage is to build foundational strength, improve spinal mobility, and enhance core stability through a series of targeted exercises. The priorities above ensure a well-rounded development that prepares the body for more challenging calisthenics exercises.
✨Lower Back Fundamental Progression and Training Structure
Skill training for the lower back is fundamental, and it is essential to recognize that building a strong and resilient lower back isn’t just about overcoming physical challenges. Psychological barriers play a significant role as well.
Psychological barriers to lower back training:
- 😢 Fear of Injury: Given the prevalence of lower back issues, there’s a common apprehension about exercises that might cause pain or worsen existing conditions. Overcoming this fear starts with understanding and trusting the process.
- 😢 Discomfort with New Movements: Starting any new exercise routine can feel awkward or uncomfortable, especially when it involves the lower back—a critical support structure for many movements.
To break through these barriers, beginners should start with foundational strength exercises that build confidence and familiarity with lower back engagement. For instance, beginning with simpler exercises like lower body lifts and arch holds can help build the base strength and confidence needed to tackle more advanced lower back exercises.
🌟Progression and Training Structure for Lower Back Fundamentals:
- ✊ Start with Basic Strength: To build a strong foundation, focus on exercises that enhance core stability and lower back strength, such as lower body lifts and arch holds.
- ✊ Gradually Introduce More Challenging Movements: As confidence and strength grow, slowly incorporate exercises that increase the demand on the lower back, like supermans and deadlifts with proper form and light weights.
- ✊ Emphasize Proper Body Alignment: Ensure a correct posture and alignment to maximize the benefits of each exercise and minimize the risk of injury.
- ✊ Develop Body Awareness and Control: Learn to recognize and correct your posture and movements during exercises. This awareness is crucial for advancing safely.
- ✊ Consistent Practice and Incremental Progression: Maintain a consistent routine, gradually increasing the difficulty and intensity of exercises. This approach ensures steady progress while minimizing the risk of overexertion.
- ✊ Incorporate Breathing Techniques: Proper breathing supports better performance and enhances focus and control during exercises.
🔑Key Reminders for Lower Back Training:
- ✔️ Maintain Consistent Exercise Routine: Regularity in your workouts is key to building strength and endurance.
- ✔️ Focus on Body Alignment and Control: Remember to maintain proper posture throughout your exercises.
- ✔️ Be Aware and Adjust: Listen to your body and make necessary adjustments to ensure exercises are performed safely.
- ✔️ Breathe Properly: Effective breathing supports exercise performance and helps maintain focus and control.
In The Movement Athlete App, the lower back calisthenics fundamental progression is a comprehensive pathway designed to unlock strength and stability in the core, particularly focusing on the erector spinae muscles.
No worries about planning your workouts; the app handles it all. Your program adjusts as you achieve new skills and progress, ensuring a seamless journey.
🔥Back Fundamental Training Plan🔥

1. 👊Strength Element
The strength element of lower back fundamentals emphasizes strengthening the muscles crucial for supporting and executing lower back movements.
Here’s a solid hint: the stronger those muscles, the better you’ll move, and the longer you’ll last in any physical hustle. It’s all about leveling up your game, from posture to performance.
And here’s the cool part: boosting your lower back strength isn’t just for fitness fanatics. A step-by-step progression takes you from “just starting out” to “look at me now,” making sure everyone can get in on the action.
Strength Progressions
Here’s a list of lower back fundamental exercises that work on your strength:
⚡️Bent Knee Lower Body lift

How to perform:
- Start Position: Lie on your stomach, legs straight and together, arms extended straight ahead next to your ears.
- Leg Curl: Squeeze your glutes and hamstrings, curling your legs towards your butt.
- Lift: Engage your lower back muscles to lift your hips and thighs off the floor.
- Extend Legs: Straighten your legs back out.
- Repeat: Continue with another repetition.
⚡️Hands Down Upper Body lift

How to perform:
- Starting Position: Lie flat on the floor, legs straight and together with toes pointed, arms extended along your sides.
- Movement: Pinch your shoulder blades together and lift your upper torso by pushing your hands down against the floor.
- Pause: Hold briefly at the top position.
- Lower: Gently return to the starting position with control.
- Repetitions: Perform the exercise for the specified number of repetitions.
⚡️Straight Leg Lower Body lift

How to perform:
- Starting Position: Lie on your stomach, legs straight and pressed together. Stretch your arms straight forward next to your ears.
- Movement: Engage your glutes and hamstrings to lift both legs off the ground as high as comfortably possible.
- Hold: Keep your legs lifted for a moment.
- Lower: Gently return your legs to the floor.
- Repetition: Perform the lift again, maintaining the form.
⚡️Elbow Upper Body Lifts

How to perform:
- Start: Position yourself face down, legs extended straight, pressed together, toes pointed.
- Arm Position: Bend your elbows, crossing your arms so your right palm rests on your left elbow and your left palm on your right elbow. Position your crossed arms above your head.
- Lift: Elevate your chest and head off the floor, maintaining your arms in their overlapped position above your head.
- Hold: Keep this lifted stance for a few seconds.
- Lower: Gently lower back to the starting flat position.
- Repetition: Continue with the exercise for the desired number of repetitions.
⚡️Upper Body Lifts-Arms by Ear

How to perform:
- Starting Position: Lie down on the floor, legs straight and close together with toes pointed. Reach your arms straight above your head, close to your ears.
- Movement: Engage your abdominal muscles, lifting your head and shoulders off the floor, keeping your arms straight beside your ears and your chin tucked towards your chest.
- Hold: Maintain this raised position for a few seconds.
- Return: Gently lower back down to the starting position.
⚡️Swimmer

How to perform:
- Starting Position: Lie face down, arms extended straight ahead by your ears, legs straight and pressed together.
- Movement: Lift your right arm and left leg simultaneously, as high as possible.
- Switch: Lower them back to the floor and lift your left arm and right leg.
- Full Superman: Finish the sequence by lifting both arms and legs together, keeping them straight.
- Repetitions: Continue the pattern for the specified number of repetitions.
⚡️Arch Ups

How to perform:
- Starting Position: Start by lying on your stomach, legs straight, squeezed together, and toes pointed. Stretch your arms forward, close to your ears, with your face facing down.
- Lift: Arch your back to raise both your chest and head from the floor while also lifting your legs and hips as much as you can.
- Lower: Gently return to the starting position.
- Repetitions: Perform the movement for the specified number of repetitions
⚡️Arch Hold

How to perform:
- Starting Position: Lie on your stomach, legs straight and pressed together with toes pointed. Extend your arms forward next to your ears, face down.
- Lift: Arch your back to lift both your chest and head off the floor while also lifting your legs and hips as high as possible.
- Hold: Maintain this position for the specified time.
2. 🤸Skill Element
⚡️Hip Thrust (One Leg)

How to perform:
- Setup: Sit with your mid-back against the edge of an elevated surface (like a bench). Position one foot on the ground so your knee is directly above your toes.
- Positioning: Lift the opposite foot off the floor, extending that leg forward.
- Movement: Drive through the heel of your grounded foot, engaging your glutes and hamstrings to lift your hips. Aim to create a straight line from your shoulders to your knees.
- Hold: Pause at the top of the movement, ensuring your hips are fully extended and aligned with your upper body.
- Lower: Carefully lower your hips back to the starting position with control.
- Switch Legs: Perform the exercise with the other leg, maintaining the same form and control.
- Repetitions: Alternate legs, completing the specified number of repetitions for each.
Equipment:
- High surface (ensure it’s sturdy)
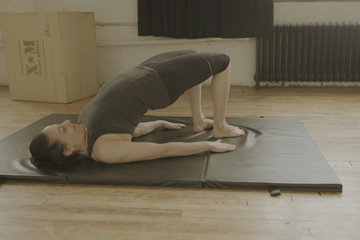
⚡️Yoga Bridge Lifts

How to perform:
- Start: Lie down on the floor, knees bent, arms straight by your sides.
- Lift: Press your hips upwards, lifting off the floor towards the ceiling.
- Hold: Keep your hips elevated for a few seconds.
- Lower: Gently return your hips to the floor.
- Repeat: Continue this movement for the desired number of repetitions.
3. 💪Muscle Element
⚡️Band Deadlifts

How to perform:
- Setup: Stand with a resistance band under your feet, gripping the other end with both hands. Keep your feet shoulder-width apart.
- Starting Position: Maintain a straight back and slightly bend your knees.
- Movement: As you straighten your legs to stand up, pull the band upwards, engaging your glutes.
- Return: Slowly lower back to the starting position, maintaining a straight back and slightly bending your knees.
- Repetition: Perform the exercise for the desired number of repetitions.
Equipment:
- Band
4. 🏃Endurance Element
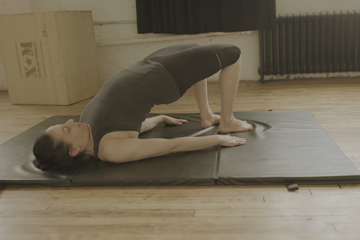
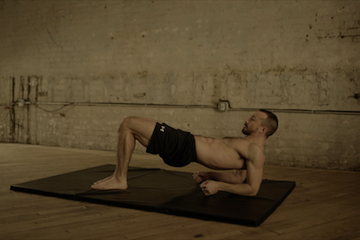
⚡️Yoga Bridge (Short Bridges)

How to perform:
- Start: Lie flat on your back with knees bent, feet flat on the floor, and arms resting straight by your sides.
- Lift: Press through your heels to raise your hips towards the ceiling.
- Hold: Maintain the lifted position for the predetermined time. (Recommended: 30-second hold for 3 sets.)
- Lower: Slowly lower your hips back to the starting position.
- Repeat: Continue the lifting and lowering sequence for the set number of repetitions.
⚡️Straight Leg Lower Body Hold

How to perform:
- Position: Start face down on the mat, arms by your side, palms facing down.
- Movement: Keeping your legs together, engage your glutes and press through your palms to lift your legs off the ground, aiming your feet towards the ceiling. Lift your hips off the ground as well.
- Hold: Keep your legs in the top position for the set duration.
- Lower: Gently return to the starting position.
- Repeat: Perform the exercise again for the recommended number of repetitions.
🙌Next Exercises After Lower Back Fundamentals
Once you have a solid grasp of lower back fundamentals, you can progress to more challenging exercises that further build strength, skill, muscles, and endurance.
Two awesome moves you can explore are the Elevated Bridge (kind of like the warm-up act for the full bridge) and the Back Plank. Think of them as your next steps after nailing the fundamentals. These exercises aren’t just a step up in challenge; they’re a whole new arena for your back strength and technique, each with its perks and hurdles to conquer.
💥Elevated Bridge (Bridge Prep)
Integrating the Elevated Bridge (Bridge Prep) into your routine fine-tunes your form for advanced challenges. This progression gradually enhances spine flexibility, back strength, and balance.
Achieving the perfect elevated bridge involves patience, skill, strength, and endurance. Progress might be slow, but with consistent, dedicated effort, mastering this exercise becomes smoother. Remember, success in this journey relies on trusting the process and staying committed.
1. 🌟Yoga Bridge (Short Bridges)
Strengthens the posterior chain and targets the glutes and hamstrings.
How to perform:
- Starting position: lay flat on the floor, knees bent, and arms straight on the sides.
- Movement: Press hips on the floor, hold the position for a specified time, and go down.
- Repetition: Perform the movement again
2. 🌟Yoga Bridge Lifts
Yoga Bridge lifts strengthen the posterior chain and target the glutes and hamstrings.
How to perform:
- Starting position: Lay flat on the floor, knees bent, and arms straight on the sides.
- Movement: Press hips up off the floor, hold for a few seconds, then lower back down.
- Repetition: Perform this for specified repetitions.
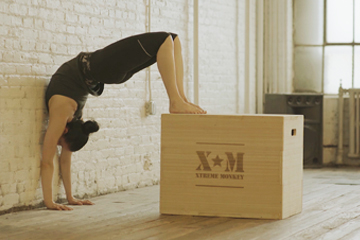
3. 🌟Box Laying Bridge
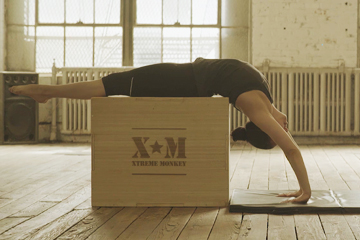
It requires good shoulder, wrist, and back flexibility. It targets the shoulders, forearms, and lower back.
How to perform:
- Starting position: Lay on the box, hands overhand, palms reaching down for the floor.
- Movement: Push up through the shoulders and keep the body straight.
- Hold: Hold the position for a specified time
Equipment: High surface
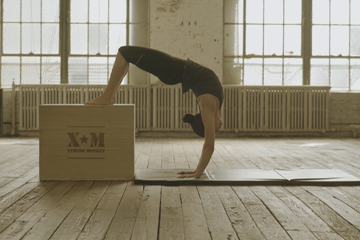
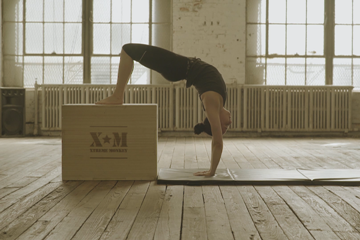
4. 🌟Box Bridge
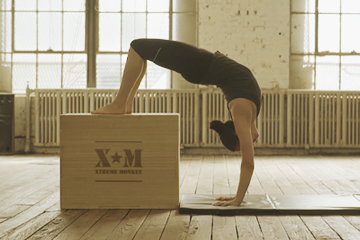
Your feet are elevated on the box, as this exercise increases back flexibility and works on the shoulder and arm strength.
How to perform:
- Starting position: Begin by sitting on a box, gently laying back onto the box, and scooting off towards the floor.
- Movement: Reach your palms toward the floor with straight elbows. Feet flat on the box, push up, elevate back and butt.
- Hold: Hold the position for a specified time, kick your feet over your head, and stand up straight to finish.
Equipment: High surface
5. 🌟Box Bridge Against the Wall
This exercise is done with feet on the box and chest against the wall. It targets hamstring, glute, deltoid, and arm strength.
How to perform:
- Starting position: Lay on the box, lower your upper back toward the floor, reach your palms toward the floor, and keep your arms straight.
- Movement: Push up through feet, back, and butt elevated. Walk hands toward the wall until your chest and arms touch.
- Hold: Hold the position for a specified time.
Equipment: High surface and wall
6. 🌟Box Bridge Rock
Your feet are elevated to the box while you repeat a rocking motion. This exercise increases back and wrist flexibility and improves shoulder and arm strength.
How to perform:
- Starting position: sit on the box, gently lay back onto the box and scoot off towards the floor.
- Movement: Reach your palms to the floor with elbows straight. Feet flat on the box, push u, elevating back and butt. Push through your shoulders, arms straight next to your ears. Rock shoulders over palms, then rock back head behind palms.
- Repeat: Repeat the movement, then kick your feet over your head and stand up straight to finish.
Equipment: High surface
7. 🌟Diamond Box Bridge
Focuses on the shoulder and back flexibility. Targets the deltoids, arms, glutes, and hamstring.
How to perform:
- Starting position: Lay on the box, reaching hands for the floor.
- Movement: Push up into a bridge, arms straight, next to your ears. Form hands into diamonds.
- Hold: Hold the position for a specified time.
Equipment: High surface
8. 🌟Diamond Box Bridge Rock
A dynamic exercise that engages your deltoids, arms, glutes, and hamstrings, offering a comprehensive workout. It’s specially designed to enhance shoulder and back flexibility
How to perform:
- Starting position: Lay on the box, reaching hands for the floor.
- Movement: Push up into a bridge, arms straight, next to your ears. Form hands into diamond and gently rock forward and backward.
- Repetition: Repeat movement as specified.
Equipment: High surface
9. 🌟Elevated Bridge
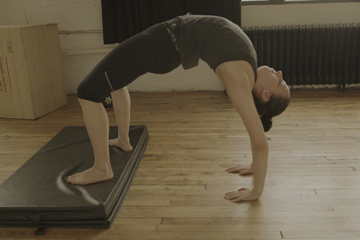
This exercise elevates the feet on a mat. It targets the arms, deltoids, trapezius, and hamstrings.
How to perform:
- Starting position: Lay on your back with your feet elevated on a mat.
- Movement: Place hands next to your ears, knees bent, and press up into a bridge.
- Hold: Hold the position for a specified period.
Equipment: Mat or block
Getting this skill down unlocks the door to the bridge—you know, that awesome move that not only powers up your glutes and hamstrings but also gives your back and shoulders a nice stretch. Plus, it’s a killer way to amp up your core stability and really zero in on those abs.
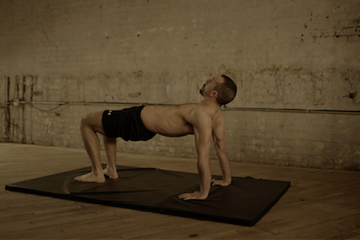
💥Back Plank
Diving into back fundamentals also opens up the world of the back plank – a super exercise for core strengthening that gets a bunch of muscles in on the action. Picture holding yourself in a plank, but it’s like you’re defying gravity from the backside. It’s an isometric hold that calls on your abs, obliques, glutes, hamstrings, triceps, and deltoids to work in harmony. Pretty cool, right?
Here are the progressions to the ultimate back plank:
1. ⚡️Crab Lifts

It’s a powerhouse for pumping up your upper and lower body strength, rocking that core stability, and boosting your flexibility. It’s like giving your whole body a high-five, all from the comfort of the floor.
How to perform:
- Starting position: Sit on the floor with your knees bent and feet flat, about hip-width apart. Place your hands behind you, fingers pointing towards your feet, slightly wider than shoulder-width apart.
- Movement: Engage your core and glutes to lift your hips up towards the ceiling. Aim to create a straight line from your shoulders to your knees, resembling a tabletop. Press down into your palms and feet to stabilize and lift higher, ensuring your arms are straight and your chest is open. Keep your head in a neutral position, eyes looking up or slightly forward
- Repetition: Repeat lowering and raising for a few repetitions.
2. ⚡️Crab Hold
The crab hold is your go-to move for giving those shoulders a good stretch and beefing up your core strength. Think of it as a chill hangout for your muscles where the hamstrings and glutes get some serious spotlight. It’s all about holding steady and feeling the burn in just the right places.
How to perform:
- Starting position: Sit on the floor, knees bent, feet flat and hip-width apart, hands behind you with fingers pointing towards your feet.
- Movement: Press into your hands and feet, lifting your hips into a reverse tabletop. Contract the abdominals and obliques, keeping the torso straight. Keep your chest open and your shoulders back.
- Hold: Hold the position for a specified time, then lower back down.
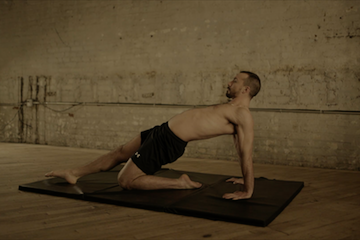
3. ⚡️One Knee bent Back Plank
The one knee bent back plank throws a cool twist into the mix—instead of stretching both legs out, you bend one knee up. It’s like giving your usual back plank a little personality. This variation still gives your abs, obliques, glutes, hamstrings, and arms a solid workout but with a different feel. Perfect for mixing things up and keeping those muscles guessing!
How to perform:
- Start Position: Sit up straight, legs extended in front of you, and place your hands behind you with fingers facing your butt.
- Movement: Legs together, left leg straight and right leg bent. Tighten your abdominals, obliques, and glutes to keep your hips lifted and body straight from the head through the extended leg.
- Hold Position: Maintain this position, ensuring your lifted leg, torso, and head form a straight line. Hold the position for a specified time.
4. ⚡️Knee Tucked Single Leg Back Plank
This exercise is great for strengthening your core and giving your quadriceps a good stretch. It mainly works out your abs, butt, hamstrings, the back of your arms, and your shoulder muscles.
How to perform:
- Starting position: Sit with your left leg bent, foot under you, and right leg straight. Arms extended behind you, palms down, and fingers towards you.
- Movement: Engage your glutes, hamstrings, and abs, lifting your hips towards the ceiling. Press through your right heel and arms, raising your hips as high as possible.
- Hold: Maintain for 5 seconds, then lower and repeat.
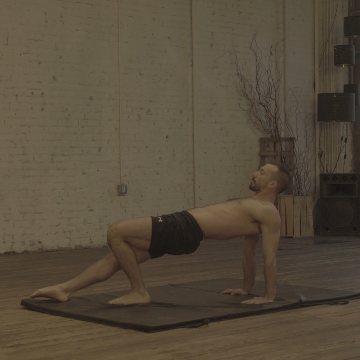
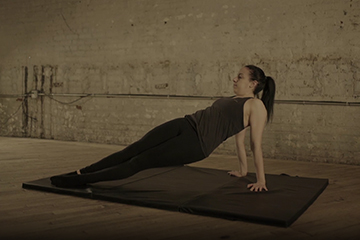
5. ⚡️Back Plank
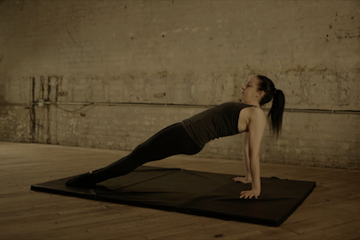
The back plank is like a team effort for your muscles, really firing up your core. It’s all about holding steady and getting those abs, side muscles, glutes, hamstrings, the back of your arms, and shoulders all working together.
How to perform:
- Starting position: Sit straight with legs extended in front, arms behind you, palms down, and fingers towards you.
- Movement: Tighten your glutes, hamstrings, and abs, lifting your hips towards the ceiling. Push with your arms to form a straight line from heels to ears.
- Hold: Hold the position for a set time, then lower and repeat.
6. ⚡️Back Elbow Tucked Plank
The Back Elbow Tucked Plank is all about giving your core a good workout while also hitting those hamstrings and glutes.
How to perform:
- Starting position: Lay on your back, using your elbows to elevate your shoulders and upper back. Bend your knees and place your feet flat on the floor, a few inches out from your butt.
- Movement: Contract your glutes and hamstrings while lifting your hips off the floor towards the ceiling. Contract abdominals and obliques.
- Hold: Hold position for 5 seconds, then lower back down and repeat.
7. ⚡️Back Elbow Plank

This exercise is all about strengthening your core by holding a steady pose. It works your abs, side muscles, butt, hamstrings, and both the back and front of your arms.
How to perform:
- Starting Position: Lay on your back, using your elbows to elevate your shoulder and upper back. Stand with your legs straight out towards the ceiling.
- Movement: Contract abdominals, glutes, and hamstrings while lifting hips off the floor towards the ceiling.
- Hold: Hold the position for 5 seconds, then lower back and repeat.
8. ⚡️Back Plank Pulses
A good core strengthening exercise, it engages the abdominals, obliques, glutes, hamstrings, triceps, and deltoids.
How to perform:
- Starting Position: Position yourself by sitting upright, legs stretched out in front of you, arms placed behind, palms pressing into the floor, and fingers directed towards your butt.
- Movement: Engage your glutes, hamstrings, and abs to lift your hips towards the ceiling, using your arms for a strong push. Aim for a straight line from your heels to your ears. For pulses, dip your hips halfway down, allowing your toes to lift while staying on your heels. Keep those glutes and hamstrings tight. Engage your core to lift your hips back to the top, letting your toes touch down again.
- Repetition: Do 4 pulses, then gently rest your hips to a seated rest.
9. ⚡️Back Plank Single Leg tucks
Instead of kicking with a straight leg, the leg here is bent. It’s still a full-body party, engaging your abs, obliques, glutes, hamstrings, and triceps. A little twist on the classic move to keep things interesting.
How to perform:
- Starting Position: Sit tall, legs stretched out in front, arms behind you, palms down, fingers pointing towards your rear.
- Movement: Tighten those glutes, hamstrings, and abs, lifting your hips towards the ceiling with a solid push from your arms. Aim for a straight line with your body. Then, lift your right leg, engaging your abs and obliques, and draw your knee to your chest.
- Alternating: Keep the rhythm going by switching legs back and forth.
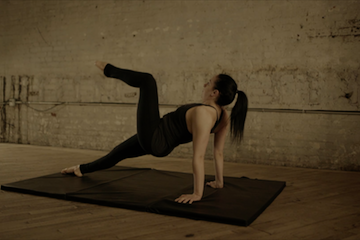
10. ⚡️Back Plank Kicks
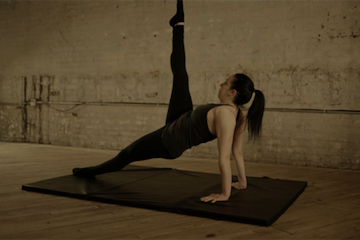
Taking the back plank up a notch, we dive into back plank kicks. Think of it as your regular back plank, but with a twist—you’re adding some flair with single-leg kicks. This move doesn’t just engage the usual suspects like your abs, obliques, glutes, hamstrings, and arms, but it also throws in a fun challenge.
How to perform:
- Starting Position: Sit up straight with legs extended in front of you and arms reaching behind, palms flat on the floor.
- Movement: Engage your glutes, hamstrings, and abs to lift up towards the ceiling, pushing firmly with your arms to create a straight line with your body. Start by lifting your right leg up with your toes pointed.
- Alternating: Lower back down and then lift your left leg straight up before lowering. Keep alternating between legs for the set duration.
11. ⚡️Back Plank Twists
Stepping up from the back plank, we’ve got the back plank twist – a bit of a challenge but oh-so-rewarding. This move is fantastic for shaping those obliques and hitting the abs, glutes, hamstrings, triceps, and deltoids. It’s like giving your body a full-circle workout while focusing on those twisty, rotational muscles.
How to perform:
- Starting Position: Sit upright, legs straight ahead, arms behind with palms on the floor, fingers towards you.
- Movement: Engage glutes, hamstrings, and abs to lift hips high, pressing firmly into your arms. Aim for a straight line from heels to ears, then twist hips right and left.
- Repetition: Continue twisting for the set time.
The exercises mentioned focus mainly on building strength. If you’re keen on boosting your skills, getting those muscles more defined, and ramping up your endurance, the Movement Athlete app has a whole set of progressions waiting for you.
These steps are perfect for cranking up the intensity and variety of your workouts, so you’re not only getting stronger—you’re upping your game, building stamina, and preparing for all kinds of physical feats.
🧐Frequently Asked Questions:
🔎What are the best calisthenics exercises for strengthening the lower back?
Some of the most effective calisthenics exercises for strengthening the lower back are hyperextensions, planks, and bridges.
🔎How often should I train my lower back with calisthenics for optimal results?
Training your lower back 2-3 times weekly is generally recommended for optimal results. This allows sufficient time for muscle recovery and growth while preventing overuse injuries.
🔎Can calisthenics help relieve lower back pain?
Yes, calisthenics can help relieve lower back pain by strengthening the muscles around the spine, improving posture, and increasing flexibility. Effective exercises include cat-cow stretches, pelvic tilts, knee-to-chest stretches, and many more.
🔎What are the key principles of lower back training with calisthenics to ensure safety and prevent injury?
To safely train the lower back with calisthenics, prioritize proper form, gradually increase exercise difficulty, ensure balanced training across all core muscles, start with warm-ups and end with cool-downs, and listen to your body to adjust workouts as needed to avoid injury.
💥Conclusion
The guide emphasizes the critical role of lower back strength in calisthenics, presenting a structured approach to building this foundation through fundamental exercises that focus on skill, strength, muscle, and endurance.
It outlines a progression-based training system designed to enhance core stability, flexibility, and overall performance while addressing the psychological aspects of training.
You can effectively strengthen your lower back by integrating targeted workouts into a consistent routine and emphasizing proper form and gradual progression. This will enable advanced calisthenics movements and a balanced, injury-free fitness journey.