📖 Read Time: 4 Minutes
🏋️ Join the tribe of Movement & Calisthenics Athletes
People just like you that are working with their own body weight to get strength, lose fat, build muscle, recover from injuries and live their best lives!
📋 TABLE OF CONTENT: The Ultimate Guide to Planche
1. 🧐What is a Planche? | 2. ✅Planche Benefits | 3. 🤸♀️Planche Requirements | 4. 📌Injury Prevention
5. 🔑How to Perform a Perfect Planche | 6. ☑Planche Progressions | 7. ⭐Expert Tips
8. 🍄Planche Drills | 9. 🔥Planche Workout | 10. 💪Equipment | 11. 🤩Advanced Variations
HOW TO PERFORM A PERFECT PLANCHE
Performing the planche looks simple enough to the naked eye but there are very important details that you need to be mindful of. 💪
Proper cueing and body preparation should first be learned before performing the move to maximize skill performance and mitigate risks of injuries. 🎯
Here are the steps in order to perform a full planche:
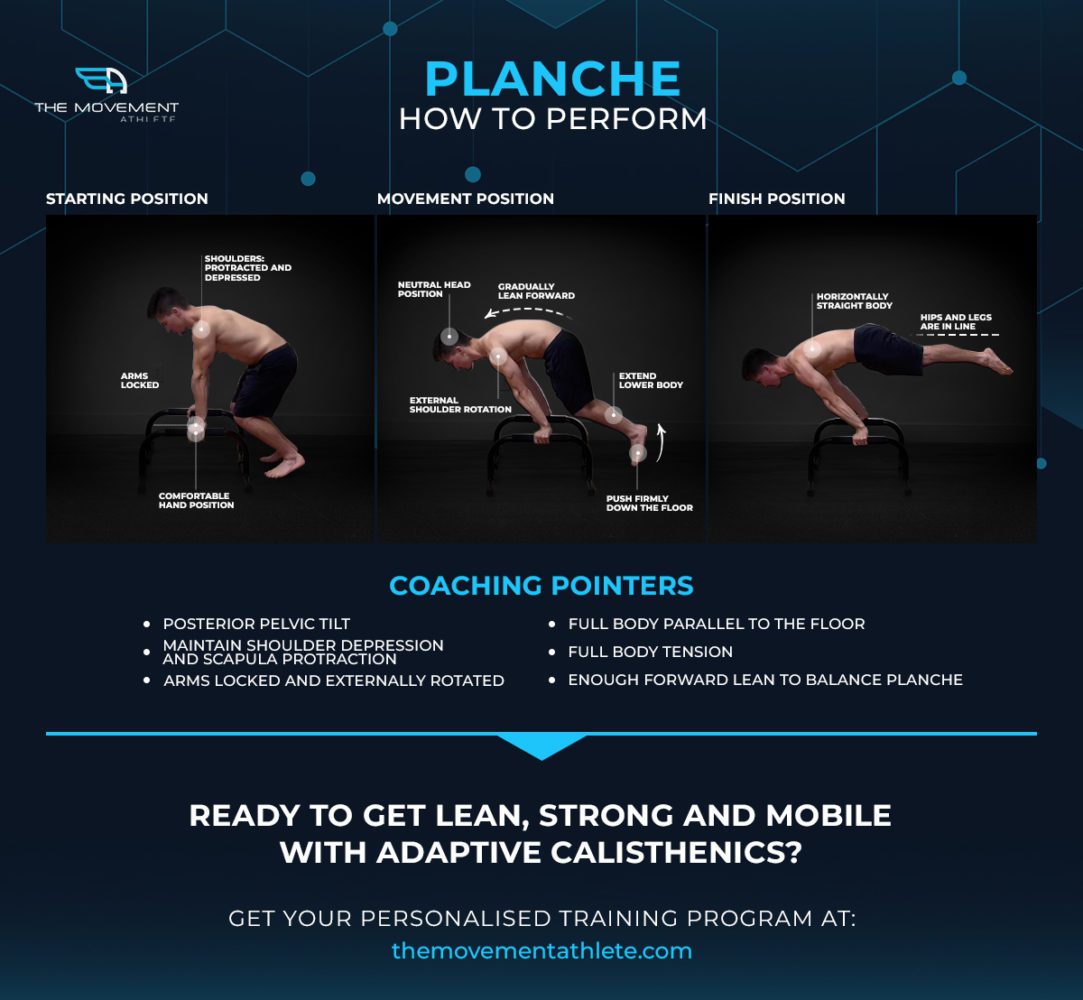
🤜 Step 1: Push-up Position
First step to going to the planche position is by preparing your body posture. At a glance, the full-planche hold is basically a push-up position with legs elevated, body parallel to the ground, and arms at an angle. So we’ll take advantage of that similarity by assuming the push-up position to begin. 🔄
What massively differs is the mental preparation and specific muscle activations.
As you assume the push-up position, prepare your form for the actual planche and activate the muscles you will be prioritizing when holding such as the scapula, wrists, and anterior deltoids. Don’t forget about the lower body as well! 🎯
Another difference could also be the foot position. Instead of having your feet planted on the ground, you have to point your toes so that your upper part of your foot is on the floor. This allows you to slide your foot easily as you move towards the planche position.
🤜 Step 2: Planche Lean to Full Planche
From the push-up position, lean forward while keeping the body line and posture for the planche. Continue leaning until your hands are aligned to your navel. The amount of lean will put more pressure on your wrists and shoulders, but less weight on your lower body. This will allow you to lift them for the planche position. ⚖️
The lean is essential. It is impossible to lift your whole lower body without this lean as this will place the center of gravity to the middle of your body, allowing balance for the planche hold.
🤜 Step 3: Full Planche Hold
When you reach the planche position, it’s a matter of holding the correct form and maintaining full body tension. 💥
📌 Keep in mind the proper form:
✅ Slight hollowed upper back – When you do the scapula protraction, you might think of it as the rounding of the upper back. That is not the case. A completely rounded upper back is a result of a closed chest. This shortens the serratus anterior making it unable to produce the maximum potential effort. Rounding of the upper back is a compensation for the lack of strength in your scapula.
✅ Aim for a neutral chest position – This will put more load on the shoulders and helps you maximize your body’s effort to hold the planche position. It might be more difficult at first but once you get stronger, the benefit outweighs the difficult journey. Plus it makes your planche look a lot better! ✨
✅ Protracted scapula – While maintaining the neutral chest position, have your scapula still protracted. It makes the move more biomechanically efficient as planche is already such an awkward position to hold.
✅ Shoulders fully depressed – Push your shoulders far away from your ears. This is an excellent cue to activate your anterior deltoids, one of the main muscles for planche. 💪
✅ Legs squeezed together – Full body tension is required for such an advanced skill. Squeeze the legs together in order to attain the tension as well as hold the position longer and better.
✅ Arms completely straight and locked – Planche is a straight-arm strength work. There’s no point in training the skill itself with bent arms. There are tons of other bent-arm work that can supplement planche training, but having your arms bend during the planche attempt will only teach you bad habits.
It might be frustrating as our bodies aren’t used to pushing with much effort while having our elbows completely locked out. Joint development is slow so respect this portion of the planche journey. ⏳
✅ Hands underneath the navel – As mentioned in our previous articles, you can only lift your legs if you are able to find the center of gravity of the position. The only way to do this is to lean far enough so that your hands are underneath your navel, basically the almost the center of your body. This motion requires you good shoulder strength, scapula mobility and of course, wrist strength and mobility.
✅ Upper and lower body parallel to the ground – Planche hold can only count if your body is parallel to the ground. It could be difficult to achieve at first, but it is the proper form of planche. Plus it looks so much cooler than having your body diagonal. 🔥
✅ Flat lower back – Arching of the lower back indicated compensation or weaknesses in other areas. It could also show weakness for the lower back itself. Always be mindful of your lower back as it leads you to what are your weak links that need to be addressed.
✅ Posterior Pelvic Tilt – Maintaining PPT allows maximum core activation, which obviously, vital for planche work and for maintaining a good bodyline and planche posture.
📌 For easier progression
The easier planche positions have the basic form: straight bodyline, rigid depressed shoulders, lockout elbows, neutral chest, protracted scapulas, and so on. 📋
The difference lies in the amount of lean and lower body position. More lean means more difficulty but paves your way to extending legs. Start from the tucked position then gradually extend it. You’ll also encounter open positions such as the straddle planche and the frog planche which spreads the weight of your lower body outwards, making it much easier compared to the full planche. 🐸
Attaining the planche doesn’t happen by accident. It’s achieved through countless hours of hard, but smart training. Making progress is done by working on specific planche progressions so you can build the necessary strength and mobility, specific for the skill. 🎯
Not sure where to start with your calisthenics training? Take our free assessment to get a personalized training plan that includes planche progressions suited to your current level.
You’ll learn more about the progressions in our next article: “The Ultimate Planche Progression“
Free Planche Training Guide
Download our complete guide to mastering the planche
Related Articles You’ll Love:
Ready to get started?
Get your free personalized training plan now