📖 Read Time: 8 Minutes
🏋️ Join the tribe of Movement & Calisthenics Athletes
People just like you that are working with their own body weight to get strength, lose fat, build muscle, recover from injuries and live their best lives!
🤔There are exercises that look very easy. Once you try it, you’ll realize you’re no way near executing the exercise in even just decent form. You find yourself researching about the move and see the difficulty of training to get there.
👉 Nothing great comes easy.
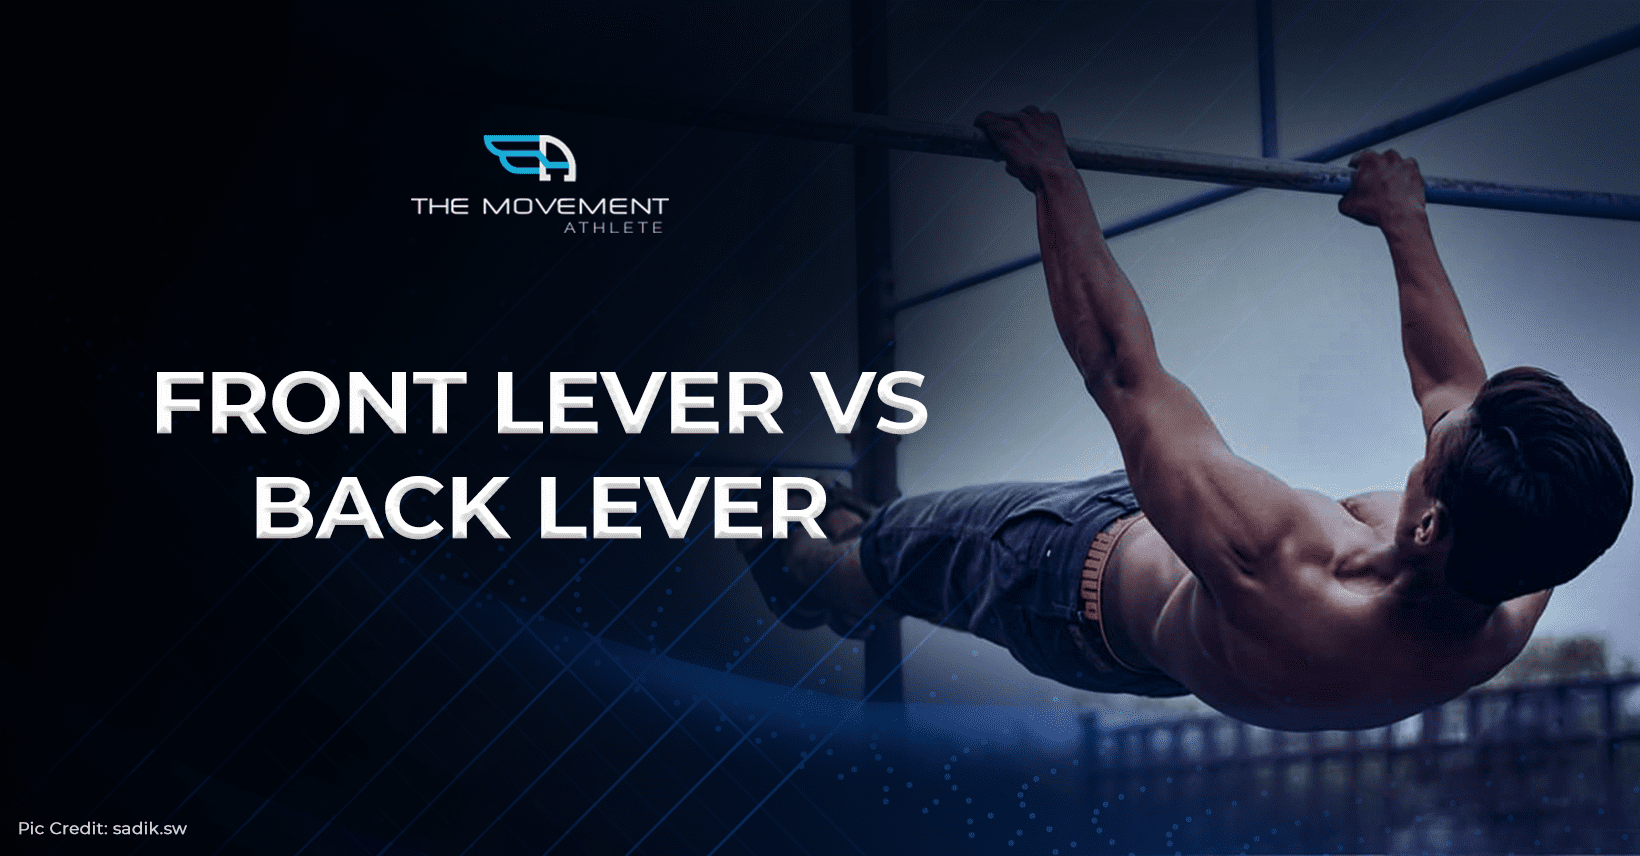
Good examples of these are the front and back lever. Yep, professional gymnasts and advanced calisthenics athletes can basically do it in their sleep. For us regular folk, it will take some time.
Don’t fret because they, too, didn’t learn the move in their first try. It took them hours and hours and hours of hustling and smart, hard training to get them. So this means it’s totally possible even for you.
Aside from looking extremely cool hovering in mid-air, these exercises have insane benefits. That’s why you’ve got to include them in your training routine in the long run.
📌Want to get immense upper body strength, especially with your lats (latissimus dorsi a.k.a. the largest muscles in the upper body) and amazing core strength? There’s no short to get there. You have to take your time. Take the necessary smart steps and do the work.
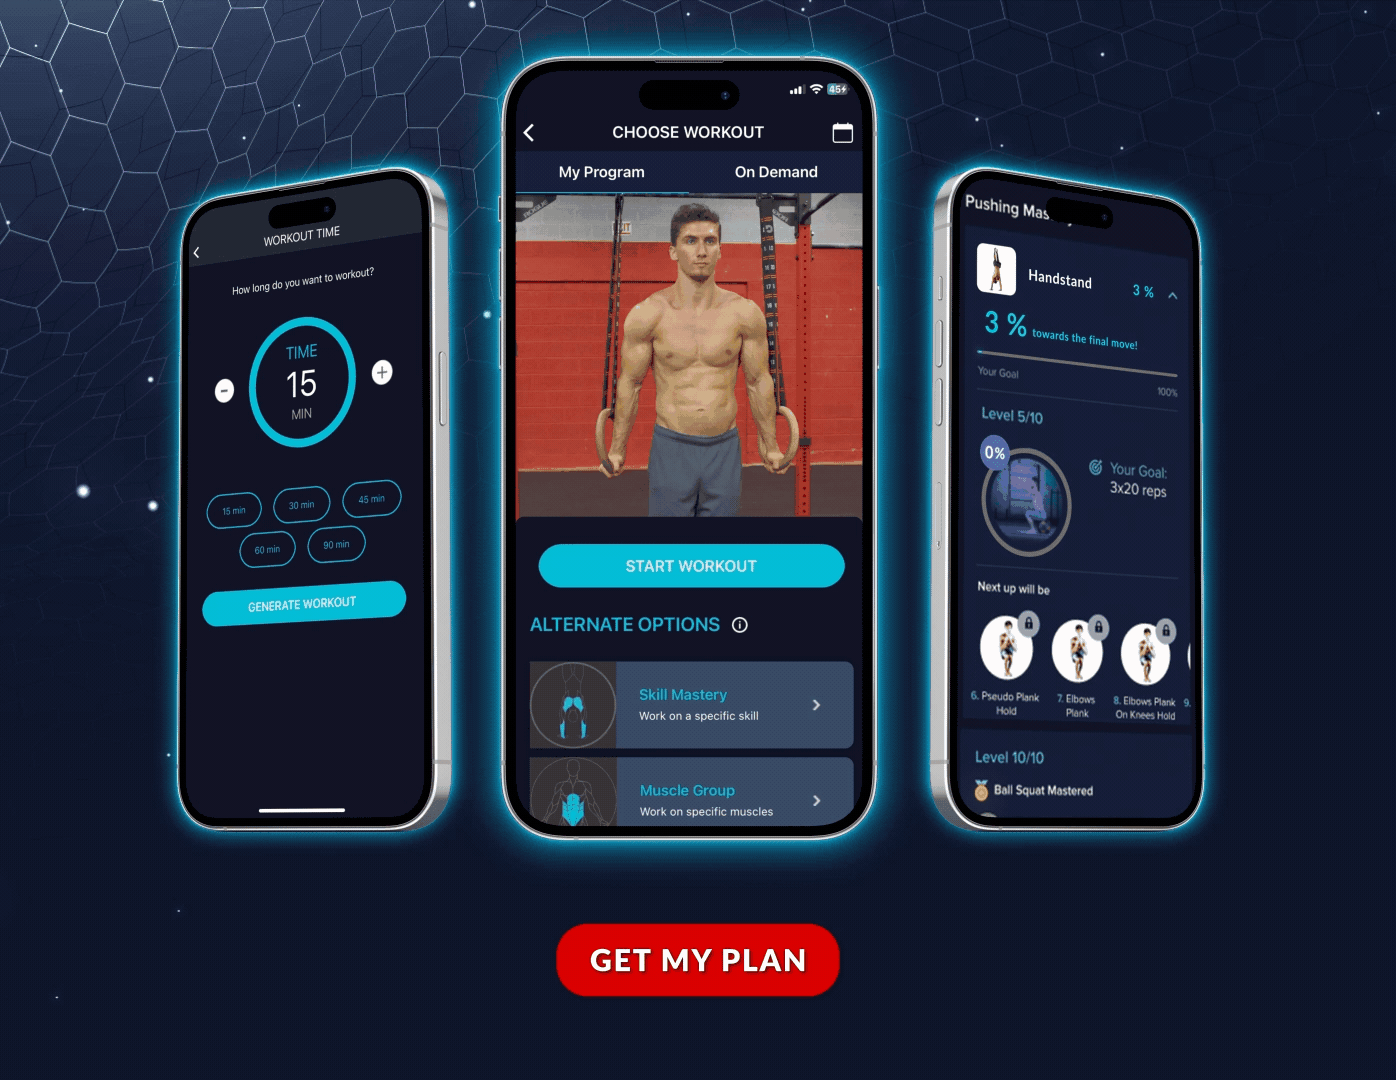
Incorporating front and back lever exercises helps you get there so better start including them in your calisthenics training! Not sure where to start? Take our free assessment for a personalized plan.
🎯 Here is a simple table to help you visualize the important muscles being activated for front and back lever:
Front and Back Lever Exercises: A Fundamental Gymnastics Strength
The front and back lever exercises we come and love today in calisthenics root from gymnastics. As mesmerizingly difficult the exercises look, they have rated a grade of A in the Gymnastic Code of Points. From their own grading scale, A to F, A is the easiest and F is the most difficult. Yes, front and back levers are all basic exercises and basic strength foundations in gymnastics. Just imagine how difficult the other exercises are?
These exercises provide enormous benefits which is why gymnasts take advantage of these exercises. Instead of using weights to get stronger, gymnasts train these, and even more difficult, exercises through progressions.
Progressions are basically a set of exercises that leads to the end goal. Leverage, range of motion, tempo and other biomechanics are manipulated to make an exercise easier or harder.
We’ll provide you progressions below for both front lever and back lever. Notice that they have fair similarity since they both make use of the lever component.
🧐 What is Front Lever Exercise?
We’ve said it before and we’ll say it again! These “easy” but “difficult” exercises have some insane benefits.
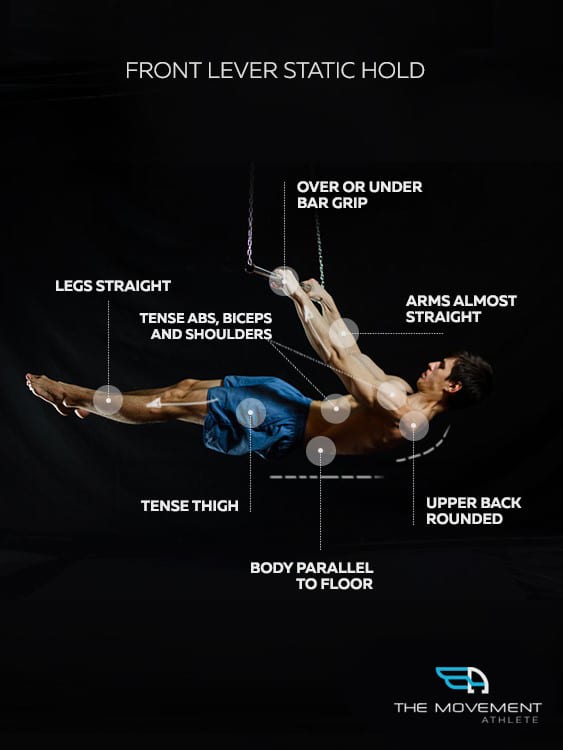
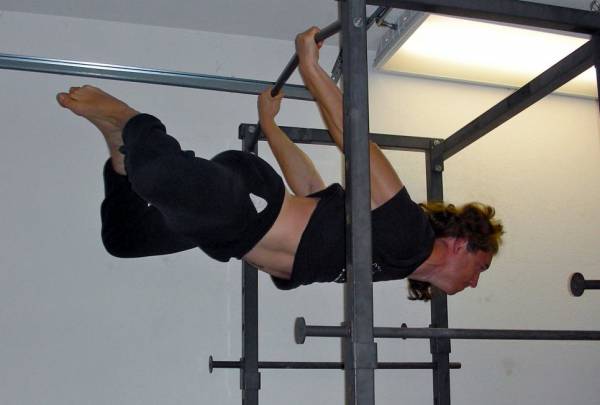
🤜A front lever exercise is a kind of Calisthenics movement that looks like an easy resting position, but is actually designed to build and develop your core strength. With the help of your back muscles, such as the lats, rhomboids, and spinal erectors, as well as your abdomen, you can maintain the proper posture during the movement.
However, make no mistake. A front lever is both difficult and cool-looking. It’s a common gymnastic move wherein a static hold is performed on still rings or a pull-bar, and the person is lowering his or her body from an inverted hang, until the body is completely straight and horizontal. With this position, it seems like the person is floating on air, or is in a rigid plank.
However, the front lever exercise is easier said (and seen) than done. It requires a high degree of back, straight-arm and core strength before you can do it. No worries. Even with all of what we said about the front lever being a difficult move, it is totally achievable by everyone.
If you think it’s something you WANT to achieve, then stay with us, and we’ll show you the proper progressive steps in attaining this exercise!
💪Perfecting the Front Lever
The front lever exercise is simple, but requires personal commitment, dedication, and focus to master. The steps to complete the exercise are done in a progressive manner to build the necessary strength to advance and to avoid unnecessary confusion from complicated, and ineffective shortcuts.
Here’s how you can perfect the front lever:
1. 👍 TUCK FRONT LEVER. This will be the first or the basic position as you advance in the training. To do this posture, grasp the bar within overhand grip. Pull your legs and hips up, at the same time leaning back. Your back should be rounded and your body tucked up like a ball. Try to keep your back approximately parallel to the ground.
2. 👍 ADVANCED TUCK FRONT LEVER. Begin with the tuck front lever position. Once your body is up, straighten your back (instead of a rounded one) and see that it forms a line parallel to the ground. At the same time, pull your shoulder blades back in retraction. You may open your legs slightly so that your thighs are perpendicular to the body.
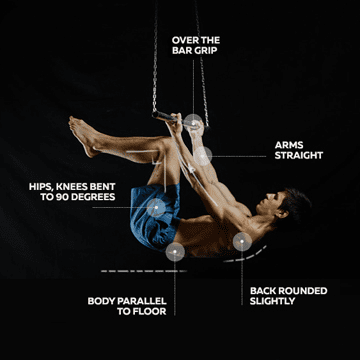
3. 👍 ONE BENT LEG FRONT LEVER. From your tuck front lever, extend your bent leg out so that it seems like it’s floating in the air. The lower leg will be perpendicular to the ground, with your hip opened up completely. If your leg feels wobbly or tired, don’t worry. You may alternate legs between practice.
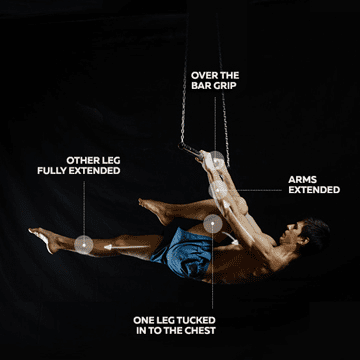
4. 👍 ONE LEG FRONT LEVER. A more advanced technique than the bent leg is this one! Front the first position, extend one leg out completely straight. That means your back, hips, and extended leg all make a horizontal line, parallel to the ground. The other leg, whichever side it is, will be tucked in hard to the chest.
5. 👍 ADVANCED ONE LEG FRONT LEVER. From the tuck front lever, extend one leg completely straight, and the other partially untucked and away from the chest. The foot of the untucked leg will be in line with the knee of the extended leg. Keep your back and straight leg parallel to the ground! This “halfway open” form is designed to increase the leverage dramatically. Alternate legs.

6. 👍 FRONT LEVER. Starting from the tuck lever position, keeping both legs together, gradually extend them out at the hips and knees, until they are completely straight. Your entire body should be a one straight line that is parallel to the ground. Pull down hard with the hands and the lats, as well as working the pulling-apart action to assist in stabilization.

With the progression of holds, you can definitely achieve this!
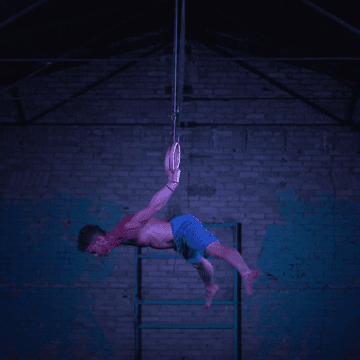
🧐 What is Back Lever Exercise?
Now let’s move on to the counterpart of front lever- the back lever exercise, which is on another level of awesome!
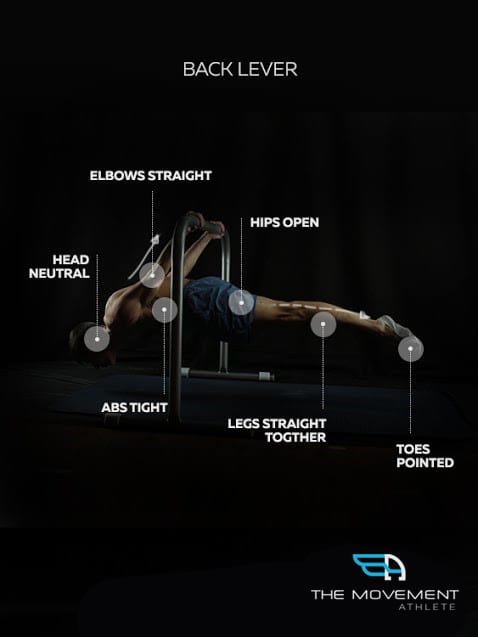
🤜This whole-body exercise places an emphasis on your back and core. It also requires strength and flexibility in the shoulders and arms in a typically untrained position. It would be good to have a spotter (just ask a friend to help you out) who can assist you in case you fall.
The back lever can be an awkward position, and because you are somewhat inverted, you may feel like you don’t quite know where your body is in space. Have your spotter friend also point out if you’re doing the correct form or not! You don’t want any injuries.
💪How To Do The Back Lever?
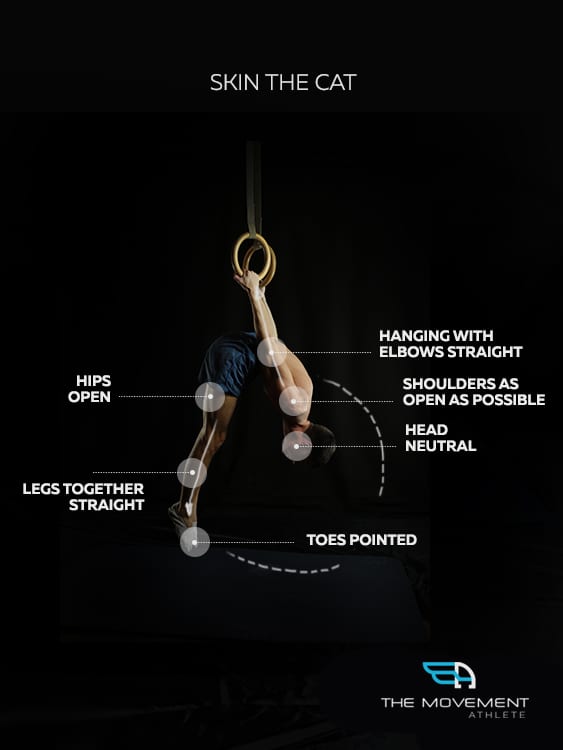
Before you even try doing this exercise, you must practice first skin the cat.
Don’t worry! We don’t mean it literally. The Skin The Cat is a preparatory exercise you should do to get your muscles warmed up. It mostly focuses on the shoulders, so that it builds flexibility, as you use it for a full extension later on.
To do Skin The Cat: Raise your legs up from a hanging position. Now, thread your feet under the bar, and lower down as far as you can behind you. Reverse the movement to come back up, and practice several times. Slowly but surely.
Now that you’re done with your preparatory exercise, here are the steps on how to do a back lever:
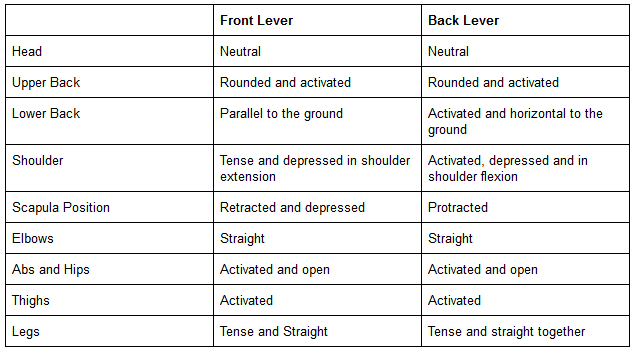
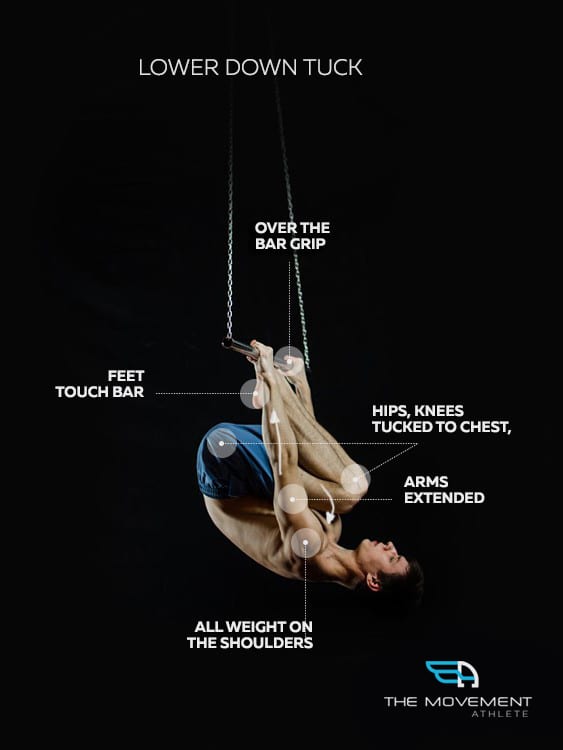
1. ✊ TUCK BACK LEVER. Start by grabbing the bar in an overhand grip, jumping, and tucking yourself into a ball into a Skin The Cat manner. Now, lower yourself (slowly) until your back is parallel to the ground. You can stay tucked up tightly, with a rounded back. Or you can slightly open your legs.
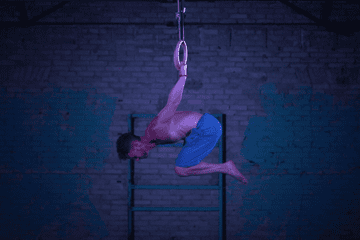
2. ✊ ADVANCED TUCK BACK LEVER. Start from the first form. From there, straighten your back instead of having it rounded up. By doing this, your hips are opened, increasing the leverage of the exercise. To ensure that your back is really straight, ask your trusty pal spotter to check on you.
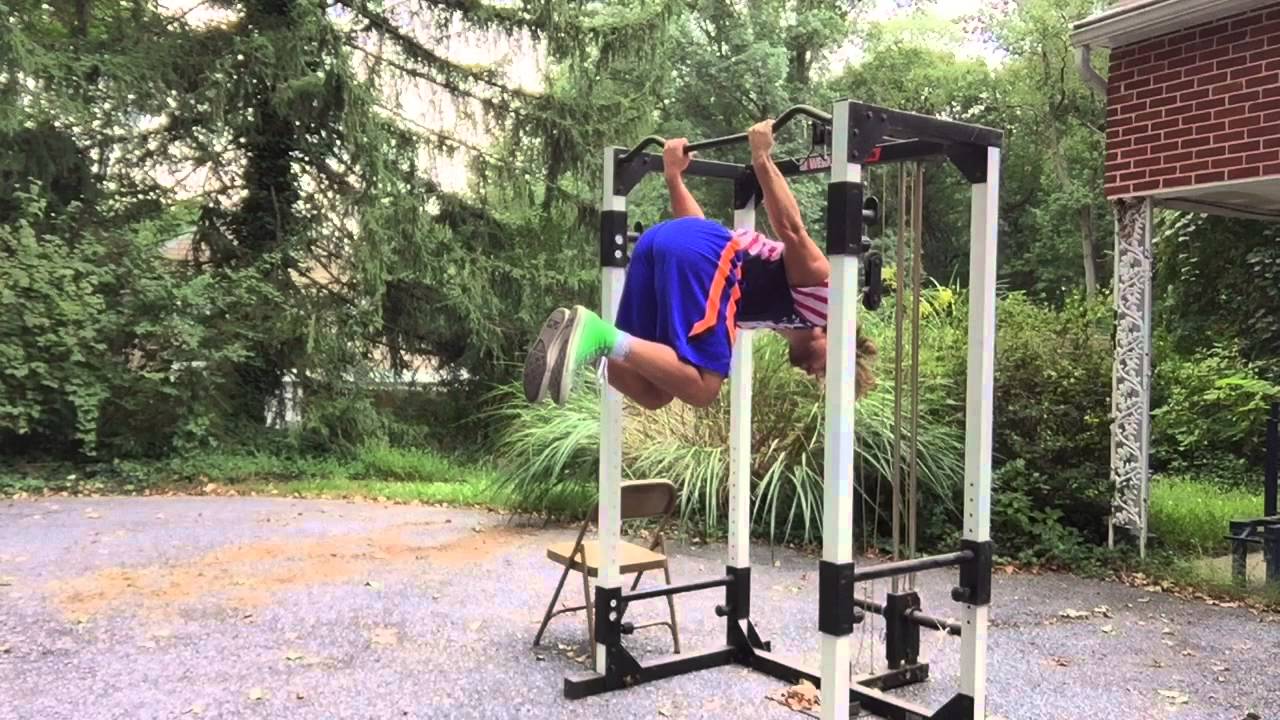
3. ✊ LEGS BENT STRADDLE BACK LEVER. Begin by doing the tuck back lever. As you complete that form, pull yourself up until your head is directly facing the ground, and your legs overhead. Straighten out your hips, but bend your knees. Spread the legs at the knees as wide as you can. If you feel like it’ll cause you to lose balance or grip, then just spread it a little. Keep this alignment lower until you are parallel with the ground. Practice this patiently. This will help you lower into the back lever easily than extending into it once you’re horizontal. It’s all about the progression.
4. ✊ LEGS BENT BACK LEVER. Next, pull yourself up until your head is facing the ground and your legs are overhead. Straighten the hips out, but keep the knees bent. This time, keep the knees together. Hold this position.

5. ✊ STRADDLE BACK LEVER. You need to pull yourself up until your head is facing the ground with your legs overhead. Straighten your legs at the knees and hips and spread your legs wide into a straddle position. Stay low while holding this form. The tip in here is to widen the straddle so it’s easier.
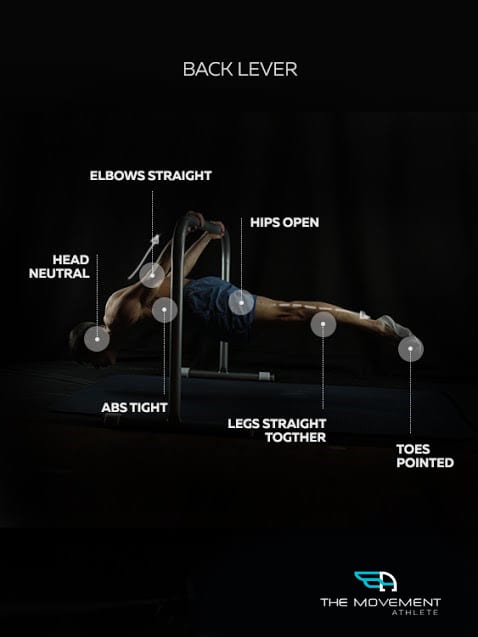
6. ✊ BACK LEVER. Again, pull yourself up until your head is facing the ground with your legs overhead. Straighten out the legs at the knees and hips, and make sure to keep the legs together. Your body must form a one straight line through your legs. Keep this alignment lower until you are parallel with the ground, and hold.
🔎🔎🔎Which one is easier?
One major difference between the two levers is the role of your shoulders. With back lever, your shoulders need to have good shoulder flexion mobility. People usually have problems with this that hinder them from doing the back lever. But being in the back lever position, you can load your lats more to hold yourself in the position rather than putting the load on your arms. This is something you can’t do with the front lever.
On the other hand, front lever requires you to be in shoulder extension by pulling your shoulders down to lift your body into a front lever. Your shoulder position will just be in front of you which is pretty much easier for people. Instead of requiring mobility, the front lever requires you more strength.
With all these said, most people tend to find back lever easier. Fewer requirements on strength and more on shoulder mobility.
But then again, there are so many factors to be considered when comparing the difficulty of the exercises. So to answer the question: “Which one is easier?”, the answer is it depends from person to person.
If you’re aiming to learn levers but can’t decide yet which one to learn first, think of your goal. Which one would do more benefit for you? You can actually learn both at the same time. You just need to start slowly and progressively with your training.
I Don’t Think I Can Do It, Should I Stop?🧨🧨🧨
Remember, you can’t build your strength💪 overnight. In the same way, you can’t practice all the steps right away just because you want to. This simple progression may already take months, depending on how you train your body. Be patient. Work through the steps and you’ll get there. Practice your willpower, so you can overcome this physical challenge.
If you’re interested in fully committing to the exercise, you need to learn the full progression of the front and back lever. The full progression addresses even your weaknesses so you can get to your goal faster.
Unparalleled Foundation
Mastering the front and back lever exercises are a great way to build a foundation for Calisthenics trainings. Why?
✅These are essential calisthenic strength movements that will provide incredible stimulation for total body strength and body coordination and control. You can’t get that from any ordinary exercise.
✅Training with these bodyweight exercises will motivate you to train harder and achieve more advanced skills.
✅These exercises already provide you with the basics. When you advance in your Calisthenics training, you can always return to these fundamental concepts to attain other progressions.
If you want to get started but don’t know how to work with the progressions, you can check out The Movement Athlete and take our free assessment to gauge where your skill levels at. Once you know your calisthenics fitness level, you can slowly develop your strength to do front and back lever and other crazy calisthenics movement with the in-depth training progressions.
Don’t hesitate to work more and be more! These front lever and back lever exercises are the keys to training Calisthenics easily.
You still want that powerful and toned body, don’t you?
Free Front Lever Training Guide
Download our complete guide to mastering the front lever
Related Articles You’ll Love:
Ready to get started?
Get your free personalized training plan now