Pull-ups are a staple in developing a strong and healthy body.
It’s undeniably a must-have in your workout routine to build muscles and get stronger with your pulling motion. You don’t want to go on with your life without ever being able to do a pull-up.
To do it, all you have to do is hang from a bar, ring, stable tree branch or even a ledge, then pull your whole body upwards. Sounds simple and easy but not quite, right?
Don’t be discouraged because, in this exercise, you have to pull the whole weight of your body upwards using only your upper body. This would naturally be difficult for beginners when starting out and even for more trained athletes if they’re not used to the motion.
Alas, pull-ups are still a very achievable exercise that you need to incorporate into your workout regimen. Anybody can learn to do a pull-up.
You just need to follow a proper set of progression and exercises to safely and efficiently build you strength and muscle so you can finally get a pull-up.
But before actually training with the progression, you need to know where your pulling skill level is currently at!
Progressions are basically pointless if you’re not going to take your time by starting out with an assessment. Training without an assessment is similar to putting too many weight plates on the bar for your first ever bench press. What will happen if you do that? Trust me, don’t try it! You’ll get SPLAT!
Take an assessment similar to what we have in The Movement Athlete Academy. Or you can take the more difficult way by checking out one by one the exercises below. Be sure to start at the bottom. Don’t underestimate the difficulty of the exercises.
Upon taking an assessment sheds a light to the path you need to take in order to get your first ever PROPER pull-up.
If you want to get your first pull-up, then you have to continue reading this guide!
Here are the best progressions you must do in order to get your first pull-up!
1.🤜Wide Arms Pulls
For pull-ups, you need to have a strong back and biceps. Wide arms pull (also known as bodyweight rows) is your entry point to learn a pull-up. The horizontal position of the wide arm pulls compared to the vertical position of regular pull-ups makes the exercise more doable for beginners. It will hit the muscles you need to train for a pull-up with more muscle activation on the lower latissimus dorsi, teres minor, rhomboids and trapezius.
When first starting out, you can position yourself at a higher bar so your legs can assist you more in this pulling exercise. You can proceed to go to a lower bar as you get stronger.
👍How to perform:
- Begin under a low bar with hands wide, overhand grip position.
- Body straight, legs straight out and shoulder-width apart.
- Keeping body straight, pull chest towards the bar.
- Lower body down, and arms straight.
- Repeat per specified repetitions.
2.🤜Close Arm Pulls
This exercise has a similar execution compared to the earlier mentioned, wide arm pulls. Still a horizontal pulling exercise but in this exercise, your arms are together and in an underhand position. This promotes more muscle activation in the biceps, pectoralis major, while still also working on the aforementioned muscles.
Close arm pulls are done to target and strengthen other possible weak links in your back and arms that may hinder you from doing a pull-up.
👍How to perform:
- Begin under a low bar with hands side by side, underhand grip position.
- Body straight, legs straight out and shoulder-width apart.
- Keeping body straight, pull chest towards the bar.
- Lower body down, and arms straight.
- Repeat per specified repetitions.
3.🤜Dead Hang
Dead hang is considered the basic step of pull-ups where you will hang from a bar. This will be your first vertical pulling exercise, the start of the actual position of a pull-up. (Don’t get me wrong. You’ll also benefit so much from the two arm pulls earlier.)
There is a stretch felt on both arms as the whole body hangs. Keep the core tight at all times. Don’t forget to breathe!
One thing people miss to address when training for a pull-up is their grip strength. The dead hang exercise prepares you exactly for the grip demands you will experience in the future exercises.
👍How to perform:
- Hold a bar with hands placed slightly more than shoulder-width apart.
- Keep your arms and back straight and abs tight.
- Bend your knees to 90 degrees, keeping them slightly apart and hang.
- Hold this position for a specified time.
- Repeat a few times.
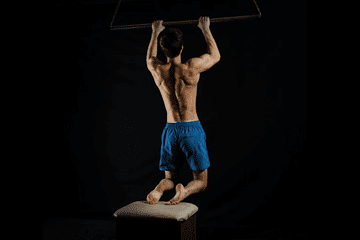
4.🤜Jumping Pull-ups
To get you used to the motion of the pull-ups, you have to first use momentum to get you started. This will not get you stronger to the point that you can do pull-ups but it will get a feel for the vertical movement that you are not used to yet.
Keep in mind to tense all of your muscles that just jumping up and down on the bar. You need to feel the feeling of getting over that bar which is essentially the motion of a pull-up.
👍How to perform:
- To begin, stand on a box under the bar, arms reach up and palms grab with an overhand grip.
- Jump up and pull your chin over the bar, keep your arms in close to your sides.
- Lower back down, feet onto the box.
- Repeat per specified repetitions.
5.🤜Legs Assisted Chin Over Bar Hold
You need to strengthen one of the weak points of a pull-up which is the top portion. But before we move to the pull-up, you’ll first maximize the gains for a chin-up position. Chin-up position is much easier compared to the pull-up position because of the assistance of your arm muscles. Pull-up position makes use more of your back muscles.
For now, you’re going to lessen the load of your back and arms with your legs. The legs will carry some of the weight so you can hold the position. This will get your biceps, lats, rhomboids, and chest pumping!
This can be done with or without a resistance band. If done without a resistance band, you would need a box to stand on while holding the position.
👍How to perform:
- Begin by hanging from bar with an underhand grip.
- One foot on resistance band, legs together.
- Pull up, chin over bar, keep arms in next to your body.
- Hold position for specified time.
6.🤜Chin Over The Bar Hold
This is a level-up version of the earlier bar hold. You’ll just have to take the assistance off, Your leg, in the previous exercise progression, acts similar to training wheels on a bike. But instead of keeping your balance (like on a bike), your legs keep you up in the position by lifting some of the weight.
You’ll feel your shoulders, back, core burning up. You’ll also mainly feel the biceps getting activated by this exercise.
👍How to perform:
- Hold the bar with an under bar grip and hands placed shoulder width apart.
- Pull yourself up till the chin comes above the bar. You can also jump to the position if you cannot pull yourself up.
- Make sure your legs are straight and slightly apart. Toes are pointed and off the floor.
- Hold this position for a specified time for a number of reps.
7.🤜Legs Assisted Pull-up Hold
Time to move forward. After getting stronger with the chin-up position holds, the pull-up hold will be next in your list.
With this exercise, you’ll be relying less on your biceps and arms, but more on your lats. This is usually where people struggle the most that’s why you need to strive even harder to get stronger.
Similar to the leg assisted chin-up hold, your legs will help you hold some of the weight while your lats should be doing most of the work. Keep everything tight!
👍How to perform:
- Begin by hanging from bar with an overhand grip.
- One foot on resistance band, legs together.
- Pull up, chin over bar, keep arms in next to your body.
- Hold position for specified time.
8.🤜Pull-up Hold
After getting comfortable with the initial pulling exercise holds, we’re moving next to non-assisted exercises. Next on our list is the top position pull-up hold.
In this exercise, you’ll train your body to get used to the top position of the pull-up. You’ll be holding your full bodyweight this time without any assistance. This exercise trains you specifically for the top position which could be a choke point in your pull-ups.
👍How to perform:
- You will need a hanging bar (high bar).
- Grip the bar normally (palms facing down) with hands shoulder-width apart. Feet resting on floor and body erect.
- In this position pull your body up (or jump) till your chin is above the bar. The elbows are bent fully.
- Hold this position for a specified time.
9.🤜Legs Assisted Pull-up
Leg assisted pull-ups are a challenging variation in the progressive pull-up exercise routine and emphasize the upper back (rhomboids, middle trapezius), core, shoulders and chest as the body is pulled vertically up against gravity.
You’ll start to feel the actual motion of the pull-up from here while you are assisted by your legs. Keep everything controlled as you go through the motion.
👍How to perform:
- You will need a hanging bar (high bar) and a knee height box behind you.
- Grip the bar normally (palms facing down) with hands shoulder-width apart.
- Bend your legs more than 90 degrees with Feet resting on the box (soles face up). Knees below box level.
- Arms are straight and shoulders, back, hips and knees should be in one line.
- In this starting position pull your body up till the chin touches the bar. The elbows are bent fully and move out a little.
- Tense your lats, rhomboids, middle trapezius to go up. Imagine driving your elbows to side of your body.
- Come down slowly to starting position.
- Keep low back straight and abs tight throughout the movement.
- Repeat the above steps.
10.🤜One leg Assisted Pull-up
Once you have gotten stronger with two legs assistance, it’s only common sense to progress slowly by removing one more leg. Doing this gives you less assistance so your lats and arms can work even harder to pull you up.
👍How to perform:
- You will need a hanging bar (high bar) and a knee height box behind you.
- Grip the bar normally (palms facing down) with hands shoulder-width apart
- Bend your legs more than 90 degrees with one foot resting on the box (soles face up). Knees below box level.
- Arms are straight and shoulders, back, hips and knees should be in one line.
- In this starting position pull your body up till the chin touches the bar. The elbows are bent fully and move out a little.
- Tense your lats, rhomboids, middle trapezius to go up. Imagine driving your elbows to side of your body.
- Come down slowly to starting position.
- Keep low back straight and abs tight throughout the movement.
- Repeat the above steps.
11.🤜Assisted Negative Chin-up
Negative here pertains to the lowering movement of the pull-up motion.
Negatives (eccentric phase – muscle shortening) are usually easier to do compared to the positive movement (concentric phase – muscle lengthening) of the exercise. This is because of our bodies being naturally much stronger when performing eccentric exercises.
For this exercise, you’ll still get the strength benefits of a pull-up by only focusing on the negative movement.
Chin-ups are the entry-level again before moving forward to the pull-up. Same reasons as before.
👍How to perform:
- To begin, start on a box so you are able to step onto the resistance band with one foot.
- Start hanging from the bar with an underhand grip, arms straight.
- Pull yourself up using your arms and back so your chin is up to bar height.
- Hold position, and slowly lower body, allowing arms to straighten back to a starting position.
12.🤜Assisted Negative Pull-up
Next move is to train the main mover again of the pull-up which is the lats. Developing the lats is crucial to actually do a full and perfect form pull-up. This move is very much similar to the earlier assisted negative chin-ups, but done with an overhand grip. The grip allows for the lat activation.
👍How to perform:
- Place band under one foot and grab bar.
- Hang from bar with feet off the ground keeping body straight.
- Pull up chest to bar and allow the band to help.
- Lower down very slowly.
- Repeat for specified repetition.
13.🤜Negative Chin-up

Now, it’s time to remove your training wheels. No more use of resistance bands but you can jump up to get to the top part of the chin-up. This will help you easily get up there and push more reps for the negative chin-up.
👍How to perform:
- You will need a hanging bar (high bar).
- Grip the bar normally (palms facing up) with hands shoulder-width apart. Feet resting on floor and body erect.
- In this position pull your body up (or jump) till your chin is above the bar. The elbows are bent fully. Tense your lats, rhomboids, middle trapezius.
- Come down slowly to starting position. Keep low back straight and abs tight throughout the movements.
- Repeat the movement.
14.🤜Negative Pull-up
When you’re doing negative pull-ups, congratulations! You’re almost there!
So while the regular pull-ups are still too heavy for you, you can still perform the negative pull-ups.
When forming negatives, your body will still get stronger and build muscle as if you’re doing the actual and full regular pull-ups. It will prepare you for the full range of motion, too.
👍How to perform:
- You will need a hanging bar (high bar)
- Grip the bar normally (palms facing down) with hands shoulder width apart. Feet resting on floor and body erect.
- In this position pull your body up till the chin touches the bar. The elbows are bent fully and move out a little.
- Tense your latissimus, rhomboids, middle trapezius to go up.
- Come down slowly to starting position. Keep low back straight and abs tight throughout the movement
- Repeat the movement.
15.🤜Chin-up
The Chin-Up is a foundational pulling movement that develops serious upper body strength, focusing on the biceps, upper back, and core. Unlike the pull-up, the chin-up uses an underhand (supinated) grip, placing more emphasis on the arms and making it slightly more accessible for beginners.
It’s a fundamental vertical pulling skill in The Movement Athlete system — part of your journey toward muscle-ups, front levers, and bulletproof shoulders.
👍How to perform:
- Dead hang with an underhand grip from a bar
- From there, explosively, your whole body upward until the chin is over the bar.
- Lower down with control.
- Repeat for specified repetitions
16.🤜Negative Chin-up 15 seconds
Since you have gained much strength from you eccentric work, we’ll do more of those to fully maximize the gains for the exercise.
The execution is very much similar to the previous exercise but the negative phase is done in a slower tempo. The slower tempo allows for more time under tension. With the amount of time your muscle is under stress, your body will be able to recruit more muscles for more strength.
👍How to perform:
- Begin by jumping up to the bar and gripping with an underhand hold.
- Hang straight.
- Pull chin up over bar, elbows bent and arms close to the body.
- Hold the position for specified time.
- Slowly lower and let arms straighten over 15 seconds.
17.🤜Negative Pull-up 15 seconds

I want you to push (or rather pull) this time a little bit more because you’re very close to getting your body perfect for proper pull-up exercise.
Same thing here with the last exercise only with the pull-up position. Keep everything tight and hold for 15 seconds.
This exercise maximizes your lats muscle growth and of course, the other synergist muscles as well.
👍How to perform:
- Begin by jumping up to the bar and gripping with an underhand hold.
- Hang straight.
- Pull chin up over bar, elbows bent and arms close to the body.
- Slowly lower and let arms straighten over 15 seconds.
- Repeat per specified repetitions.
18.🤜Bent Arm 90 Degree Hold
Now that we got stronger in the top position and the negative phase, let train the arguably most difficult position of the pull-up: the middle half of the pull-up motion.
The middle position is where most people struggle to get pass through. After having their arms at a 90-degree angle, they drop down and count that as a full pull-up.
No, that’s not yet a proper regular full-range of motion pull-up, but that’s a good start. You can strengthen the 90-degree position in order to get stronger and move beyond the 90-degree angle.
👍How to perform:
- Hold the hanging bar with normal grip and hands placed slightly more than shoulder-width apart.
- Pull yourself up till the elbows are bent to 90 degrees and pointed outwards.
- Hang in this position with your back straight and knees slightly bent so that the feet are off the floor. Cross your ankles.
- Hold this position for specified time.
- Feel the tension in the biceps, shoulders and chest muscles. Keep the abs tight throughout the hold.
- Keep low back straight and abs tight throughout the movements.
- Come down slowly to starting position. Keep low back straight and abs tight throughout the movement.
- Repeat the above steps.
🎯To sum it all up:
Anyone can learn to do a pull-up, even you! You just need to follow the right progression and stay consistent with your training. Make pull-ups a priority in your workout routine.
Below are the best exercises to finally get your first pull-up:
- Wide Arm Pulls
- Close Arm Pulls
- Dead Hang
- Jumping Pull-ups
- Leg Assisted Chin Over Bar Hold
- Chin Over The Bar Hold
- Leg Assisted Pull-up Hold
- Pull-up Hold
- Leg Assisted Pull-up
- One Leg Assisted Pull-up
- Assisted Negative Chin-up
- Assisted Negative Pull-up
- Negative Chin-up
- Negative Pull-up
- Negative Chin-up 15 Seconds
- Negative Pull-up 15 Seconds
- Bent Arm 90 Degree Hold
Looks a handful of exercises but it’s needed in order to get stronger. Don’t get discouraged and intimidated. With smart and hard work, you will get your chin over the bar with ease.
Remember that you don’t have to be strict in following these exercises. You can skip some of it your body is strong enough that the exercise isn’t really challenging enough for you.
As said earlier, PERSONALIZATION is still the key in your training regimen so start with the most challenging but doable exercise for you. From there, train consistently.
But also, we have to remind you that you don’t need to stop and forget the exercise once you have mastered it. All these exercises can still be scaled into a more difficult variation so you can maximize your gains from the exercise and get stronger with your pull-ups. For example, the first exercise, the wide horizontal pulls, can be done in a fully horizontal position for the more advanced athletes. This produces more gains in the long run.
Once you have mastered the last exercise, you can try for yourself if you can finally do a pull- up. From there, you’ll open more doors for additional challenges.
Let us know in the comment section below where you are in your pull-up journey.
How to build your own pull-up workout
So you would love to finally get your first ever proper pull-up?
Great news, gang!
We’ll teach you how to create your own workout routine for your pull-up journey which you can integrate with your other workout routine.
This simple guide will help you get your pull-ups while still getting a full-body workout at attaining a balanced strong and healthy body.
To start your quest, you must first learn the progressions of the pull-up. Progressions are basically the manipulation of leverage, tempo, and range of motion of exercises to change the difficulty. Think of it as adding weights in weight lifting. In calisthenics, we change other factors than just adding weights.
Now the progression below is kinda like a staircase. You need to start on number one then move your way up to the top until you reach the goal.
The progression guarantees success as long as you commit, stay consistent, focus and be patient with the process.
Here’s the full pull-up progression:
- Wide Arm Pulls
- Close Arm Pulls
- Dead Hang
- Jumping Pull-ups
- Leg Assisted Chin Over Bar Hold
- Chin Over The Bar Hold
- Leg Assisted Pull-up Hold
- Pull-up Hold
- Leg Assisted Pull-up
- One Leg Assisted Pull-up
- Assisted Negative Chin-up
- Assisted Negative Pull-up
- Negative Chin-up
- Negative Pull-up
- Negative Chin-up 15 Seconds
- Negative Pull-up 15 Seconds
- Bent Arm 90 Degree Hold
Step 1: ✅Take an assessment
Now that you know the list of exercises, you next need to take an assessment on where your pulling level is at.
To do that, start with the most basic exercise and try to do 15 repetitions. If you can do this comfortably, move to the next exercise until you find it too difficult to even move for just a bit. From there, you need to stop and take 2 exercises back.
Step 2: ✅Choose one dynamic exercise
Choose the most challenging DYNAMIC exercise you can do with proper form. You need to be able to do at least 3 sets of 6 repetitions of that said exercise and aim work your way up until you can do 3 sets of 15 reps.
Once you can easily do that volume, move to the more difficult dynamic exercise and follow the same volume number of reps and sets to aim.
Step 3: ✅Choose one isometric hold exercise
Similar to step number 2, choose the most challenging ISOMETRIC hold for you. Aim for a set of a 30-second hold.
If you have found the most challenging isometric exercise for you, aim to get a set of a 30-second hold before moving to the next progression.
Most of the time, you’ll be able to do a more difficult static hold compared to a dynamic exercise since it’s easier to hold a single position than move through a wider range of motion.
But then again, it highly varies from person to person.
Step 4: ✅Integrate the two exercises to your routine
Simply add the two exercises to your routine. Whether you do a full-body workout or train with an upper/lower body split or skill/strength split or whatever your goals are, add them to your routine.
Just bear in mind to listen to your body well. You don’t want to overtrain and lose all of your gains because of an injury or overfatigue.
You would want to aim for a frequency of 3 times per week to maximize your strength and growth of your pulling muscles.
Example of a workout routine:
These are the most challenging exercises I can do with the maximum volume:
One leg assisted pull-up 3 sets of 7 reps
Pull-up hold 1 set of 21 seconds
I need to work on these movements three per week. Each will, I will try to add a rep or two until I reach the desired goal before moving on to the next exercise.
This would be my pulling routine which I can also incorporate with my upper body workouts.
Now it’s your turn to make your own pull-up workout.
We challenge you to create your own workout and see your progress yourself or…
Go the easier route and train with The Movement Athlete Academy.
With The Movement Athlete, you no longer need to think about your workout and do a trial-and-error method when creating your workout. Training with TMA gives you a personalized program that adjusts to your current skill level, needs and goals.
There’s no need to worry whether you’re making the correct program for because it’s the program from The Movement Athlete is already made just for you. This way, your pull-up will be a lot closer in your reach.
Train with The Movement Athlete and finally get your first pull-up in a faster, safer and efficient way!
