
Join the tribe of Movement & Calisthenics Athletes – people just like you that are working with their own body weight to get strength, lose fat build muscle, recover from injuries and live their best lives!
There’s a lot of types of handstand, but we’ll focus on the basic straight handstand. It’s the foundation that will allow you to learn other progressions faster.
Doing the perfect straight handstand is actually an efficient skill that does not need a lot of strength to learn. It’s more of technique and body control.
📌Here are four things to perform
straight handstand perfectly:
- ✔️ Handstand entrance – kicking up to handstand
- ✔️ Straight and strong body line – proper handstand form
- ✔️ Balancing the move – keeping the position
- ✔️ Handstand exit – falling or exiting from handstand
🎯Entering the handstand
There are many ways so enter a handstand but we’ll go first with the most efficient and easiest way to enter: just kicking up
You’ll start with your hands over your head as if you’re already doing the handstand or going to start a cartwheel. Push your shoulders upwards and keep you arms straight. Your leading leg take a step forward.
Now, when you place your hands on the floor (shoulder width apart), swing your upper body forward, immediately follow with your leg behind swinging upwards then following with the other leg.
There you have it! You tried entering a handstand. Keep in mind that when you kick your leading leg ( the leg that didn’t step back), push with your other leg to follow through. This will generate enough momentum for you to reach a handstand position.
🎯For wall handstand
Handstand wall kick-up is for training your body to get the feeling of inversion without much of the balance element.
To do so, simply around two inches away facing the wall. Hands on the floor, then use the jump technique into the handstand. You can push through with force since the wall will catch you even if you kick too much.
Follow the same principles instructed above.
The point of this exercise is to master the feeling of inversion and as well as strengthen the major muscles involved for a handstand.
This will also teach your body the coordination needed in entering the handstand.
🎯For free-standing handstand:
Here’s when you’re going to add balance into the equation.
To do this, prepare your stand for the kick-up. As you kick up, get the feel of kicking just enough to get your body up without applying too much kick. Too much kick will get you up and over unless you’re upper body is strong enough to hold it.
When doing the free-standing handstand kick ups, it isn’t necessary to hold already a handstand for 10 seconds or more. You can fist practice the feeling of kicking up then just hold the handstand for 1 to 2 seconds.
The exercise will teach you how to kick the right amount of force to get you in the right position.
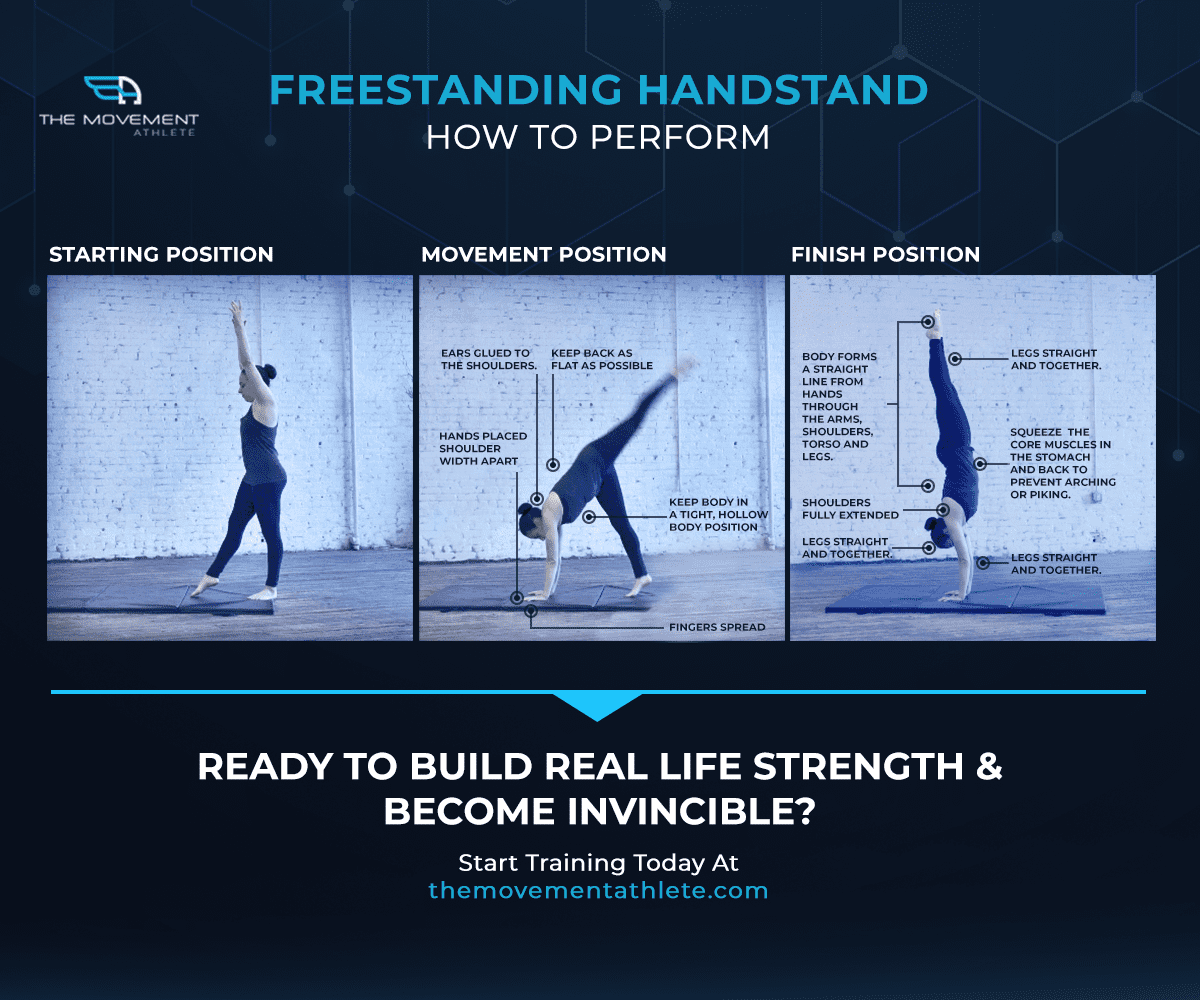
🎯Holding a strong💪 and straight line
As we said earlier, there are tons of handstand variation but will focus on the straight handstand because it is the most efficient in form and the most basic.
The key here is having the correct straight body line. From your feet, legs, hips, abs, chest, shoulders, neutral head and hand, they all need to be stacked together.
In this position, you’ll have the strongest and most efficient way to do a handstand. You’ll rely less on strength and more on technique and body control. This means you’ll fatigue less and hold the handstand for almost forever!
To get a feel of what the strong and straight body line is like, do a back handstand.
Here’s coach Becky showing how to do the exercise.
Start lying on the floor and when you put your hands over your head, simulating a handstand position, you should be able to touch the wall.
This exercise is similar to holding a handstand position but in a vertical position. Lie down on the floor but make sure your back is full flat. There shouldn’t be a gap underneath your back. Now slowly raise your arms backwards until you reach the wall. Slowly do this while having your back fully flat on the ground.
Keep everything tight and point your toes as if you’re already doing a handstand.
🎯Balancing the handstand
Based on research, the most used muscle to hold the handstand is the wrists. This goes for beginners to advanced levels athletes.
This is because your wrist will control you from tipping over or back.
Think of this way: when your standing on your feet, when your tipping over, you’ll push through the balls of your feet to resist tipping over. Opposite to falling backwards, you’ll exert more pressure on your heels to resist tipping backwards.
It’s the same in handstands!
When you’re falling forward, push through your fingers. When you’re falling backwards, push through your palm.
The pushing force is generated through your control of your wrists. That’s why you need to train your wrists well!
🎯Exiting the handstand
This one’s fairly easy because you’ll just need to let your body fall, but you need to still control it and make it as slow as possible. The options you can go with for exiting is:
- Falling backwards to your first position – control your fall and don’t just drop your dead weight.
- Falling sidewards – you’re still going to catch with your feet!
- Rolling over – recommended to remove fear
🎯Box kick up and fall
An easy way to learn how to fall safely is through the box kick up and fall technique. In this video, our coaches from The Movement Athlete will show you how it’s done.
Using a workout box or any sturdy elevated surface, you’ll place your leg up and simulate a L-shaped handstand. From there kick up to your handstand, then use the forward roll mentioned earlier to fall.
In this way, you’ll have to kick much less to go over your handstand safely. Be sure to have a soft surface when starting to learn this fall out move.
You could also kick up from your handstand then fall sidewards like you’re doing a cartwheel.
In training these moves, you’ll get over of falling over in no time.
💪Rolling over to overcome your fear of falling over!
This technique is very easy to learn and helps you get over the fear of tipping over as your coaches have shown in the video.
To do it: when you feel you need or want to exit the handstand, tuck your chin to your chest. Lower your body forward and as slow as possible. The ground will gently catch your head then you need to tuck your legs to your chest generating a rotational forward momentum.
Then voila! You’re safely back on the ground somersaulting your way out of a handstand.
Try this on a mat or grass first. As you get more comfortable and confident, then you can do it anywhere you please.
With practice, you’ll soon get your perfect handstand form. Getting the perfect form doesn’t only come with bragging rights. It provides you the benefits and also the best skill and strength transfer for your succeeding skills to learn!
What was your weak point when you were first learning your handstands? Was it your skill, mobility or fear?
Let us know in the comment section below.
Stay strong, guys!
