")
Negative handstand pushup is an essential step that conditions your body for the freestanding handstand pushups. This progression prepares your strength, balance and technique aspect to fully achieve the freestanding version.
Since we’ll only focus on the eccentric part (negative or lowering down motion) of the exercise, it’s vital to increase the time under tension by using slow tempos for the exercise. This provides enough volume and difficulty in order for the muscles to grow.
The exercise is also done against the wall to eliminate first the balance aspect of the exercise. This will allow you to focus on the correct technique and positioning before integrating balance in the equation. The wall will also guide you for safety purposes.
Master the negative handstand pushups then you’ll be so close to learning the full complete move.
👍HOW TO KNOW WHEN IT’S SAFE TO ATTEMPT?
Before you attempt negative handstand push-ups, be sure that you are already comfortable doing elevated pike push-ups. You should also have at least wall handstands with proper form before proceeding with the progression.
✅Summarized Benefits
- Prepares you for free-standing handstand push-ups
- Builds lean muscles through enough stimulation and overload
- Strengthen your triceps, shoulders, and chest
- Develops control with stabilizer muscles
- Teaches proper technique and form for free-standing handstands
- Assist in balance and coordination
- Avoids injuries from falling while balance component is not yet mastered
How to Perform💪
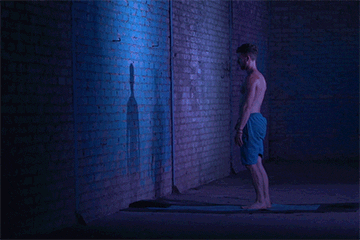
1. Start arm width away from the wall or where you feel most comfortable kicking up to handstand.
- Place hands on the ground with mat located at head position. Ensure that your hand placement is approximately 6-12 inches away from the wall and your midline/core is in a tight, stable position.
- Lock your elbows and kick up/tuck into handstand and place feet on the wall
- Slowly descend towards the mat by bending your elbows and maintaining full-body tension. Make sure to control the descent throughout the entire movement. The tempo should be the same from the start of the negative to the end of the negative.
- As soon as your head touches the mat you should be kicking quickly off the wall before any weight is applied to the head and neck. You should not be finishing in a headstand position.
- Lower your legs and get back on your feet to standing position and reset.
Coaching Pointers
Starting Position:
- Hands 6-12 inches away from the wall
- Tight core
- Feet on the wall
- Locked elbows

Movement Position:
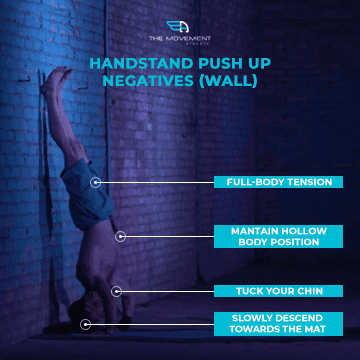
- Slowly descend towards the mat
- Maintain hollow body position
- Full-body tension
- Tuck your chin
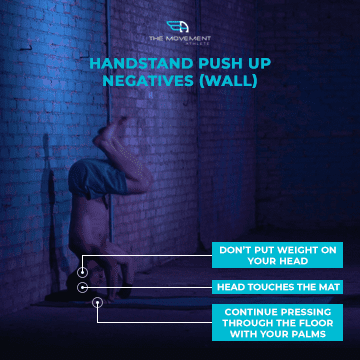
Finish Position:
- Head touches the mat
- Don’t put weight on your head
- Continue pressing through the floor
- with your palms
- Kick quickly off the wall