Join the tribe of Movement & Calisthenics Athletes – people just like you that are working with their own body weight to get strength, lose fat build muscle, recover from injuries and live their best lives!
Solidify your headstand control with free forearm stand hip and leg extensions!
If you’ve been aiming to secure a very solid and sturdy headstand that no winds and weather can blow you down, you should train with this exercise.
The free forearm stand hip and leg extensions, as you can see in its name, has 2 movements. Starting with on the basic tripod hold, there is one hip extension followed by a leg extension. This breakdown of movements allows you to master every range of motion your body has to pass through to get to a full free standing headstand.
As you have not yet fully mastered a solid freestanding headstand, this exercise allows you to feel the full position for a brief moment before coming back down to the extended hips then tripod position.
This exercise works your upper body but primarily targets your core and obliques as they will be doing most of the work as you do the extensions. Think of it as a more complex core workout as you need a strong core to hold a fully extended headstand.
Master this movement to get you a headstand as sturdy as a statue!
👍HOW TO KNOW WHEN IT’S SAFE TO ATTEMPT?
You must have a good tripod hold hip extension before testing out this skill. It will develop you the core strength, balance and confidence required for our goal move. The tripod hold hip extension is basically one component of the movement exercises so you must master it before moving on.
✅Summarized Benefits
- Strong obliques
- Strong core translatable to other calisthenics exercises
- Improves balance and confidence for freestanding headstand
- Improves body control and awareness
- Trains body coordination
- Builds more confidence for inverted skills
How to Perform💪
- From a kneeling position, place hands shoulder-width apart on the mat.
- Lean forward placing your head on the mat between your hands.
- Get up into a tripod position, then bring your knees together, tucked into your chest with toes pointed.
- Let knees come away from your chest, pointing outward, hips at a 90-degree angle.
- Extend the hips upward while keeping the legs bent. Feet should be stacked over the body.
- Return knees back to a tucked position at 90-degree angle, and then tucked into the chest.
- Repeat for specified repetitions.
👉Keep in mind
Controlled movement
This exercise is a dynamic one that involves 2 extensions and back. You have to move in a controlled manner rather than using momentum to execute the skill. It’s very tempting to use momentum just for the sake of doing the cool skill but this will not result in the benefits we are looking for.
Keep everything tight and move slowly and controlled. This will translate into much better gains.
Keep legs flexed
There’s a reason why we point our toes for the exercise. This is to engage our legs throughout the movement. It seems like the headstand only needs a tight core to balance but having unengaged legs will only throw your balance off. Keep your legs tight. But mainly, keep everything tight as well!
Coaching Pointers
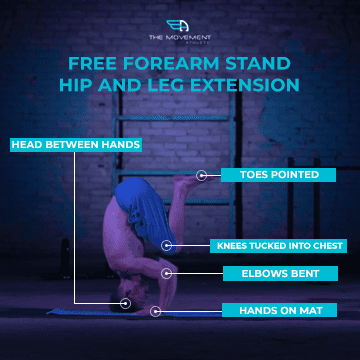
Starting Position:
Head between hands
Hands on mat
Elbows bent
Knees tucked to chest
Toes pointed
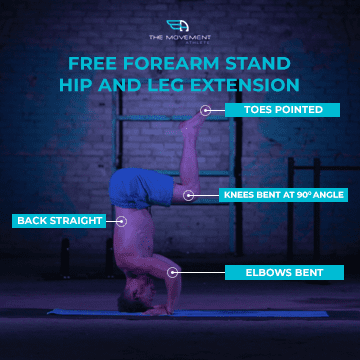
Movement Position:
Elbows bent
Hips extended
Back straight
Toes pointed
Finish Position:
Elbows bent
Legs straight
Knees extended
Abdominals tight
Back straight
Toes pointed