[et_pb_section fb_built=”1″ fullwidth=”on” _builder_version=”4.16″ collapsed=”off” global_colors_info=”{}”][et_pb_fullwidth_image src=”https://themovementathlete.com/wp-content/uploads/4-Back-Lever-Tips-for-Fast-Progress.jpg” alt=”4 Back Lever Tips for Fast Progress” title_text=”4 Back Lever Tips for Fast Progress” module_id=”_cm_image” _builder_version=”4.20.2″ height_tablet=”auto” height_phone=”auto” height_last_edited=”on|phone” global_colors_info=”{}” custom_css_main_element_last_edited=”on|phone”][/et_pb_fullwidth_image][/et_pb_section][et_pb_section fb_built=”1″ fullwidth=”on” custom_padding_last_edited=”on|phone” admin_label=”Middle Arrow” _builder_version=”4.16″ custom_padding=”0px|0px|0px|0px” custom_padding_tablet=”” custom_padding_phone=”” custom_css_main_element=”margin: 0px !important;” transparent_background=”off” collapsed=”on” global_colors_info=”{}”][et_pb_fullwidth_image src=”https://themovementathlete.com/wp-content/uploads/2017/02/arrow-2.png” admin_label=”Middle Arrow” _builder_version=”4.16″ custom_margin=”0px|0px|0px|0px” custom_css_main_element=”padding: 0px !important;” animation=”off” use_border_color=”off” border_color=”#ffffff” border_style=”solid” global_colors_info=”{}”][/et_pb_fullwidth_image][/et_pb_section][et_pb_section fb_built=”1″ admin_label=”First Content Section (Light Background)” _builder_version=”4.24.2″ custom_padding=”54px|0px|0|0px|false|false” hover_enabled=”0″ custom_css_main_element=”max-width:1100px !important;||margin:auto !important;” transparent_background=”off” collapsed=”off” global_colors_info=”{}” background_enable_color=”off” sticky_enabled=”0″][et_pb_row _builder_version=”4.16″ background_size=”initial” background_position=”top_left” background_repeat=”repeat” custom_margin=”||0px|” custom_padding=”20px||0||false|false” global_colors_info=”{}”][et_pb_column type=”4_4″ _builder_version=”4.16″ custom_padding=”|||” global_colors_info=”{}” custom_padding__hover=”|||”][et_pb_text admin_label=”Join the Tribe” module_class=”content-literature” _builder_version=”4.16″ text_font=”Raleway||||” text_font_size=”24″ background_size=”initial” background_position=”top_left” background_repeat=”repeat” text_font_size_tablet=”” text_font_size_phone=”16″ text_font_size_last_edited=”on|phone” custom_css_main_element=” line-height: 35px;” use_border_color=”off” border_color=”#ffffff” border_style=”solid” saved_tabs=”all” global_colors_info=”{}”]
Join the tribe of Movement & Calisthenics Athletes – people just like you that are working with their own body weight to get strength, lose fat build muscle, recover from injuries and live their best lives!
[/et_pb_text][/et_pb_column][/et_pb_row][et_pb_row _builder_version=”4.16″ background_size=”initial” background_position=”top_left” background_repeat=”repeat” global_colors_info=”{}”][et_pb_column type=”4_4″ _builder_version=”4.16″ custom_padding=”|||” global_colors_info=”{}” custom_padding__hover=”|||”][et_pb_text admin_label=”Intro” module_class=”content-literature” _builder_version=”4.20.2″ text_font=”Raleway||||” text_font_size=”24″ header_font_size=”50px” header_2_font_size=”40px” header_3_font_size=”30px” background_size=”initial” background_position=”top_left” background_repeat=”repeat” custom_padding=”20px||0px|||” text_font_size_tablet=”” text_font_size_phone=”16″ text_font_size_last_edited=”on|phone” custom_css_main_element=” line-height: 35px;” use_border_color=”off” border_color=”#ffffff” border_style=”solid” global_colors_info=”{}”]Are you hungry for mastering the back lever?😍
If so, then these 4 tips below can help you progress much faster in your back lever journey while also avoiding injuries and frustrations along the way.
If you’re ready to learn these 4 tips, read on or watch it here: 👇👇
4 Tips & Drill to Unlock Back Lever
[/et_pb_text][et_pb_text admin_label=”Tip 1″ module_class=”content-literature” _builder_version=”4.20.2″ text_font=”Raleway||||” text_font_size=”24″ header_font_size=”50px” header_2_font_size=”40px” header_3_font_size=”30px” background_size=”initial” background_position=”top_left” background_repeat=”repeat” custom_padding=”20px||0px|||” text_font_size_tablet=”” text_font_size_phone=”16″ text_font_size_last_edited=”on|phone” custom_css_main_element=” line-height: 35px;” use_border_color=”off” border_color=”#ffffff” border_style=”solid” global_colors_info=”{}”]
🔥Tip 1:
Train Back Lever with Pronated Grip
The first tip we have for you is to train with a pronated grip. The pronated grip is like a pul-up grip where your palms are facing away from your body at the start. When you invert, the palms will be facing your back.
In contrast, the supinated grip AKA the chin-up grip is when your palms are facing towards your body at a dead hang. When you invert, the palms will be facing away.
The pronated grip is much easier as it engages your bigger muscle groups such as the shoulders. When your try the back lever with a supinated grip, like in the chin-up, more pressure is applied unto your biceps. The difference is drastic and the bicep muscles, ligaments, and tendons are exposed to high risk of injuriy if straight-arm strength and condition is not sufficient.
Reserve the supinated grip in the future and focus on working with the pronated grip first. Supinated grip will take more time to master.
[/et_pb_text][et_pb_text admin_label=”Tip 2″ module_class=”content-literature” _builder_version=”4.20.2″ text_font=”Raleway||||” text_font_size=”24″ header_font_size=”50px” header_2_font_size=”40px” header_3_font_size=”30px” background_size=”initial” background_position=”top_left” background_repeat=”repeat” custom_padding=”20px||0px|||” text_font_size_tablet=”” text_font_size_phone=”16″ text_font_size_last_edited=”on|phone” custom_css_main_element=” line-height: 35px;” use_border_color=”off” border_color=”#ffffff” border_style=”solid” global_colors_info=”{}”]
🔥Tip 2:
Train the Muscle for Hip Extension
An overlooked aspect when training for the back lever is the lower body. If you’re unable to hold the full horizontal position even if you’re comfortable with the upper body strength, then your lower body might be to weak to hold the position.
There are two exercises that we can use to develop the posterior chain of the lower body.
⚡️Exercise 1: Prone Leg Raise
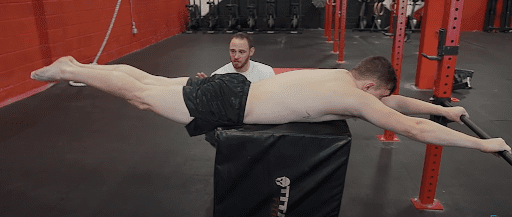
The prone leg raise is train this position perfectly for the horizontal position. To perform the exercise, you will need an elevated surface to prop your body up and something to hold on using to maintain stability.
In the photo above, it’s the full back lever position is train. It targets the lower back and the glutes which are both main stabilizers for the lower body. You can hold the top position or perform full range of motion by lower the lower body at the start then performing hip extensions for reps.
This exercise can be performed with different back lever positions such as the tuck, advanced tuck, straddle, one leg, and half lay. The strength benefits can also transfer to other lever type movements such as the planche and Maltese.
⚡️Exercise 2: Back Lever Lifts
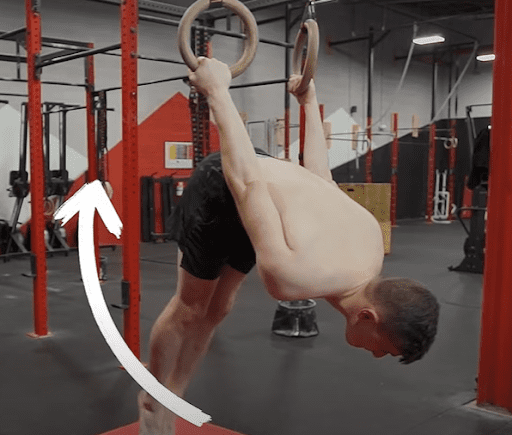
This is a much more challenging variation of the prone leg raise since you will be holding the back lever progression you are working with at the top. The exercise is actually part of the back lever progression which you can see in our app, but the main purpose of the exercise is to target the muscles responsible for holding up the lower part of the body.
We’re usually concerned with the upper body: strengthening the biceps, chests, shoulders. However, if we neglect the lower half, we can never achieve the full back lever position if the lower back and the rest of the lower half is not used in this position.
The isometric top part when holding the full back lever is the most demanding position for the lower half. We can gradually build strength towards this skill by performing full range of motion.
[/et_pb_text][et_pb_text admin_label=”Tip 3″ module_class=”content-literature” _builder_version=”4.20.2″ text_font=”Raleway||||” text_font_size=”24″ header_font_size=”50px” header_2_font_size=”40px” header_3_font_size=”30px” background_size=”initial” background_position=”top_left” background_repeat=”repeat” custom_padding=”20px||0px|||” text_font_size_tablet=”” text_font_size_phone=”16″ text_font_size_last_edited=”on|phone” custom_css_main_element=” line-height: 35px;” use_border_color=”off” border_color=”#ffffff” border_style=”solid” global_colors_info=”{}”]
🔥Tip 3:
Use Band Assistance for Back Lever Progressions
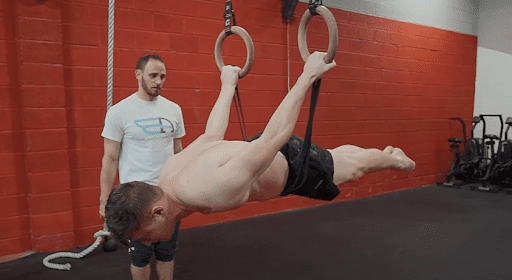
There are some speculations for band-assistance regarding back levers or other calisthenics skills. But bands have an amazing benefit for helping progress in your back lever journey!
If used properly, bands can bridge the gap between harder progressions. Let’s give an example. The difference in terms of looks between a tuck lever versus an advanced tuck lever might be small, but the advanced tuck is significantly much more difficult. Even if you can hold a 30-sec tuck bacl lever, you might not be able to hold even a second of an advanced tuck because jump of intensity and demand. It’s still a different position. To build SPECIFIC STRENGTH in the advanced tuck, holding the position with less intensity is required. This is when the bands come in.
The bands removes some of the weight while you aim to hit the correct back lever position. It helps you get a feel for the more advanced variations, but at a much lower intensity. As you grow stronger, you can a thinner band to increase the intensity. You will be surprised you’re already holding the advanced tuck without any assistance soon.
Don’t skip on the bands. Bands bridge gaps!
[/et_pb_text][et_pb_text admin_label=”Tip 4″ module_class=”content-literature” _builder_version=”4.20.2″ text_font=”Raleway||||” text_font_size=”24″ header_font_size=”50px” header_2_font_size=”40px” header_3_font_size=”30px” background_size=”initial” background_position=”top_left” background_repeat=”repeat” custom_padding=”20px||0px|||” text_font_size_tablet=”” text_font_size_phone=”16″ text_font_size_last_edited=”on|phone” custom_css_main_element=” line-height: 35px;” use_border_color=”off” border_color=”#ffffff” border_style=”solid” global_colors_info=”{}”]
🔥Tip 4: Address Weak Links
This last tip actually covers the rest of the tips we mentioned. It’s about addressing weak links.
The bulk of your progress will still come from building specific strength using the progressions. However, weaklinks can still sometimes hinder you from achieving your goal. By identifying your weakness, you can understand what you need to work on to master the back lever.
To do this, simply take a video of yourself attempting your back lever progression based on your skill level. There are nuances and compensations if there are underlying weaknesses. Here are the common weak points that might stop you from getting it down:
- ❌ Body not going over fully – lack of shoulder mobility
- ❌ Bending arms – weakness in scapula, biceps, or shoulders
- ❌ Arching back – untrained lower back and glutes
- ❌ Painful shoulders – lack of mobility or incorrect position (shoulder depression and protraction is a must)
- ❌ Retracting back – lack of scapular strength
By addressing these weakness, you can boost your back lever progress to finally get closer to the skill.
[/et_pb_text][et_pb_text admin_label=”Takeaway” module_class=”content-literature” _builder_version=”4.20.2″ text_font=”Raleway||||” text_font_size=”24″ header_font_size=”50px” header_2_font_size=”40px” header_3_font_size=”30px” background_size=”initial” background_position=”top_left” background_repeat=”repeat” custom_padding=”20px||0px|||” text_font_size_tablet=”” text_font_size_phone=”16″ text_font_size_last_edited=”on|phone” custom_css_main_element=” line-height: 35px;” use_border_color=”off” border_color=”#ffffff” border_style=”solid” global_colors_info=”{}”]
📌Takeaway
Focusing on the bigger picture, the back lever progression plus mobility training will be your go-to. But looking closer into a back lever journey, there will be details that you need to address if you want to boost your progress.
Train the back lever in a smart and safe manner.
To stay safe, be sure to check out our next section:👇👇
How to Avoid Injuries When Training Back Lever
[/et_pb_text][/et_pb_column][/et_pb_row][/et_pb_section][et_pb_section fb_built=”1″ _builder_version=”4.20.2″ custom_padding=”0px||2px||false|false” link_option_url=”https://themovementathlete.com/black-friday-2019/” custom_css_main_element=”font-family: ‘Montserrat’,Helvetica,Arial,Lucida,sans-serif;” global_module=”209500″ saved_tabs=”all” global_colors_info=”{}”][et_pb_row column_structure=”1_2,1_2″ use_custom_gutter=”on” gutter_width=”1″ make_equal=”on” custom_padding_last_edited=”on|phone” module_class=”baners-flex-row et_pb_row_fullwidth” _builder_version=”4.20.2″ use_background_color_gradient=”on” background_color_gradient_stops=”#354e65 0%|#212b35 100%” background_color_gradient_start=”#354e65″ background_color_gradient_end=”#212b35″ width=”100%” width_tablet=”100%” width_phone=”” width_last_edited=”on|desktop” max_width=”100%” max_width_tablet=”100%” max_width_phone=”” max_width_last_edited=”on|desktop” custom_padding=”0px||0|0px” custom_padding_tablet=”30px|20px|0px|20px” custom_padding_phone=”30px|20px|0px|0px” make_fullwidth=”on” global_colors_info=”{}”][et_pb_column type=”1_2″ _builder_version=”4.16″ custom_padding=”|||” global_colors_info=”{}” custom_padding__hover=”|||”][et_pb_image src=”https://themovementathlete.com/wp-content/uploads/The-Movement-Athlette-App-1.png” title_text=”calisthenics app” show_bottom_space=”off” align_tablet=”center” align_phone=”” align_last_edited=”on|desktop” _builder_version=”4.24.2″ width=”77%” global_colors_info=”{}”][/et_pb_image][/et_pb_column][et_pb_column type=”1_2″ _builder_version=”4.16″ custom_padding=”|||70px” custom_padding_tablet=”30px||30px|0px” custom_padding_phone=”30px||30px|30px” custom_padding_last_edited=”on|phone” global_colors_info=”{}” custom_padding__hover=”|||”][et_pb_text _builder_version=”4.16″ header_font_size=”24px” header_letter_spacing=”15px” header_2_font=”|700||on|||||” header_2_text_align=”left” header_2_text_color=”#ffffff” header_2_font_size=”39px” header_2_line_height=”1.1em” max_width=”87%” custom_margin=”|70px|10px|-50px” custom_margin_tablet=”|0px|10px|0px” custom_margin_phone=”” custom_margin_last_edited=”on|phone” custom_padding=”||0px|” header_2_font_size_tablet=”” header_2_font_size_phone=”29px” header_2_font_size_last_edited=”on|phone” header_2_line_height_tablet=”” header_2_line_height_phone=”” header_2_line_height_last_edited=”on|phone” global_colors_info=”{}”]
GET A FREE CUSTOMIZED TRAINING PLAN!
[/et_pb_text][et_pb_text admin_label=”Text” _builder_version=”4.16″ text_text_color=”#ffffff” text_font_size=”16px” text_letter_spacing=”-0.39px” text_line_height=”24px” header_3_text_color=”#ffffff” custom_margin=”|60px|20px|-50px” custom_margin_tablet=”|0px|20px|0px” custom_margin_phone=”” custom_margin_last_edited=”on|tablet” custom_padding=”|50px||” global_colors_info=”{}”]
Start your life-changing journey with calisthenics and get lean, strong and mobile while unlocking and mastering over 100 new gymnastics & calisthenics skills.
It only takes 5 minutes, and no credit card is required!
[/et_pb_text][et_pb_button button_url=”https://themovementathlete.com/calisthenics-assessment/” button_text=”Get a FREE, PERSONALISED TRAINING PLAN!” _builder_version=”4.16″ custom_button=”on” button_text_size=”16px” button_text_color=”#ffffff” button_bg_color=”#e02b20″ button_border_width=”0″ button_border_radius=”6″ button_letter_spacing=”1.78px” button_font=”|700||on|||||” button_use_icon=”off” custom_margin=”|||-50px” custom_margin_tablet=”||20px|0px” custom_margin_phone=”” custom_margin_last_edited=”on|phone” custom_padding=”12px|24px|10px|24px” button_letter_spacing_tablet=”1.8px” custom_css_main_element=”text-align: center;” button_border_radius_hover=”6″ global_colors_info=”{}” button_text_size__hover_enabled=”off” button_one_text_size__hover_enabled=”off” button_two_text_size__hover_enabled=”off” button_text_color__hover_enabled=”off” button_one_text_color__hover_enabled=”off” button_two_text_color__hover_enabled=”off” button_border_width__hover_enabled=”off” button_one_border_width__hover_enabled=”off” button_two_border_width__hover_enabled=”off” button_border_color__hover_enabled=”off” button_one_border_color__hover_enabled=”off” button_two_border_color__hover_enabled=”off” button_border_radius__hover_enabled=”on” button_border_radius__hover=”6″ button_one_border_radius__hover_enabled=”off” button_two_border_radius__hover_enabled=”off” button_letter_spacing__hover_enabled=”off” button_one_letter_spacing__hover_enabled=”off” button_two_letter_spacing__hover_enabled=”off” button_bg_color__hover_enabled=”off” button_one_bg_color__hover_enabled=”off” button_two_bg_color__hover_enabled=”off”][/et_pb_button][/et_pb_column][/et_pb_row][/et_pb_section]