7 Common Back Lever Mistakes That Kill Your Progress (Complete Fix Guide)
📖 Read Time: 12 Minutes | Difficulty: Intermediate to Advanced
They say mistakes are opportunities to learn. 😲 But when it comes to the back lever, some mistakes can set you back months or even cause serious injuries. Why learn the hard way when you can avoid these common pitfalls from day one?
In this comprehensive guide, we’ll reveal the 7 most common back lever mistakes that kill progress and exactly how to fix them. Whether you’re struggling with form, experiencing shoulder pain, or hitting frustrating plateaus, these solutions will get you back on track.
🏆 Join 100,000+ Movement Athletes!
Ordinary people achieving extraordinary results with progressive calisthenics—no gym required.
✅ Build real strength
✅ Master new skills
✅ Live pain-free
Takes 5 minutes • Personalized to your level • No credit card required
📋 What You’ll Learn
- Mistake #1: Retracting Your Scapula
- Mistake #2: Weak Posterior Chain
- Mistake #3: Not Engaging Your Lats
- Mistake #4: Poor (or No) Warm-Up
- Mistake #5: Neglecting Wrist Preparation
- Mistake #6: Training Through Pain
- Mistake #7: Inconsistent Training
- Bonus: Realistic Progress Timeline
📺 Video Tutorial: Watch Common Back Lever Mistakes & How to Fix Them
🔥 Why These Mistakes Are Dangerous
Before diving into the specific mistakes, understand what’s at stake when you train incorrectly:
1. Building Bad Muscle Memory 🥺
The back lever is a complex skill requiring precise technique. When you repeatedly practice with poor form, your brain creates neural pathways that reinforce incorrect movement patterns. This “muscle memory” (actually stored in your brain, not muscles) becomes increasingly difficult to override.
⚠️ Example: Training with retracted scapula for months means your protraction muscles never develop properly, making correct form nearly impossible later.
2. Hitting Frustrating Plateaus 👎
Poor technique creates inefficient force production and muscle activation. You might feel like you’re training hard, but you’re not targeting the right muscles effectively. This leads to the dreaded plateau – that soul-crushing period where despite your efforts, you see zero progress.
3. Serious Injury Risk 🤕
The back lever loads your shoulders, biceps, and chest in an unusual position. Common injuries from incorrect technique include:
- Bicep tears (especially at the tendon insertion)
- Shoulder impingement
- Chest muscle strains
- Lower back pain from poor body alignment
✅ Important: The Back Lever IS Safe!
Don’t let this scare you away. When trained correctly with proper progressions, the back lever is perfectly safe. These injuries only occur when you skip prerequisites or use poor technique.
📍 Essential Reading: Back Lever Prerequisites – Muscles Used & Requirements
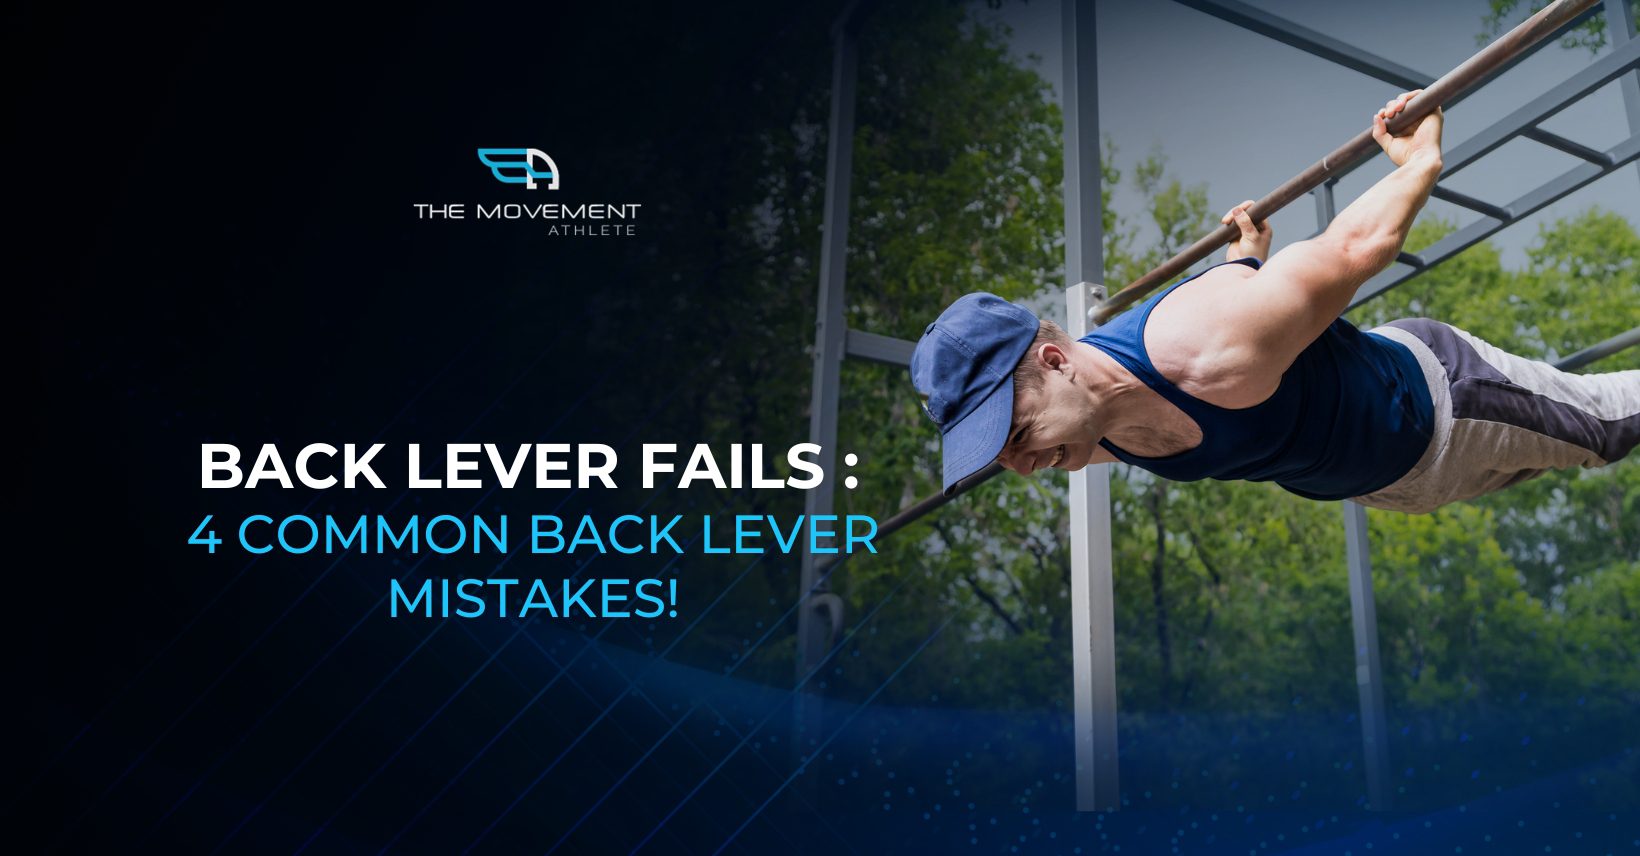
💥 Mistake #1: Retracting Your Scapula
This is the #1 form killer in back lever training. Many athletes naturally retract their shoulder blades (pulling them together) because gravity encourages this position. However, this creates multiple problems:
- Loss of stability: Retracted scapula reduces your leverage and force production
- Banana back: Creates an ugly arched position instead of a straight line
- Weakness: You can’t generate maximum downward force to maintain horizontal
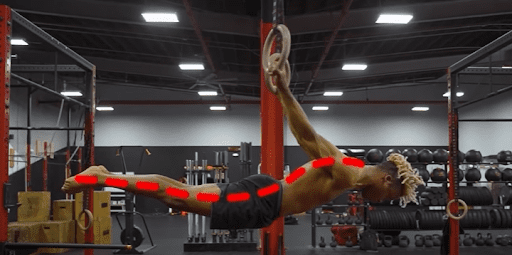
🌟 How to Fix This
Step 1: Regress to lying back lever with band/stick to isolate scapular positioning
Step 2: Focus on pushing shoulder blades apart (protraction) throughout the movement
Step 3: Build strength in this position before progressing to hanging variations
Common causes: Lack of protraction strength or simply not knowing the correct position. This drill fixes both issues.
💥 Mistake #2: Weak Posterior Chain

Because the back lever is seen as an upper-body move, athletes often neglect their lower back, glutes, and hamstrings. This creates the ugly “broken” back lever with:
- Arched lower back (anterior pelvic tilt)
- Piked hips
- Loose, disengaged legs
- Overall crooked body line
Beyond aesthetics, this weakness can cause chronic lower back pain and general muscle imbalances throughout your body.
🌟 How to Fix This
The Solution: Box Straddle Extensions
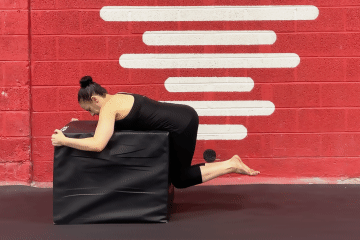
This exercise specifically targets your glutes, hamstrings, and lower back while mimicking the back lever position.

Progressions:
- Start with tuck position if you’re a beginner
- Progress to advanced tuck, straddle, then full
- Add holds at the top for extra challenge
- Aim for 3 sets of 8-12 reps
🎯 Ready to Fix Your Back Lever Form?
Get a personalized training plan that addresses YOUR specific weaknesses and builds proper progression.
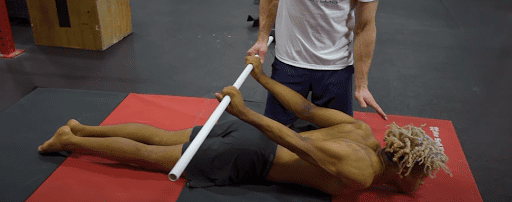
💥 Mistake #3: Not Engaging Your Lats
While everyone talks about chest, shoulders, and biceps for the back lever, your lats are the secret weapon most people miss. Without proper lat engagement, you’re working 10x harder than necessary.
The key technique: Squeeze your triceps against your lats, creating a “shelf” to support your body weight. This is why the back lever is technically easier than the front lever – when done correctly!
🌟 How to Fix This

Step 1: Start in inverted hang
Step 2: Actively squeeze triceps against lats before lowering
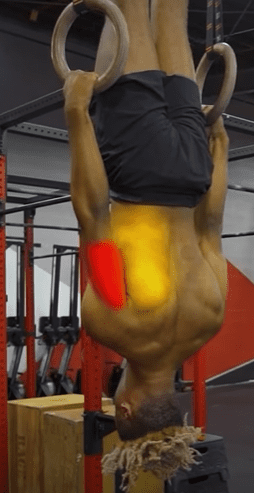
Step 3: Lower slowly while maintaining the connection
Step 4: Practice partial range of motion until you can feel the “shelf” supporting you
Pro tip: If you can’t feel it, regress to lying back lever and focus on the lat/tricep connection there first.
☝️ Bonus Mistake: Progressing Too Fast
If you can’t hold a progression for at least 8 seconds, you’re not ready for it. Period.
In calisthenics, 2 seconds of isometric hold ≈ 1 rep. So 8 seconds = 4 reps, which is the minimum volume for effective strength training at high intensity.
The fix is simple: Swallow your ego, regress to an easier variation, and build proper strength. Your future self will thank you.
💥 Mistake #4: Poor (or No) Warm-Up
There are three warm-up sins that kill back lever progress:
- Too little: Going through the motions without actually preparing your body
- Too much: Exhausting yourself before the real work begins
- Wrong focus: Random exercises that don’t target back lever muscles
A cold body attempting back levers is a recipe for injury. Your blood flow is poor, joints aren’t lubricated, and muscles aren’t activated.
🌟 How to Fix This
A proper warm-up should:
- ✅ Increase heart rate and blood flow
- ✅ Mobilize shoulders, wrists, and spine
- ✅ Activate specific back lever muscles
- ✅ Take 10-15 minutes (not 5, not 30)
Studies show proper warm-ups improve performance by up to 20%. That’s huge for a skill like the back lever!
📍 Complete guide: Back Lever Warm-up Routine: How to Get Started in 12 Minutes
💥 Mistake #5: Neglecting Wrist Preparation
Your wrists take a massive beating in back lever training. Many athletes jump straight into hanging variations without proper wrist conditioning, leading to:
- Chronic wrist pain and stiffness
- Limited grip endurance
- Fear of letting go (mental block)
- Compensatory movements that ruin form
🌟 How to Fix This
Essential wrist prep routine:
- Wrist circles (10 each direction)
- Prayer stretches (30 seconds)
- Reverse prayer stretches (20 seconds)
- Wrist push-ups (10-15 reps)
Do this daily, not just before training. Strong, mobile wrists are non-negotiable for advanced calisthenics.
💥 Mistake #6: Training Through Pain
Here’s the harsh truth: Pain is not weakness leaving the body. It’s your body’s emergency brake system telling you something is wrong.
Common pain signals athletes ignore:
- Sharp shoulder pain during entry/exit
- Elbow pain from overgripping
- Lower back ache from poor positioning
- Wrist pain from inadequate preparation
🚨 Pain Management Protocol
Stop immediately if you feel:
- Sharp, shooting pains
- Joint pain (not muscle fatigue)
- Pain that doesn’t improve with rest
- Numbness or tingling
Remember: Taking 1 week off beats taking 6 months off for surgery.
💥 Mistake #7: Inconsistent Training
The back lever isn’t built in weekend warrior sessions. It requires consistent, progressive overload over months. Yet many athletes train like this:
- 3 intense sessions in one week
- Then nothing for 10 days
- Back to random, inconsistent training
- Wonder why they’re not progressing
Your nervous system needs regular stimulation to adapt. Sporadic training confuses your body and prevents skill consolidation.
🌟 How to Fix This
Optimal training frequency:
- Beginners: 3-4x per week (every other day)
- Intermediate: 4-5x per week with varied intensities
- Advanced: 5-6x per week with periodization
Quality over quantity: 15 minutes of focused practice beats 2 hours of unfocused grinding.
Track your sessions! Use a simple log or app to maintain accountability and spot patterns in your progress.
📌 Key Takeaways
Mistakes are inevitable in your journey, but injuries don’t have to be. By avoiding these 7 common errors, you’ll:
- Progress faster with proper muscle activation
- Build a cleaner, more aesthetic back lever
- Stay injury-free throughout your journey
- Actually enjoy the process instead of fighting plateaus
📊 Realistic Progress Timeline
With proper technique and consistent training:
- Months 1-3: Master prerequisites and tuck position
- Months 4-6: Advanced tuck to straddle progression
- Months 7-12: Straddle to full back lever
- Year 2+: Refine form and increase hold times
Remember: These are averages. Your journey depends on starting strength, consistency, and avoiding the mistakes above!
💡 Want Expert Guidance?
Join thousands who’ve mastered the back lever with our proven system.
📚 Related Resources
- Safety First: How to Avoid Injuries When Training for Back Lever
- Prerequisites: Back Lever Prerequisites – Muscles Used & Requirements
- Warm-Up Guide: Back Lever Warm-up Routine: How to Get Started in 12 Minutes
- Full Tutorial: Complete Back Lever Tutorial & Progression Guide
🔥 Limited Time: Free Personalized Assessment ($197 Value)
Stop Guessing. Start Progressing.
Get Your Custom Back Lever Training Plan in 5 Minutes
⭐⭐⭐⭐⭐ Join 100,000+ athletes achieving impossible goals
✅ Complete movement assessment ($97 value)
✅ Personalized progression roadmap ($197 value)
✅ Daily adaptive workouts ($47/month value)
✅ Expert form video library ($297 value)
✅ Progress tracking & analytics ($97 value)
🎆 Total Value: $735 – Yours FREE Today
🔒 100% Privacy Guaranteed • No Spam • Unsubscribe Anytime

“I thought the back lever was impossible at my age. TMA’s progressive system helped me achieve it in 8 months – injury free! The personalized approach made all the difference.”
— James, 42, Software Engineer