Perfect Handstand Guide: Master Your Form in 2025 (Step-by-Step)
📖 Read Time: 8 Minutes | 🎯 Difficulty: Beginner to Intermediate | 📅 Updated: September 2025
Join the tribe of Movement & Calisthenics Athletes
People just like you that are working with their own body weight to get strength, lose fat, build muscle, recover from injuries and live their best lives!
You’ve been trying to get that perfect handstand for months, maybe even years. Watching others effortlessly kick up and hold it while you struggle with wobbly attempts that last mere seconds. The frustration is real – and it’s holding you back from progressing in your calisthenics journey.
Here’s the truth: achieving a perfect handstand isn’t about brute strength or natural talent. It’s about understanding the four fundamental components that most people completely overlook. Master these, and you’ll transform from shaky attempts to rock-solid holds that last 30+ seconds.
🎯 Quick Answer: Perfect Handstand Requirements
| Component | Key Focus | Common Mistake |
|---|---|---|
| Entry | Controlled kick-up with proper momentum | Kicking too hard/soft |
| Alignment | Stacked joints from wrists to toes | Arched back or banana shape |
| Balance | Wrist control and micro-adjustments | Relying on shoulder strength |
| Exit | Safe, controlled descent | Panic falling |
🔊 “How long does it take to learn a handstand?”
Most people can achieve a 5-10 second handstand in 2-3 months with consistent practice. A solid 30-second hold typically takes 6-12 months, depending on your starting flexibility and strength level.
📋 What You’ll Learn:
There’s a lot of types of handstand, but we’ll focus on the basic straight handstand. It’s the foundation that will allow you to learn other progressions faster.
Doing the perfect straight handstand is actually an efficient skill that does not need a lot of strength to learn. It’s more of technique and body control.
📌 The 4 Pillars of Perfect Handstand Form:
1. ✔️ Handstand entrance – kicking up to handstand
2. ✔️ Straight and strong body line – proper handstand form
3. ✔️ Balancing the move – keeping the position
4. ✔️ Handstand exit – falling or exiting from handstand
🎯 Part 1: The Perfect Handstand Entry (Without Fear)
Purpose: Master the kick-up technique that gets you into position without overshooting or undershooting.
There are many ways to enter a handstand, but we’ll go first with the most efficient and easiest way: the controlled kick-up.
You’ll start with your hands over your head as if you’re already doing the handstand or going to start a cartwheel. Push your shoulders upwards and keep your arms straight. Your leading leg takes a step forward.
Now, when you place your hands on the floor (shoulder width apart), swing your upper body forward, immediately follow with your leg behind swinging upwards then following with the other leg.
💡 Pro Tip: The 70% Rule
Most beginners kick too hard out of fear. Try kicking with only 70% of what feels necessary. Remember: when you kick your leading leg (the leg that didn’t step back), push with your other leg to follow through. This generates perfect momentum without overshooting.
Step 1: Master the Wall Handstand First
Handstand wall kick-up trains your body to get the feeling of inversion without the balance element. This is crucial for building confidence.
To do this, stand about two inches away facing the wall. Place hands on the floor, then use the jump technique into the handstand. You can push through with force since the wall will catch you even if you kick too much.
Why This Works:
• Masters the feeling of inversion safely
• Strengthens the major muscles involved
• Teaches body coordination for entry
• Builds confidence without fear of falling
Ready to Master Your Handstand?
Get a personalized handstand progression plan based on your current level. Our free assessment identifies your weak points and creates a custom path to your first solid handstand.

Step 2: Progress to Free-Standing Attempts
Here’s when you add balance into the equation. The key is finding that sweet spot of momentum.
Prepare your stance for the kick-up. As you kick up, focus on kicking just enough to get your body up without applying too much force. Too much kick will send you over unless your upper body is strong enough to hold it.
When practicing free-standing handstand kick-ups, don’t aim to hold for 10 seconds right away. First practice the feeling of kicking up then holding for just 1-2 seconds. This teaches you the right amount of force needed.
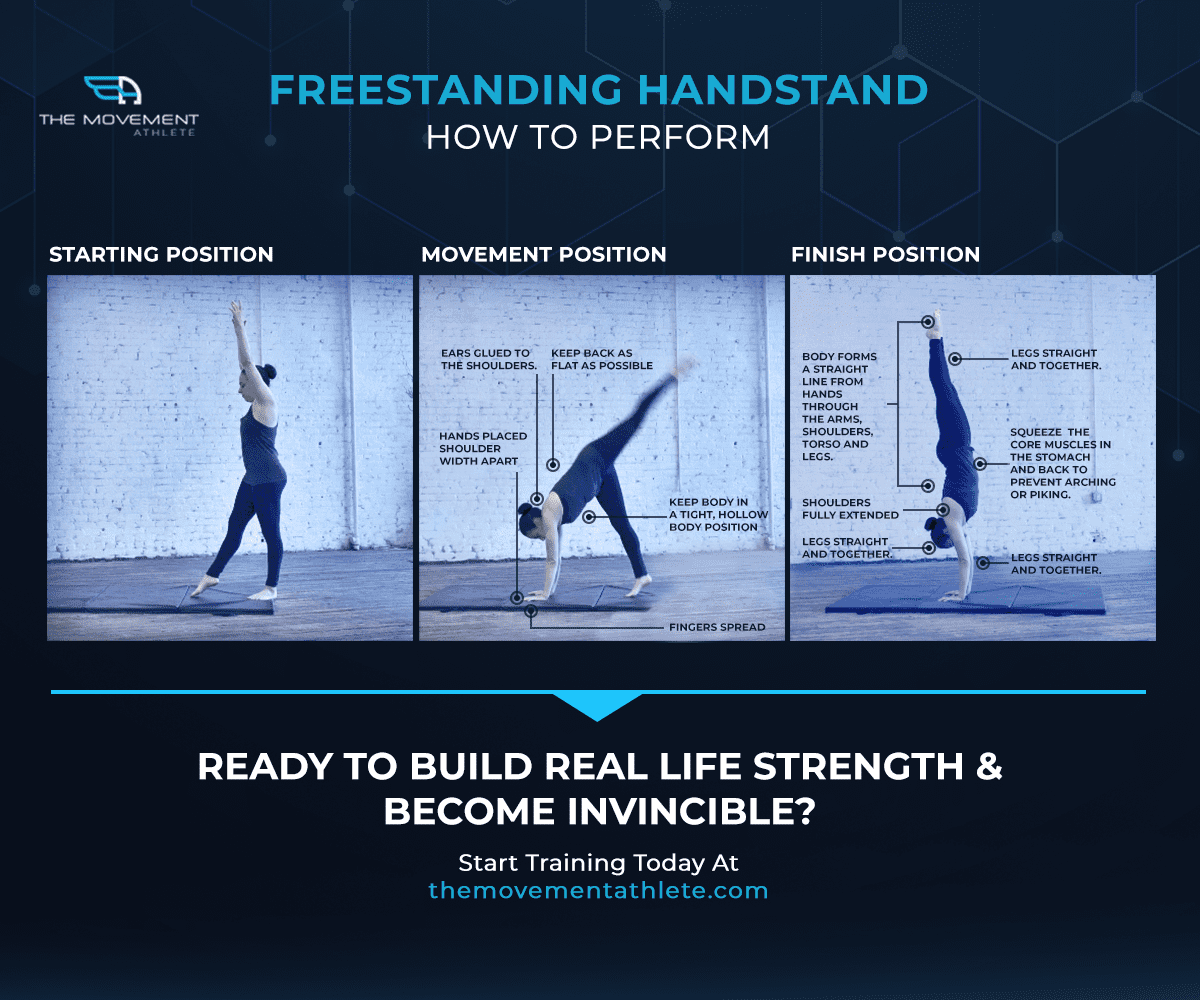
🎯 Part 2: Building Your Straight Line (The Secret to Effortless Holds)
Purpose: Create the efficient body position that requires minimal strength to maintain.
There are tons of handstand variations, but the straight handstand is the most efficient in form and the most basic foundation for all others.
🔑 The Stacking Principle
The key is having the correct straight body line. From your feet, legs, hips, abs, chest, shoulders, neutral head and hands, they all need to be stacked together like building blocks. When properly aligned, gravity works for you, not against you.
In this position, you’ll have the strongest and most efficient way to do a handstand. You’ll rely less on strength and more on technique and body control. This means you’ll fatigue less and hold the handstand for almost forever!
The Back-to-Wall Handstand Drill
To get a feel of what the strong and straight body line is like, practice the back handstand. Here’s coach Becky showing how to do the exercise.
Start lying on the floor. When you put your hands over your head, simulating a handstand position, you should be able to touch the wall.
This exercise simulates holding a handstand position horizontally. Lie down on the floor with your back fully flat – there shouldn’t be a gap underneath. Slowly raise your arms backwards until you reach the wall while maintaining that flat back position.
Keep everything tight and point your toes as if you’re already doing a handstand.
🎯 Part 3: The Wrist Secret (How to Balance Like a Pro)
Purpose: Learn the micro-adjustments that keep you stable without muscling through.
Based on research, the most used muscle to hold the handstand is the wrists. This goes for beginners to advanced level athletes.
This is because your wrist will control you from tipping over or back.
Think of It Like Standing on Your Feet:
When standing on your feet and tipping forward, you push through the balls of your feet to resist. When falling backward, you push through your heels. It’s the same in handstands!
• Falling forward → Push through your fingers
• Falling backward → Push through your palms
The pushing force is generated through your control of your wrists. That’s why you need to train your wrists well!
Struggling with Balance?
Our complete handstand guide includes wrist strengthening routines and balance drills that cut learning time in half. Download your free copy now.

🎯 Part 4: Safe Exits (Overcome Your Fear of Falling)
Purpose: Build confidence by knowing you can safely exit at any time.
Exiting seems easy – just let your body fall. But you need to control it and make it as slow as possible. Here are your options:
• Falling backwards to starting position – control your fall, don’t drop dead weight
• Falling sideways – cartwheel out, catching with your feet
• Rolling over – recommended for removing fear completely
The Box Kick-Up and Fall Technique
An easy way to learn safe falling is through the box kick-up and fall technique. Our coaches from The Movement Athlete show you how it’s done:
Using a workout box or sturdy elevated surface, place your leg up and simulate an L-shaped handstand. From there, kick up to your handstand, then use the forward roll to fall.
This way, you’ll kick much less to go over safely. Be sure to have a soft surface when starting to learn this fall-out move.
You could also kick up then fall sideways like doing a cartwheel. Training these moves eliminates fear of falling in no time.
💪 The Forward Roll Exit (Fear Killer)
This technique is easy to learn and completely eliminates the fear of tipping over.
When you feel you need to exit the handstand, tuck your chin to your chest. Lower your body forward as slowly as possible. The ground will gently catch your head, then tuck your legs to your chest, generating forward rotational momentum.
Voila! You’re safely back on the ground, somersaulting your way out of a handstand.
⚠️ Safety First:
Practice on a mat or grass first. As you get comfortable and confident, then you can do it anywhere you please.
⚠️ 5 Common Handstand Mistakes That Kill Your Progress
After coaching thousands of athletes, we’ve seen these mistakes repeatedly sabotage progress:
| Mistake | What Happens | The Fix |
|---|---|---|
| 1. Banana Back | Arching compensates for poor shoulder mobility | Work on shoulder flexibility first |
| 2. Wide Arms | Places too wide, making balance impossible | Shoulder-width only |
| 3. Looking at Hands | Breaks body alignment | Neutral head position |
| 4. Locked Elbows | Hyperextension causes injury | Slight micro-bend |
| 5. No Warm-Up | Wrist injuries from cold starts | 5-min wrist circles minimum |
📊 Your Realistic Handstand Timeline (Based on 10,000+ Students)
With 3-4 Practice Sessions Per Week:
🟢 Week 1-2: Wall handstand holds (30-60 seconds)
🟢 Week 3-4: First free-standing attempts (1-2 seconds)
🟡 Week 5-8: Consistent 5-10 second holds
🟡 Week 9-12: 20+ second holds with good form
🟠 Month 3-6: 30-60 second holds
🔴 Month 6+: One-arm prep and advanced variations
*Timeline varies based on starting strength, flexibility, and practice frequency
Want Faster Progress?
Join thousands who’ve mastered their handstand with our structured program. Get daily workouts, form checks, and a complete progression path.
❓ Frequently Asked Questions
Do I need to be strong to learn a handstand?
No, handstands are more about technique than strength. If you can hold a plank for 30 seconds, you have enough strength to start learning.
How often should I practice handstands?
Practice 3-4 times per week for 15-20 minutes. Daily practice is fine if you warm up properly and listen to your body.
Why can’t I kick up into a handstand?
Most people kick too hard from fear. Try the 70% rule – kick with only 70% of what feels necessary. Practice against a wall first to build confidence.
✍️ About This Guide
This handstand guide was created by The Movement Athlete coaching team, based on teaching 10,000+ students to master their handstand. Our approach focuses on technique over strength, making handstands accessible to everyone.
With practice, you’ll soon achieve your perfect handstand form. Getting the perfect form doesn’t just come with bragging rights – it provides the foundation for advanced skills and the strength transfer you need for your calisthenics journey.
What was your weak point when you were first learning handstands? Was it skill, mobility, or fear? Let us know in the comments below.
Stay strong, Movement Athletes! 💪

GET A FREE CUSTOMIZED TRAINING PLAN!
Start your life-changing journey with calisthenics and get lean, strong and mobile while unlocking and mastering over 100 new gymnastics & calisthenics skills.
It only takes 5 minutes, and no credit card is required!